Download

1 / 8
80 likes | 205 Views
How to get Jing on your computer How to use Jing. 1. How to download. http://www.techsmith.com/jing/ Click the download button Choose download for windows or Mac You will see ” thanks for downloading ”, if the automatical download has worked

E N D
1. How to download • http://www.techsmith.com/jing/ • Clickthedownloadbutton • Choosedownload for windows or Mac • Youwillsee ”thanks for downloading”, iftheautomaticaldownload has worked • If not, you have to clickthebutton ”clickhere” • Allowinstallingjing
- The Jing installation wizard will guide you through the set up • - You have to click”next” for several times till the pop up window • - ”Jing is ready to go” appears -> klick ”finish” • Now you can see the Jing Sun on your desktop • You have to create a new account to use Jing whenever you want • You need an email account and can choose a password to sign in • now you are ready to use use the program
A pop up window will open and ask you, if you need a little more – that`s Jing pro BUT it`s not free, you have to pay for it, so klick the button ”Not interested”
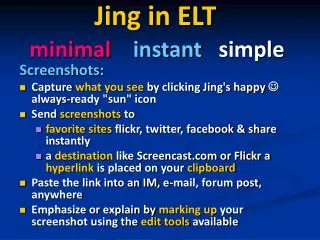
2. How to use Jing • Jing can make a screenshot or a screencast • If you wan`t to make a screenshot, scroll with your coursor over the yellow half circle on the top of your desktop • Click the cross on the left side • A big moving cross appears on your desktop • Click and hold the left mouse button to choose the picture you want to include
If you click the left mouse button again a small window opens and you can see 5 signs • The one in the left means capture image, if you click it, the picture you choosed before is on your computer and you can save it where ever you want • Now you can put it in every file you want.
3. Screencasts If you want to take a screencast you have to scroll over the yellow sun again, choose the cross on the left and decide what part of the desktop you want to film Now click the second button from the left – capture video The program asks you, which microphone you want to use, but it`s possible to do it without a microphone too. Decide what ever you want to use The Recording will start immediatly – the maximum time is 5 minutes, if you want to stop earlier, click the stop button, choose a name and save it wherever you want