Download
1 / 28
280 likes | 371 Views
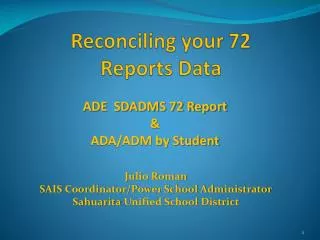
Reconciling your 72 Reports Data. ADE SDADMS 72 Report & ADA/ADM by Student. Julio Roman SAIS Coordinator/Power School Administrator Sahuarita Unified School District.

E N D
Reconciling your 72 Reports Data ADE SDADMS 72 Report &ADA/ADM by Student Julio Roman SAIS Coordinator/Power School Administrator Sahuarita Unified School District
In order to reconcile your data using the ADA/ADM by Student report from your SIS and the SDADMS 72 report from ADE through Excel: • You will need to have a basic knowledge and understanding of Excel • Be able to retrieve the SDADMS 72 report from • ADE in text format • Be able to produce the ADA/ADM by Student report (or equivalent) from your SIS in text format
Preparing the ADA/ADM by Student Report • Open up your Excel program and paste your text data that you copied from your SIS (Student Information System). • Label this first worksheet SIS 72 report. • Proceed to label worksheet two as ADE 72 report, worksheet three as Combined files & worksheet four as Reconciled results. SIS 72 report
Preparing the ADA/ADM by Student Report (continued) • From your SIS 72 report page select ONLY the data from your student header lines to the last cell of your student data & copy the data. You will not want or need student totals for this purpose. • Then go to your Combined files worksheet and paste your data there. With all your cells still highlighted make sure to Unmerge your cells.
Preparing the ADA/ADM by Student Report (continued) • On your Combined Files worksheet you will only want one header row. In this example - row 2 & columns D, E, H, I, K & L (School Number, School, Membership, Attendance, Off Track Days & Days Not Enrolled), example 1. These are not pertinent at this time. • If done correctly you will end up with only the columns needed(example 2). They are student number, student name, grade, start and exit date & total absences. Example 1 Example 2
Preparing the ADE 72 Report from a text file • When your file has processed at ADE, download your file & import it back into your SIS like normal. • Going back to ADE’s SDDI (Student Detail Data Interchange) select your school > click on the DownloadArea link. • Click on the SDADMS72 Unadjusted Student ADM Report link. • Select the Simple Text radio button, Grade will be All > click on Go.
Preparing the ADE 72 Report from a text file (continued) • A download window appears – select the Save File option. If asked where to save the file please save to your desktop >click OK. • Next, open a new blank excel worksheet > go to your File menu and select Open > find your file under your Desktop. Make sure in the type of file you select All files. • Select your text file and click on Open.
Preparing the ADE 72 Report from a text file (continued) • 2010-2011 School Year Method • The Text Import Wizard appears • Keep the Delimited button selected > click on Next • Deselect the Tab box and select the Comma box > click on Next • Click on the Finish Button
Preparing the ADE 72 Report from a text file (continued) • 2010-2011 School Year Method • When your data appears – Select all data on this worksheet by clicking in the upper left hand corner and then right click in your cells and Copy all data. • Go to your worksheet labeled ADE 72 report and Paste the data there. • Close out the text file from ADE Text file from ADE Pasted data from the ADE text file SIS 72 report
Preparing the ADE 72 Report from a text file (continued) • 2011-2012 School Year • The Text Import Wizard appears • Keep the Delimited button selected > click on Next • Keep the Tab box selected and also select the Comma box > click on Next • Click on the Finish Button Here is the difference from last year to now.
Preparing the ADE 72 Report from a text file (continued) • 2011-2012 School Year Method • When your data appears you will need to shift cells A1 & A2 to the right by one. • Select cells A1 & A2 and do a right click on your mouse. • Scroll down and select Insert. A new window will appear - select the button Shift cells right and click OK.
Preparing the ADE 72 Report from a text file (continued) • 2011-2012 School Year Method (continued) • Once the cells have been shifted select your entire column A by clicking once on the cell A (should show as being highlighted). • Right click with your mouse inside column A. • Scroll down and select Delete. • From this point continue to copy and paste your data as instructed from page 9.
Preparing the ADE 72 Report from a text file (continued) • From your ADE 72 report worksheet Select > Copy & Paste the following columns to your Combined files worksheet starting on column H – Grade, School_Student_ID, Last_Name, First_Name, StartDate, End_Date, Reported_Absence . • Results will look as shown below. Column’s A through F is data from your SIS 72 report sheet & column’s H through N is from the ADE 72 report sheet. SIS 72 report
Preparing the Combined Files Worksheet • Label on row one starting after the last occupied cell – ID #’s, Absences, Start Date & Exit Date respectively. • Need to get rid of any spaces before or after your data in their cells. Many different ways. Found a program through Ablebits.com called Trim spaces for Excel. • Select all your data once again (click on the upper left hand corner) • Click on the Ablebits.com tab and click on the Trim Spaces icon.
Preparing the Combined Files Worksheet(continued) • A new window pops up – click on the Run button • When complete click on the OK button. • Reformat your absence columns so that they have two decimal places after the whole number. Any blank absences on the ADE side will need to be replaced with a 0 (zero). 0.00
Preparing the Combined Files Worksheet(continued) • Click inside cell A1 then hold down Control+Shift+8. This will only select your data that came from your SIS ADA/ADM by Student report. • Go to your Sort > Custom Sort > check mark the box labeled My data has headers > you will sort by column A (labeled Student). This column is your student ID number column.
Preparing the Combined Files Worksheet(continued) • Do the same for your ADE SDADMS 72 report • Click inside cell H1 and hold down Control+Shift+8. • Custom sort by School_Student_ID
Preparing the Combined Files Worksheet(continued) • Final step before comparing your data is removing your last day of school exit date found on your SIS ADA/ADM by Student report. • Highlight column E (Exit Date) by clicking on cell E> hold down Control+H (or locate your Find & Replace link). • The Find & Replace window pops up. In the Find what box insert your school’s end of year exit date. • The Replace with box will remain empty. • Click on the Replace All button > completion window pops up – click OK > then click on the Close button. • All your end of school year dates are replaced with the exception of any student who withdrew during the school year.
Comparing your data You will now create your formula’s in columns O, P, Q & R. This could vary depending on which column you decide to insert ID #’s, Absences, Start Date & Exit Date. Most important step!!!! Under column O (your ID #’s column) you will compare if the Student ID in column A from your SIS ADA/ADM by Student report is equal to the Student ID in column I from the ADE SDADMS 72 report for that row. Under column P you will compare if the student absences in column F from your SIS ADA/ADM by Student report is equal to the student absences in column N from the ADA SDADMS 72 report for that row. The same will apply for your Entry and Exit dates.
Comparing your data (continued) • Formula for comparing your Student ID’s is: =IF(A2<>I2,1,0) • What this means is if the data in cell A2 is not equal to the data in cell I2 than your result will be a 1. If the data for both is true then your result will be a 0 (zero). • Formula for comparing your Absences is: =IF(F2<>N2,1,0) • What this means is if the data in cell F2 is not equal to the data in cell N2 than your result will be a 1. If the data for both is true then your result will be a 0 (zero).
Comparing your data (continued) • Formula for comparing your start date is: =IF(D2<>L2,1,0) • What this means is if the data in cell D2 is not equal to the data in cell L2 than your result will be a 1. If the data for both is true then your result will be a 0 (zero). • Formula for comparing your exit dates is: =IF(E2<>M2,1,0) • What this means is if the data in cell E2 is not equal to the data in cell M2 than your result will be a 1. If the data for both is true then your result will be a 0 (zero). These are false negatives. Power School exit date is always the next non-school day from the last day of attendance. ADE will always show the students last day of attendance.
Comparing your data (continued) Excel tip: Now that your formula’s are in their respective cells you can carry that formula down the rest of that column to finish your comparison. Place your cursor in the bottom right hand corner of each cell containing the formula’s. If done right your cursor will change to a small solid black plus sign (+). Double click while in this stage and your column will change from blanks to either zero’s or ones. Continue doing this for the remaining cells.
Comparing your data (continued) • While scrolling down the ID #’s column and you come across a cell with a one (1) you will need to investigate. Chances are the roster from your SIS may have more students than the roster from ADE. You will have to handle these on a case by case basis. • Suggestion for such occurrences is to make note of the student and Cut only the data pertaining to that student and paste it on your worksheet labeled Reconciled results. Your cells should be shifted up to cover the deleted cells. Example would be to delete the data from cells Axx through Fxx only. To refresh your formula’s simply double click on the bottom right hand corner in the Student ID cell (column O) above the line you are currently on (#REF!). Start with the Student ID then proceed to the Absences, Start Date & Exit Date cells. Double click on bottom right corner of this cell to refresh your calculations..
Comparing your data (continued) • Your end result when comparing or reconciling your students by ID numbers is that you have the same numbers of students on both sides. For example, if on your SIS ADA/ADM by Student report side you have 250 students than on your ADE SDADMS 72 report you should have 250 students. • Once these match you can continue comparing the absences, Start & Exit dates. • When sorting by absences suggest you sort from Largest to Smallest. You are only looking for absences that do not match. • Returning students (those with R codes) will also give you a false negative. As an example, reports between Power School and ADE do not come out the same. Power School reports are newest enrollment to oldest. ADE is oldest to newest. • For this purpose you will have to compare the two lines.
Reconciled Results • Those students whose data does not match can be copied and pasted onto the worksheet labeled Reconciled Results. • This is your finished product. These are the students whose absences, start or exit dates do not match between your SIS and ADE or are missing entirely on the ADE 72 report . • Resubmit their membership data only to ADE and once processed verify any of the data that did not match (which is usually the absences).
Advantages and Conclusion • Total time to reconcile each school has gone from approximately 1 – 2 days per school to roughly 20 -30 minutes per school. • Accuracy for reconciliation has been increased. • This provides good record keeping and method to show auditors that you are reconciling your data & making corrections as necessary. • Amount of paper has been largely reduced.
Advantages and Conclusion • This presentation does not cover every possible situation. Schools are different therefore situations are different. You will have to do further investigations on extreme cases. • Vast majority of your data will be comparable between your SIS and ADE. • Reconciling your SDADMS 75-1 reports can be done the same way. You choose which columns of data you want to reconcile.
If anyone has any questions my contact information is: Julio Roman Sahuarita Unified School District 520-625-3502 Ext 1047 jroman@sahuarita.net