Download
1 / 32
320 likes | 498 Views
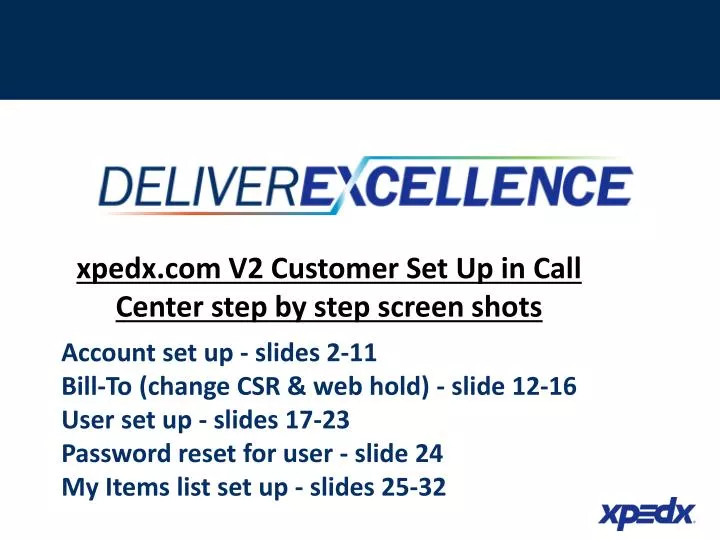
xpedx.com V2 Customer Set Up in Call Center step by step screen shots. Account set up - slides 2-11 Bill-To (change CSR & web hold) - slide 12-16 User set up - slides 17-23 Password reset for user - slide 24 My Items list set up - slides 25-32. WEB UPDATE FLAG go OEFILE option 26 # 2 , set to Y.

E N D
xpedx.com V2 Customer Set Up in Call Center step by step screen shots Account set up - slides 2-11Bill-To (change CSR & web hold) - slide 12-16User set up - slides 17-23Password reset for user - slide 24My Items list set up - slides 25-32
WEB UPDATE FLAG go OEFILE option 26 # 2 , set to Y xpedx Confidential – For Internal Use Only
MAX - set E-invoicing flag (credit department) xpedx Confidential – For Internal Use Only
MAX - Find the Parent Acct# known as the MASTER in call center xpedx Confidential – For Internal Use Only
Call Center -Click on Customer or F9 search xpedx Confidential – For Internal Use Only
Call Center – Verify Organization Before doing any customer search, use the dropdown to choose the Organization if it is something other than your default Organization (the default should be xpedx). xpedx Confidential – For Internal Use Only
Enter the Parent SAP and press F7 SEARCH When in the Advanced Customer Search tab, if you hit your F9 function key, it clears all the fields where data was typed….doesn’t clear the selections if you used the ‘Type’ or ‘Division’ drop down options….clears everything else. TIP- xpedx Confidential – For Internal Use Only
Go to the MASTER tab and click on MANAGE CUSTOMER PROFILE xpedx Confidential – For Internal Use Only
Check Order multiple if account wants to see the order multiple on the site then UPDATE PROFILE xpedx Confidential – For Internal Use Only
If customer line level PO is used set at CUSTOMER LEVEL xpedx Confidential – For Internal Use Only
Corporate info tab – SET FLAG to enableCustomer Rules tab – SET FLAG to require UPDATE RULES xpedx Confidential – For Internal Use Only
Set additional flags at BILL TO LEVEL CHILD CUSTOMERS tab Click on account, then Manage profile xpedx Confidential – For Internal Use Only
2nd option for getting to the bill to levelenter MAX account # in Advanced Customer Search xpedx Confidential – For Internal Use Only
Corporate info tab -CSR1, CSR2. select Network id & update profile.scroll down for additional set up (see next slide) Hit update after assign CSR –scrolling will change value in CSR field xpedx Confidential – For Internal Use Only
Corporate info tab (bottom half) Other item number display (Mfg # is the default),CSR email confirmation flag, Sales rep email confirmation flag, order min / max / small order fee & Order Confirmation Address ListREMINDER – Minimum order and small order fee are mandatory for all Q & V accounts and must be set up manually. xpedx Confidential – For Internal Use Only
Manage Customer Rules tab -WEB hold flag xpedx Confidential – For Internal Use Only
User Set up • TIPS -- • Only edit one user profile in call center at a time. If a user profile is OPEN, clicking on another ‘manage user profile’ will take you to the old one, not the new one. • Every migrated user will be authorized at the ship to level only. • Deleting a user: must un-assign locations before can delete user xpedx Confidential – For Internal Use Only
Double click on the MASTER CUSTOMERthen click on CREATE CUSTOMER CONTACT xpedx Confidential – For Internal Use Only
Enter First Name. Last Name. Email Address. User Id (same as email address) and check user roles and CONFIRM (F8) As soon as you press confirm the customer receives an email. QUICKLY do the next step.NOTE: The total # of characters for the first & last name is 49. Call Center allows 80 but MAX can only accept 50 including the spaces. There is a 40 limit character on user IDs and must be lower case. Note : estimators cannot place orders xpedx Confidential – For Internal Use Only
Click Manage User Profile then the customer assignment tab xpedx Confidential – For Internal Use Only
Assign the appropriate access by checking the boxes and click UPDATE ASSIGNMENT xpedx Confidential – For Internal Use Only
Go back to the USER PROFILE INFO TAB – assign a preferred catalog viewOptional : default ship to , order max (min set at bill to level later), preferred catalog, …scroll down xpedx Confidential – For Internal Use Only
…. additional email notification, email address for invoices & blanket PO#’s. remember to UPDATE USER PROFILE when done. xpedx Confidential – For Internal Use Only
Password reset can be done from the contact screen Password reset emails expire after 24 hours xpedx Confidential – For Internal Use Only
Set up of My Items Lists xpedx Confidential – For Internal Use Only
Creating a MYITEMS list Go to the customer master and click on MYITEMS SEARCHthen CREATE NEW LIST Note: you must choose a sort by and press search in order to see existing lists xpedx Confidential – For Internal Use Only
Enter the List Name, the Master Customer # and select SEARCH xpedx Confidential – For Internal Use Only
Select GET CHILD CUSTOMERS Check the correct customer level and press CREATE Note select the customer at the highest (master) level unless you have a reason to restrict the list xpedx Confidential – For Internal Use Only
Click ADD ITEM, in the pop up window enter the item number and click ADD xpedx Confidential – For Internal Use Only
Optional -click on the UOM and change the UOM in the pop up window xpedx Confidential – For Internal Use Only
Save Changes xpedx Confidential – For Internal Use Only
The list is now available for the user on xpedx.com 2.0 • Note: Call Center does not validate entitlements – check your items first to see if they are valid items in your warehouse. • Entitlement verification in MAX, item inquiry F4, F17 xpedx Confidential – For Internal Use Only