Download
1 / 103
1.03k likes | 1.13k Views
SDJR Demonstration. The following demonstration was conducted using the national instructions and MO1 tools and guidance The SDJR process is expected to evolve over time, but this is the best guidance that is currently available. Build an Electronic Folder.

E N D
SDJR Demonstration • The following demonstration was conducted using the national instructions and MO1 tools and guidance • The SDJR process is expected to evolve over time, but this is the best guidance that is currently available
Build an Electronic Folder • Before you begin a project, create a folder for storing all project documents • Supports NASIS Project object • Ultimately stored on the MO1 SharePoint site to facilitate sharing of information and enhancing security • Data may have to be scanned for it to be stored electronically
Build an Electronic Folder • Includes, but not limited to: • Spatial Distribution Maps • Pedons • OSD, TUDs, KSSL pedons, and/or other pedons • MUD’s • Original and newly proposed provisional map unit forms • Links to KSSL Data • Photos • Correlation Information • Correlation documents and trip reports • University Data • Vegetation Information • Any other pertinent information
1 – Inventory and Assess Map Units • In the SDJR map unit table provided • Sort by map unit name • Group map units based on identical or similar names • For map units in SDJR and MLRA projects • Populate project ID and project name • For map units not in a project • Populate a zero in the project ID
1 – Inventory and Assess Map Units • MO1 recommends that you assign a project ID, project name, and priority using the map unit Excel spreadsheet • We have added these three fields to the Excel spreadsheet containing your map units • Feel free to develop your own methods to organize map units if these don’t work for you
1 – Inventory and Assess Map Units • Project ID • Internal tracking tool/data management tool • Uses a sequential alphanumeric systems • Each project gets a unique ID • Will help with filtering and querying • Map units that contain the same major component (s) will receive the same number, but can be subdivided with an alpha character • Enter zero for all non-projects • This way, a blank project ID indicates that the map unit (s) was not evaluated
1 – Inventory and Assess Map Units • Project Name • Will be the name populated in the Project table in NASIS • Proposed projects start with SDJR • Example – SDJR – MLRA 2 – Alpha sandy loams, 0 to 8 percent slopes • Future projects start with MLRA • Example – MLRA – MLRA 4A – Beta loams • Left blank for non-projects
1 – Inventory and Assess Map Units • Project Priority • This is your proposed project priority, • Management team has the final say • If you attempt to prioritize your projects, than you will have to decide what criteria to use • Acreage and land use will be two of the most important criteria
1 – Inventory and Assess Map Units • Filtering • Can use filtering to isolate similarly named map units • Here, I have located all Alderwood consociations that generally occur in the 0 to 15 slope range
Project ID • Project ID = 0 • Map unit only used in one soil survey area • No reason to create future project at this time • No similar map units • Not harmonizable
Project ID • Project ID = 1 • Identical named map units in several survey areas • No lower case letter suffix used since there is not a second set of Agnew map units that will be included in a project
Project ID • Project ID’s = 2a and 2b • Lower case letters used with 2 since there is an Alderwood project for 0 to 15 % slopes and a second project for Alderwood 15 to 30 % slopes • You may end up grouping all Alderwood into a single project, keeping all Alderwood projects associated with the same number will make that easier to do at a later time
Project Name • Make sure to correctly separate MLRA (future) projects from SDJR (proposed) projects • No project name given for non-projects • No priority needed for MLRA or non-projects
1 – Inventory and Assess Map Units • Assign all map units in the table to a SDJR, MLRA, or non-project • Once this is complete, import the table into your SDJR geodatabase and create a relationship class between the table and the soil polygon feature class
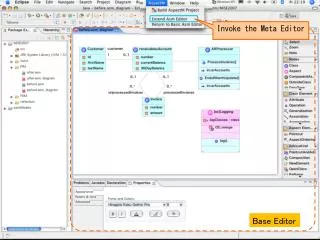
1 – Inventory and Assess Map Units • Relationship class • Establishes connection between the soil polygon layer and the Mapunit table • Allows for querying of the table and subsequent display of tabular data through the soil polygon layer • i.e. select data in table and show which polygons it occurs in • Overcomes many to one relationship • Can use identify tool to click on a polygon and see associated information in the table
1 – Inventory and Assess Map Units • Relationship class • Created in ArcCatolog Soil polygon feature class Relationship class SDJR map unit table
1 – Inventory and Assess Map Units • Relationship class • Identify tool • Click on a polygon and “drill down” into the related table • Can see all the component level information from the table that is associated with the polygon Data from map unit table
1 – Inventory and Assess Map Units • Relationship class • Spatially display tabular data • Open table and use select by attributes to find records • Can see all the component level information associated with the polygon In this example, we have selected project ID 30b. This is a simple query, but you can create complex queries that group multiple data elements together.
1 – Inventory and Assess Map Units • Relationship class • Spatially display tabular data • Relate selected records form the table to the soil polygon feature class • Choose related tables and then choose the soil polygon feature class • This will select all corresponding records in the soil polygon feature class All polygons that are part of project 30b are now selected
Display Component Level Data • We have displayed polygons in this project that have minor hydric components in red
Display Component Level Data • Some Alderwood components in this project have the out-of-date classification of Loamy-skeletal, mixed, mesic Vitrandic Durochrepts
Display Component Level Data • Due to the presence of volcanic ash in the region, we expect the WEI to be lower than 86. This query show Alderwood components in this project with a WEI of 86 that also have a Vitrandic Subgroup
MLRA SSA Wide Maps • Generate maps of soils properties for the entire MLRA SSA
1 – Inventory and Assess Map Units • Relationship class • Display location of RV pedons • The table includes information about your component RV pedons • You can use the Add XY data tool in ArcMap to spatially display all of your RV pedons • Always choose WGS84 as your coordinate system
1 – Inventory and Assess Map Units • MO1 Demonstration • For the rest of the MO1 demonstration, we have randomly chosen three Getchell map units in MLRA SSA 1-1 to harmonize • Project ID: 30b • Project Name: SDJR – MLRA 3 Getchell loam, 30 to 65 percent slopes
2 – Populate Proposed Projects in NASIS • For additional Project Object guidance, use NASIS 6.0 Training Material: Chapter 14 – Managing Update Projects • Added a new row to the project table and populated: • Project Name (can copy and paste in from the excel map unit table) • Project Description • Approval – Not Approved • MLRA SSO Area Symbol • MLRA SSO Area Name • State Responsible This is the information I populated for project 30b
2 – Populate Proposed Projects in NASIS • Project Description Elements: • Indicate it’s a SDJR project • Ownership • Acreage • Location • Methods • Description will be reviewed by the MO1 staff and the Management Team
2 – Populate Proposed Projects in NASIS • Getchell Project Description
2 – Populate Proposed Projects in NASIS • Populate Project Mapunit table • Load appropriate soil surveys into your local database • Open Project Mapunit table and use the national map unit symbol to add map units • National map unit symbols are in the excel spreadsheet • Double check to make sure you are loading the correct map units, as a map unit name can be used with more than one national map unit symbol
2 – Populate Proposed Projects in NASIS My symbols match so I know I loaded the correct map unit for 30b Mapunits From Excel Spreadsheet
Prioritization • The MLRA SSOL has the option to add a recommended prioritization • This is done by adding it to the project name • SDJR – MLRA 3 – 1 – Getchell loam, 30 to 65 percent slopes • The Management Team is ultimately responsible for setting the priorities • I did not add a priority to 30b
3- Proposed SDJR Projects Reviewed Overview of the project review process
4 – Approved project is developed • Once project is approved by the management team, the MLRA SSOL checks “Project Approved“ • The number or map unit acres is totaled • I have three Getchell map units in the project that total 5653 acres
4 – Approved project is developed • Populate the Project Land Category with the total map unit acres
4 – Approved project is developed • Populate the Project Mapping Goal • Update NRCS Acres Goal • 20% of the total acres in the Project Land Category Breakdown • Use NASIS acres, not GIS acres • 5653 NASIS acres of map units in project 30b • 5,653 * .20 = 1,131 acre goal • Fiscal Year
4 – Approved project is developed • Populate the Project Staff Table • Identify the project leader
4 – Approved project is developed • Populate the Project Milestone table with: • Project approval date • 13 milestones that start with “SDJR” • Project completed date
4 – Approved project is developed • Enter the date the project was approved in the “Milestone Date Completed” field • You will add the “date completed” for the other milestones as you work through the project
4 – Approved project is developed • As you work through the SDJR project, up date the milestones and also update the Project Milestone Progress child table
4 – Approved project is developed • Create New MLRA map unit • Add new row in the Mapunit table • Populate: • Mapunit Name • Kind • Status- Provisional • Write down the National Mapunit Symbol • Will be used in the DMU description
4 – Approved project is developed • Populate Mapunit History table • Author • Correlation Kind - status change – added • Text– provide a brief write up about the purpose of the new map unit Example of write up
4 – Approved project is developed • Add a new row in the Data Mapunit table • Populate • DMU Description • DMU Description will contain 2 components • “MLRA-SSOA” General Map unit symbol • “MLRA-SSOA” Detailed Map unit symbol • National map unit symbol • Example • 9_1300_2mprt • 9 is the MLRA- SSOA developed general map unit symbol • 1300 is the MLRA- SSOA developed detailed map unit symbol • 2mprt is the national mapunit symbol of the map unit this DMU will be correlated to as the representative DMU
4 – Approved project is developed • Return to the Mapunit table and add a new row to the Correlation table for your new MLRA map unit • Add your new DMU and make sure the Rep DMU is checked • Add the DMUs that are the Rep DMU for all the original map units in your project • Make sure they are not the Rep DMU for your new map unit
4 – Approved project is developed • Add new MLRA map unit to your Project Mapunit table • Use the national mapunit symbol to add your map unit • *This maintains the link between your new map unit and your SDJR project
5 – Create Spatial Distribution Maps • Store in electronic folder • Map unit distribution • Thematic maps • Precipitation/temperature maps • Geology maps • Land cover maps • Pedon location maps • Any map you feel is appropriate
6 – Compile Historical Information • Begin adding data to your folder • Pedons • OSD, TUDs, KSSL pedons, and/or other pedons • MUD’s • Original and newly proposed provisional map unit forms • Links to KSSL Data • Photos • Correlation Information • Correlation documents and trip reports • University Data • Vegetation Information • Any other pertinent information
6 – Compile Historical Information Screen Shot of my 30B project folder