Download
1 / 14
220 likes | 649 Views
Workshop 4B Contact with Friction. Workbench-Mechanical Structural Nonlinearities. Workshop 4B: Contact with Friction. Goal Create contact pairs between three parts (piston, cylinder and seal). Run 2 load step analysis to simulate assembly of the three parts together.

E N D
Workshop 4BContact with Friction Workbench-MechanicalStructural Nonlinearities
Workshop 4B: Contact with Friction Goal • Create contact pairs between three parts (piston, cylinder and seal). • Run 2 load step analysis to simulate assembly of the three parts together. • Post Process force along axis to assembly parts. Model Description • 2D Axisymmetric • Piston is constrained from movement. • Cylinder is displaced to simulate assembly • Materials: • Steel for Piston and Cylinder • Elastomer for O-Ring • 1st load reconciles interference between piston and inside diameter of O-ring • 2nd load step slides cylinder onto piston-O-ring subassembly. Piston O-ring Cylinder
… Workshop 4B: Contact with Friction Steps to Follow: • If you already have Workbench open from a previous run, start a new analysis with Utility Menu>File>New… • Browse for and open “W4b-Oring.wbpj” project file.
… Workshop 4B: Contact with Friction The project Schematic should look like the picture to the right. • Highlight the Engineering Data Cell and open by clicking on the Right Mouse Button (RMB)=>Edit to verify the predefined material properties • elastomer and Structural Steel • Verify that the units are in Metric(Tonne,mm,…) system. If not, fix this by clicking on… • Utility Menu=>Units=>Metric(Tonne, mm,…)
… Workshop 4B: Contact with Friction • Return to the project schematic page • Double click (or RMB=>Edit…) on the Model Cell to open a Mechanical Session
… Workshop 4B: Contact with Friction • Once inside the Mechanical application, verify the working unit system • “Unit > Metric (mm,kg,N,s,mV,mA)” • The piston-cylinder assembly is already set up as a 2D axisymmetric model with the necessary boundary conditions and loads. It remains to define the contact pairs between the parts, set up the solution control analysis settings, run the solution and post process the results. • Expand each folder in the project tree to become familiar with the model and to confirm material assignments for each part, boundary conditions, loads and Analysis Settings.
… Workshop 4B: Contact with Friction Note: Auto contact detection did not create adequate contact relationships for this model. There is only one bonded contact pair created by default and it is insufficient for representing the assembly.
… Workshop 4B: Contact with Friction • Redefine the O-ring To Piston contact region as follows: • Revise Target definition to include the three surfaces of the O-ring groove as shown. • Change Type to Frictional Contact • Friction Coefficient = 0.05 • Switch to Asymmetric behavior • Formulation = Augmented Lagrange • Pinball Radius = 2mm target
… Workshop 4B: Contact with Friction • Insert an additional manual contact region between O-ring and Cylinder wall by highlighting Connections branch and RMB>Insert>Manual Contact. Defined this new region with specifications below. Contact Target
… Workshop 4B: Contact with Friction • Confirm the Analysis Settings • Note: Large deflection is turned on: There are two load steps with different autotime stepping specifications
… Workshop 4B: Contact with Friction • Confirm the displacement load of 10mm is applied to the cylinder at load step 2.
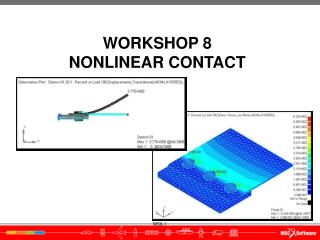
… Workshop 4B: Contact with Friction • Execute the solve. After many iterations and a few bisections, the solution converges.
… Workshop 4B: Contact with Friction • Review the Total Deformation results. Change the contour bar to clarify the deformation of the O-ring geometry Animate the result
… Workshop 4B: Contact with Friction • Highlight Solution Branch and RMB>Insert>Contact Tool Insert and post process contact status, pressure, frictional stress and penetration