Download
1 / 35

E N D
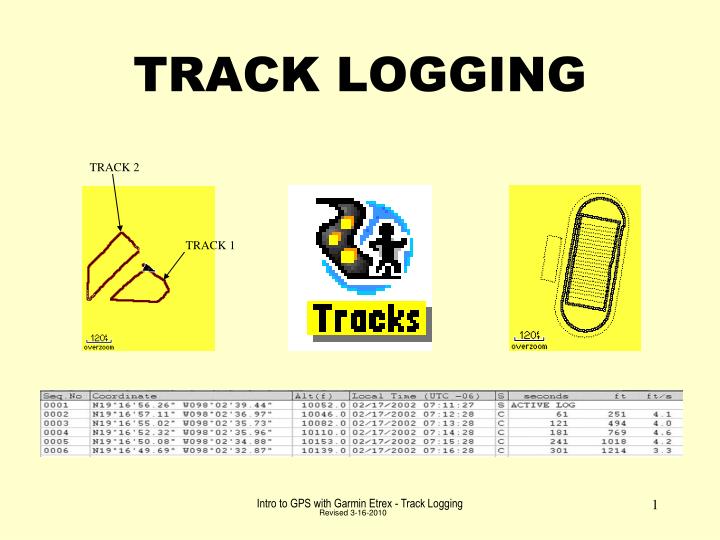
TRACK 2 TRACK LOGGING TRACK 1 Intro to GPS with Garmin Etrex - Track Logging Revised 3-16-2010
Like waypoints, tracks can be used to capture features. Tracks can be used to define lines and polygons. Commonly compared to a “bread crumb trail,” tracks record a point at user specified intervals. Intervals can be based on time, distance or automatically determined by the GPS. Useful mining applications for tracks are: Pit Area Pond Reclamation Area Work Limit Borrow Area Property Lines Access Road/trail Revegetation Area Channel Highwall TRACKS Intro to GPS with Garmin Etrex - Track Logging
Prior to collecting tracks, it is important to know some information about the lines or polygons you are trying to define. A small feature with many angle points is best defined using a small interval. Larger areas with less angle points can be defined collecting track points less often. This is important because the Etrex has a limited memory capacity (can be expanded if unit has MicroSD card). If tracks are collected all day using 1 or 5 second intervals, the memory will become full and either the data must be downloaded to a computer prior to continuing or the data will be overwritten. On the other hand, if an one acre tract of land with many turns is defined with a 30 second interval, it is likely that not all angle points will be defined. Interval TRACK TRACK 1 ACRE PARCEL 1 ACRE PARCEL CORRECT INCORRECT SHORT INTERVAL LONG INTERVAL Intro to GPS with Garmin Etrex - Track Logging
Screen shots taken from GPS Utility. http://www.gpsu.co.uk Long intervals may be used when the line or polygon defined is long and may take hours to capture with the GPS. Several items captured at long intervals may be large parcels of land, a long hiking trail, or miles of straight roads. Below is an example of a track log captured while climbing a volcano in Mexico. The starting point was a cabin near 10,000’. A track point was captured once a minute. The long interval was used to conserve memory and due to the slow nature of mountain climbing it is not necessary to collect data more often. Start 10,052’ Long Interval Example End at summit 14,613’ Start End Intro to GPS with Garmin Etrex - Track Logging
To quickly get to the main menu page from any other page on the GPS, press the Menu/Find key 2 times. Once at the Main Menu toggle down to the Tracks icon and select it. Track Log Page View of Track Log with 10 saved tracks using 3% of the memory capacity. Intro to GPS with Garmin Etrex - Track Logging
If the GPS has previous tracks and they have been saved to your computer, delete these tracks prior to starting your next set of tracks. The Etrex Vista can store only 20 tracks at a time so it is important to delete the tracks after they have been backed up. Press the Menu button to bring up the menu and choose Delete All Saved to delete saved tracks. Verify by choosing Yes. Delete Tracks Intro to GPS with Garmin Etrex - Track Logging
Now you are back to the Track Log screen. Select the Off button and then select the Clear button. After the Clear button is pushed the Track Log memory will read 0%. At this time there are no saved tracks and 20 unused. Track Clear Intro to GPS with Garmin Etrex - Track Logging
Track Setup Select the setup button on the Track Log screen. Intro to GPS with Garmin Etrex - Track Logging
1. Select Wrap When Full to continue logging after memory has reached 100% capacity. Once 100% is reached the earliest data in the track log will be overwritten. 2. Select Time as the Record Method in the pull down menu. 3. Set the time at 3 seconds for training purposes. In a real application the time interval will be changed in respect to the size and/or the complexity of the feature being defined. Track Setup Intro to GPS with Garmin Etrex - Track Logging
4. If the GPS has a data card installed, data can be stored to to this card. Storing to this MicroSD card will allow for a larger track point storage capacity. Select the Data Card Setup button. 5. If logging of track data to card is desired, check the box. For class purposes, leave this box unchecked. 6. Push the Quit button on the GPS twice to return to the Track Log screen. Track Setup Intro to GPS with Garmin Etrex - Track Logging
Go to the starting point of the line or polygon you wish to track. Check the satellite page to ensure that GPS has an accurate location. Return to the Track Log page and select the On button and begin walking the area. Remember that the GPS is recording a point at your set interval, 3 seconds in our case. If a angle point is approached, pause at least 3 seconds to allow the GPS to record a point at the corner. Switch to the map page to see the area being defined as a series of dots. Starting a Track Return to your starting point and select the Off button on the Track Log. Intro to GPS with Garmin Etrex - Track Logging
After the track log has been turned off, the user has the option to save the track. Select the Save button. Saving a Track This is the first track recorded so choose Yes and save the entire track. If any previous tracks were still in the GPS memory it will be saved with this track. Its important to manage the On/Off button to clearly define the tracks. Intro to GPS with Garmin Etrex - Track Logging
Once the track is saved, the Saved Track screen displays the linear distance of the track and the area. By toggling up to the name field, the name can be changed from the date to something more descriptive. Select OK to go back to the Track Log. Saved Track Info The track log shows 1 saved track and 19 unused. Intro to GPS with Garmin Etrex - Track Logging
TRACK 2 Repeat the same procedure for the next track. When the track is saved choose NO when asked to save the entire track. The GPS will prompt for the Start and End of the track. Once these selections are made, the track will be saved. TRACK 1 Track 2 The track log shows 2 saved tracks and 18 unused. Intro to GPS with Garmin Etrex - Track Logging
The track log records and stores all information related to the track including time and speed information. Part of the saving process is the stripping of this information to conserve space in the memory. Both the track log and the saved tracks are stored in the GPS until the memory is cleared or the tracks are deleted. In older Garmin GPS units the number of track points was also reduced when the track was saved. Thus the saved track is a generalization of the track points selected from the active track log. This reduction of vertices reduced the accuracy of the saved track. It seems with the increased memory of newer models, that this reduction of track points is no longer the case. As seen with the last 2 track examples, the saved track and the raw track log contains the complete set of track points. This can be seen in the next several slides in Mapsource. The user should be aware of these differences between the track log and the saved tracks if problems arise. For design purposes I chose to use the data from the track log and not the saved tracks. CAUTION Intro to GPS with Garmin Etrex - Track Logging
The active track log retains all track point information including time, leg time, speed, course and altitude. MapSource – Active Track Log Intro to GPS with Garmin Etrex - Track Logging
The saved track log does not save all track point information including time, leg time, and speed. Mapsource – Saved Track Intro to GPS with Garmin Etrex - Track Logging
Once the tracks have been downloaded to the computer and saved, delete the saved tracks and clear the Track Log from the GPS. Press the Menu button to bring up the menu and choose Delete All Saved to delete saved tracks. Verify by choosing Yes. Select the Clear button to delete the Track Log. The screen shot to the right shows that all 20 tracks are unused and the Log is using 0% memory. Now you are ready to repeat your track collection on new features. Delete Tracks Intro to GPS with Garmin Etrex - Track Logging
Track 2 was saved as a separate entity by defining the start and endpoint manually. The user has the option to save all previous tracks as one. The vertical profile is shown of track 2. Each yellow dot represents a track point on the profile. Mapsource – Saved Track 2 Intro to GPS with Garmin Etrex - Track Logging
Once you are comfortable with collecting tracks, you may find alternative ways to collect lines and polygons. The previously mentioned method of collecting tracks then saving them is discussed in the Garmin Etrex Vista HCx manual. Saving tracks has its advantages and disadvantages. For those who are new to the GPS it allows the user to save up to 20 individual tracks. Because this unit is not a data collector, this method can be cumbersome and limiting at times especially when collecting larger quantities of data. All users will discover the most convenient means of collection for their purpose. The next two methods discussed are alternatives to the method of saving tracks as discussed on the previous slides. Alternative Methods for Track Logging Intro to GPS with Garmin Etrex - Track Logging
The previous method of track logging allows a user to save a track and assign a name to the feature. The downfall of this method is that the GPS is limited to saving only 20 tracks and if not saved properly, results may not be what was intended. By tagging the track with a waypoint, it is possible to collect lines and polygons without actually saving separate tracks. By using this method, the GPS user can collect data faster and is only limited by the maximum number of waypoints and trackpoints, not by the number of saved tracks. Method 2: Track + Waypoint Tagging TRACK WAYPOINT TAG (at start/end point of track) X PARCEL1 Intro to GPS with Garmin Etrex - Track Logging
Go to the starting point of the line or polygon you wish to track. Check the satellite page to ensure that GPS has an accurate location. Return to the Track Log page and select the On button and begin walking the area. Remember that the GPS is recording a point at your set interval, 3 seconds in our case. If an angle point is approached, pause at least 3 seconds to allow the GPS to record a point at the corner. Switch to the map page to see the area being defined as a series of dots. Method 2: Track + Waypoint Tagging Return to your starting point and select the Off button on the Track Log. Intro to GPS with Garmin Etrex - Track Logging
After switching off the track log and while still at the start/end point, mark a waypoint. In this example a track was developed for a street block. A waypoint was placed at the start/end point of the track and called Block1. Method 2: Track + Waypoint Tagging Once the waypoint is placed, return to the map page and see that the track is now tagged with the waypoint “Block1.” By using this method the polygon was quickly tracked and without saving the track, the track is identified by the waypoint tag. Intro to GPS with Garmin Etrex - Track Logging
End zone - End zone Actual = 300’ GPS = 303’ The active track log can be used to quickly map areas that have a lot of detail. This should be used when each feature can be identified without a label. The tracks should be identifiable by memory or by looking at the results once downloaded into the mapping software. Field notes may also be necessary. By cycling the track log on and off as the area is mapped, a map can be quickly and accurately created. The stadium at Prairie View A&M University in Texas was mapped as quickly as it could be walked using this method. The map on the right is a view of the raw track log in MapSource. Method 3: Track logging only Intro to GPS with Garmin Etrex - Track Logging
Go to the starting point of the line or polygon you wish to track. Check the satellite page to ensure that GPS has an accurate location. Return to the Track Log page and select the On button and begin walking the area. Remember that the GPS is recording a point at your set interval, 3 seconds in our case. If an angle point is approached, pause at least 3 seconds to allow the GPS to record a point at the corner. If a small area is being mapped, use a one second interval to define the area more accurately. Method 3: Track logging only Cycle this switch on and off to quickly map an area. Remember that a line will not connect points while log is switched off. Intro to GPS with Garmin Etrex - Track Logging
Method 3: Track logging only By switching the track log on and off, the stadium is quickly and accurately mapped. The mapping progress can be verified by viewing the map page. At the right, the data is shown in TopoFusion. Intro to GPS with Garmin Etrex - Track Logging
One of the most useful tools of the Garmin is the capability to calculate areas in the field without having to dump your track into your computer first. Area calculation allows for immediate sizing of ponds, parcels, project limits, borrow areas, etc. Area Calculation POND 2.34 ACRES Intro to GPS with Garmin Etrex - Track Logging
Begin at the Track Log screen. Push the Menu button and select Area Calculation. Start Area Calculation Select the start button and begin to walk your area. Return to the point of beginning and select the stop button. Intro to GPS with Garmin Etrex - Track Logging
After the Stop button is selected the area is displayed and units can be adjusted by clicking the down arrow. Choose the Save button to save as a track. Save Area Calculation The familiar Saved track screen appears. Select OK. Note: If an accurate area measurement is needed in the field, write this number down prior to pushing the Save button. In this case the Area is shown as 0.14803 ac on this screen. After Save is pushed the Saved Track screen has rounded the Area to 0.1 ac… a big difference when measuring small areas. Intro to GPS with Garmin Etrex - Track Logging
To make things simple, use the area calculation when defining polygons. Using the Start/Stop buttons allows you to quickly define your area. Remember to save it as a track when finished. Recommendation:Track Logging v. Area Calculation When defining lines turn the track log on and off then save as a track. If the GPS asks if you want to save the entire track, say no and choose the begin and end point of the line as shown to the right. Intro to GPS with Garmin Etrex - Track Logging
At times it may be necessary to track back over a saved track or to find your way back to the truck. The TracBack feature performs this task. From the Track Log screen choose the TracBack button. TracBack Follow the directions and map to return to the location. Intro to GPS with Garmin Etrex - Track Logging
It is possible to navigate the TracBack from the Compass page if preferred. TracBack Push the side Menu button to bring up the Menu. Choose Stop Navigation when finished. Intro to GPS with Garmin Etrex - Track Logging
FIELD 1. Define at least 2 linear features by Track Logging. Choose one that is straight and the second add curves as if you were walking on a trail. Try different methods. Exercise 2. Define at least 2 area features such as parking lots by Track Logging or Area Calculation method. Save tracks. Decide which method works best for you. 3. Use Area Calculation feature to determine an area in acres or square feet. Save track. 4. Choose one of the previously saved tracks and use the TracBack feature to retrace your track. COMPUTER LAB 5. Download track to the computer and view tracks in Mapsource and TopoFusion using same methodology as outlined in the earlier waypoint topic. Intro to GPS with Garmin Etrex - Track Logging
Downloading Data • Connect Garmin • Receive from Device – Tracks • Save as untitled file • Select tracks tab • Select track • Right click – track properties • Delete track fragments • Edit the tracks • Names • Symbols Intro to GPS with Garmin Etrex - Track Logging
Transferring data in MapSource • Open second MapSource window • Parkway.gdb • Cut or copy tracks from untitled into the Parkway Save • Save Parkway.gdb • Save as C:\GPS\Parkway.gpx Intro to GPS with Garmin Etrex - Track Logging