Download
1 / 20
200 likes | 334 Views
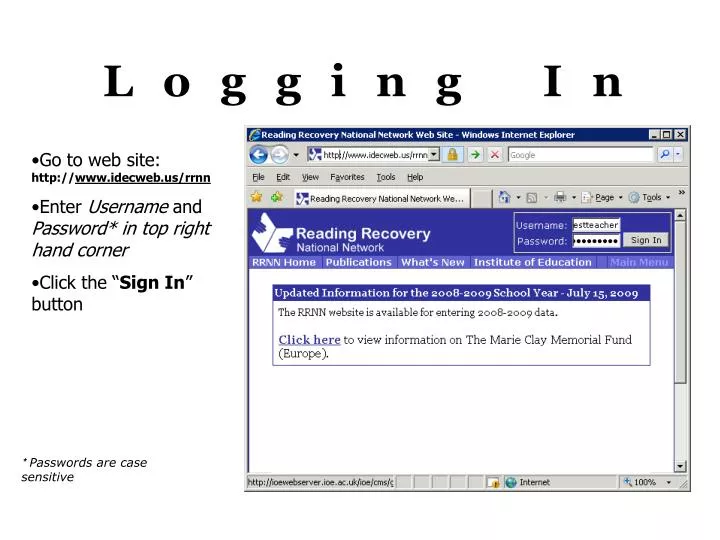
Logging In. Go to web site: http:// www.idecweb.us/rrnn Enter Username and Password* in top right hand corner Click the “ Sign In ” button. * Passwords are case sensitive. Main Menu. Review pupil data – Review pupil data entered by teachers.

E N D
Logging In • Go to web site: http://www.idecweb.us/rrnn • Enter Username and Password* in top right hand corner • Click the “Sign In” button * Passwords are case sensitive
Main Menu • Review pupil data – Review pupil data entered by teachers. • Review teacher data – Review teacher data entered by teachers. • Review school data - Review school data entered by teachers. • Check and Submit to the Institute of Education –Link activates at year-end and takes teacher leaders through a final review process of data before reports are run. • View List of Authorities and Schools – Displays a list of all the educational authorities and schools in training centre. • View a list of Teachers - Displays a list of all the teachers in training centre. Teacher Leaders can lookup teachers usernames and passwords here. • Check status of ID List – Allows teacher leaders to see when the IoE is done updating your rosters of teachers and schools. • Change my training centre message – Allows Teacher Leaders to modify a message that will be displayed to all the teachers in their training centre. • Download reports and data files – Gives teacher leaders access to all the reports and data dumps for LAs and schools. Gives teachers access to school level reports for the schools they work in. • Enter teacher data – Allows teachers and Teacher Leaders to enter their personal teacher data. • Enter school data - Allows teachers and Teacher Leaders to enter data about the schools in their training centre. • Enter pupil data - Allows teachers and Teacher Leaders to enter their pupil data. • Change password – Allows teachers and Teacher Leaders to change their password • Update my contact information – Allows teachers and teacher leaders to update their contact information.
Data Submission Process Teachers enter and save data Teachers Submit data to teacher leader Teacher Leaders Approve or Return data Teacher Leaders can Retrievedata if corrections are needed
As teachers begin to enter data they can either choose to Save or Submit. • Save allows teachers to save any changes and finish later. • The data will be validated and any errors will be highlighted in red and have descriptions at the bottom of the page. (See top two pictures) • Teachers will not be able to save data until all errors are fixed. • Submit allows teachers to save any changes and submit the data to their teacher leader for approval. • The web site will validate data and display errors. Teachers will not be able to submit data until all errors are fixed. • In addition, the web site will check the data for missing and unlikely values. If found, it will display a warning message and descriptions at the bottom of the page. (See bottom two pictures) • Teacher can either choose to ignore warnings or go back and fix questionable data. Saving and Submitting Data
As teachers Save and Submit data, the web site validates it before it is saved into the database. This means that NDEC computers check all values to make sure they are allowable. • Examples of validations: • Observation survey scores • Methodological Validations
Comparisons • Improbable values Validations
Saving vs. Submitting validations • When saving data, the web site will validate all data being entered but allow teachers to leave fields blank. • When submitting data, the web site will validate all data being entered and check for required fields and improbable or missing values. Validations
Entering Teacher Data • Click the Enter teacher data link in the teacher menu. • Enter data by selecting options from drop boxes and entering values in text boxes. • Click Save to save changes and finish later. • Click Submit when ready to submit to teacher leader. • Click Cancel to discard any changes and return to the Main Menu.
Entering School Data • Click the Enter school data link in the teacher menu. • The following page will list all the schools in your training centre. Teacher Leaders will see all schools, teachers will only see the schools they work in. (See picture bottom left) • Enter data in text box. (See picture bottom right) • Click Save to save changes and finish later. • Click Submit when ready to submit to teacher leader. • Click Cancel to discard any changes and return to the list of buildings. • Only one teacher per school needs to enter school data.
Adding a new Pupil • Click the Add a new pupil link in the teacher menu. • Select a school and pupil group from the drop boxes and click the Add button. (See picture bottom left) • Enter the student’s background data. (See picture right) • Click Save to save changes and finish later. • Click Submit when ready to submit to teacher leader. • Click Cancel to discard any changes and return to the list of pupils.
Continue adding data for a Pupil • After Saving or Submitting the background page or any other pupil page, you will be taken to the Pupil Data page. • The pupil data page lists every student entered by the teacher and the status of each page in the pupil’s record. You’ll notice in the picture below that each student can have multiple records that represent different types of programmes/interventions they received. • You can also view pupil data from a the previous school year by selecting previous school year from the Show pupils from drop-down menu. This will allow teachers to create new records for pupils served in the previous year. • To continue adding data a pupil, click on the icon corresponding to the page you are entering data for. This will bring up the appropriate page. Tony’s multiple records Click here to switch between school years
Modifying Existing Pupils • Click the Enter pupil data link in the teacher menu. • To edit a portion of a pupil’s record click an icon( or ). The icons represent the various states of data submission. Depending on the state, teachers may only be able to view data and not make any changes. • As with teacher and school data, teachers can either Save or Submit each part of a pupil’s student record.
Read-Only Records • When a teacher has entered and saved a page but not submitted it to the teacher leader, a teacher leader has a read-only view of that page. • When a teacher has submitted a page to the teacher leader the teacher has a read-only view of that page. • Read-only records can be viewed but not edited. • A teacher leader may “take” a page from a teacher at any time by clicking the Acquire button.
Teacher Leaders will review teacher, school and pupil data as they are submitted by teachers. • Once a teacher leader starts the review process the web site will automatically take the teacher leader to the next record that is ready to approve. • When reviewing data Teacher Leaders can take several possible actions: • Approve the record and continue • Save any changes without approving and continue • Return the record to the teacher and continue • Skip the record without saving any changes • Exit the review process • A record can be Retrieved after it has been approved if corrections are needed. Reviewing and Approving Data
Reviewing School Data • Click the Review school data link in the teacher leader menu. • The resulting page will display a list of all the schools in a training centre. (see picture bottom) • There are several filtering options available: • Show all schools • Show all schools with data ready to approve • Click on the name of a school to begin reviewing data.
Reviewing School Data • Review the data and click the Approve button to approve and move on to the next record. If you want to make changes but are not ready to approve the record, make these changes and click the Save button to continue. You may also Return this record to the teacher for further modification, Skip this record and come back to it later, or Exit the approval process. • The comments field can used for communication between the teacher and teacher leader.
Reviewing Teacher Data • Click the Review teacher data link in the teacher leader menu. • The resulting page will display the teacher data in a training centre. (see picture bottom) • There are several filtering options available: • Show all teachers • Show all teachers with data ready to approve • Show my teachers • Show my teachers with data ready to approve • Click on the name of a teacher to begin reviewing data.
Reviewing Teacher Data • Review the data and click the Approve button to approve and move on to the next record. If you want to make changes but are not ready to approve the record, make these changes and click the Save button to continue. You may also Return this record to the teacher for further modification, Skip this record and come back to it later, or Exit the approval process. • The comments field can used for communication between the teacher and teacher leader.
Reviewing Pupil Data • Click the Review pupil data link in the teacher leader menu. • The resulting page will display a list of filtering options: • Show pupils for an entire training centre, an educational authority, a school, or a teacher. • Show pupils in a specific pupil group. • Show pupils with a specific programme outcome. • Show pupils whose data has a specific submission status. • Show only pupils whose programmes started in a specific month. • Show only pupils of teachers affiliated with a teacher leader. • Select one or more filtering options and click the Next button. Viewing all pupils in the training centre is the default option.
To review a portion of a pupil’s record click the icon ( ). • This will begin the review process and cycle through all pupil records that need approval. Reviewing Pupil Data