Download

1 / 29
290 likes | 309 Views
Scanner & Auto-Replenishment Program. Scanning & Auto-Replenishment Program. The Auto-Replenishment program is designed to replace manual inventories and returns and will assist you in properly managing your inventory. The program will replenish merchandise based on sales activity.

E N D
Scanning &Auto-ReplenishmentProgram The Auto-Replenishment program is designed to replace manual inventories and returns and will assist you in properly managing your inventory. The program will replenish merchandise based on sales activity. The value of the scanner package is $1,500, and the person that signs the property disposition form becomes accountable for the scanner and components.
Scanning &Auto-ReplenishmentProgram • You must complete property disposition form within 5 days of receipt. • A copy of the property disposition form must either be mailed or faxed to Eurpac, attention Theresa Fehmel, and a copy of this form will be placed in your personal file. • Upon departure or transfer, all hardware including cables and phone cords must be returned to the area Supervisor. A copy of property disposition form (see attached) must be signed by the Supervisor after taking possession of the scanner package and faxed or mailed to Eurpac in Virginia Beach. Make sure you keep a copy for your own records.
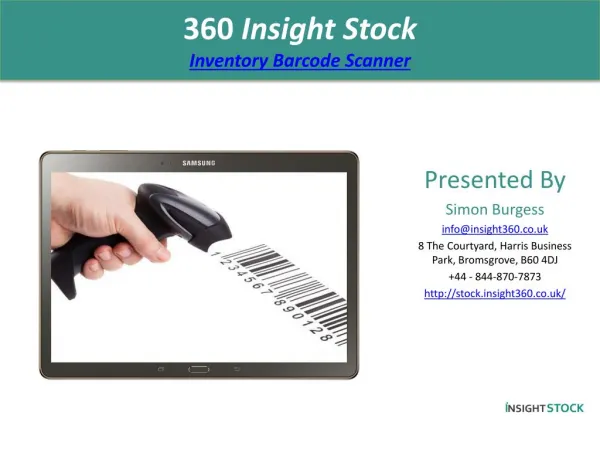
Scanner Package Includes: • Symbol P460 Scanner • U.S. Robotics 56K External Modem • AC Adapter for Modem • Symbol Adapter (black box) 5. Black Electrical Cord 6. Computer Cable w/Adapter 7. Phone Line (not pictured) 8. Gray Scanner Cable 1. Symbol P460 Scanner 3. AC Adapter for Modem 6. Computer Cable With Adapter 8. Gray Scanner Cable 5. Black Electrical Cord 2. Robotics 56K External Modem 4. Symbol Adapter
Assembly of Scanner Package Place all contents of the Scanner Package in a cool and dry place, and preferably close to a phone jack. • Attach Gray Scanner Cable (8) to bottom of the Symbol P460 Scanner (1) and twist slightly. • Take the Black Symbol Adapter (4) and plug into the Gray Scanner Cable (8). • Plug Black Electrical Outlet Cord (5) into the Black Symbol Adapter (4) and plug into an electrical outlet The Scanner begins charging as soon as the unit is plugged in.
To Connect Modem • Connect the U.S. Robotics AC Adapter (3) (for 110volt use only) to the U.S. Robotics 56k External Modem (2) and then plug into an electrical outlet. If you don’t have access to 110volt power contact Michael Bondmass or Sheree Tingen. • Connect one end of the Computer Cable (6) into the U.S. Robotics 56k External Modem (2), and the other end into the Gray Scanner Cable (8). • A Phone Line (7) will plug into the back of the Robotics 56k External Modem (2) in the closest plug to the corner of the Robotics 56k External Modem (2), then directly into wall phone outlet.
Scanning Procedures for P460 Scanner is always on. Hit the Enter key to wake it up BEFORE A SCAN INVENTORY IS TAKEN, ALL CONTROL NUMBERS FOR INVENTORY BEING SCANNED MUST BE REPORTED Main Menu Screens • Control Numbers • Scan Inventory • Returns • Send Data • Utilities You will see only one option on the screen of the Scanner at a time, but under the Main Menu screen there are five (5) separate options as shown below:
Procedures cont’d. If you have any data in the scanner you will get the following message. Press Y for Yes This will not be the case if the user has cleared the file.
Procedures cont’d. From the Control Number screen enter the Store Number and you will be taken to the second Control Number screen (next page). You may then enter the six digit control numbers. The Control Numbers will not remain on the screen. The program automatically prompts you for the next number by clearing the field.
Procedures cont’d. When all Control Numbers have been entered into the scanner, press the Asterisk * key to take you back to the Main Menu.
Scan Inventory Screens From the Main Menu screen select #2 Scan Inventory and press Enter. After selecting option #2 from the Main Menu, you will be presented with the following Inventory Options: Select Inventory Type • Home Entertainment • Software • Accessories • Miscellaneous
Scan Inventory Screens cont’d. Select the type of inventory scan you will be performing by pressing the number indicated or using the up or down and pressing Enter. The program will ask you if you wish to add to the existing file. Press Y for yes.
Scan Inventory Screens cont’d. You will be prompted to input your Account Number and press enter. Begin scanning the inventory. The Account Number and Scanning Activity will always be visible in the upper left and right hand corners of the scanner.
Scanning • With scanner in hand, position your fingers so that you can use the index and middle finger (or what is comfortable for you) to squeeze the trigger. The red laser on the front of the scanner must be pointed at the manufacturer’s UPC number located on the spine or the back of the product. DoNotScanthePricePointorRichterUPC from the Eurpac price label when performing an inventory. • To enter multiple quantities • Scan the UPC code first • Press enter • Input the quantity amount • Press enter again
Review, Find & Quantity Change • To see the last item & quantity scanned: • Press the Down • To return to scan input screen press Enter or • press Asterisk * twice • or • To change quantity, input corrected figure and • press Enter • The display then returns to scan input screen • To “Find” the Quantities for any item scanned • during session: • Press Up and scan the item in question • UPC and quantity for most recent scan of that item are displayed. Continue pressing Enter to find earlier scans and quantities for the same item • To change any of these quantities, press Down and input the correct quantity, then press Enter • To exit the “Find” Program and return to the scan input screen, press Asterisk *
Transmitting of Scan Data Upon completion of the inventory scan you are then ready to transmit data. Whenever possible, please try to transmit from the store. • Connect the U.S. Robotics AC Adapter (3) (for 110volt use only) to the U.S. Robotics 56k External Modem (2) and then plug into an electrical outlet. Connect one end of the Computer Cable (6) into the U.S. Robotics 56k External Modem (2), and the other end into the Gray Scanner Cable (8). Plug the other end of the Gray Scanner Cable (8) into the back of the Symbol P460 Scanner (1). Take the Black Symbol Adapter (4) and plug into the Gray Scanner Cable (8). Plug Black Electrical Outlet Cord (5) into the Black Symbol Adapter (4) and plug into an electrical outlet. A Phone Line (7) will plug into the back of the Robotics 56k External Modem (2) in the closest plug to the corner of the Robotics 56k External Modem (2), then directly into wall phone outlet. Turn the Modem on. • You must be at the Main Menu screen to transfer data. You may do so by pressing the Asterisk * button until the Main Menu screen appears.
Transmitting of Scan Data cont’d. At the Main Menu screen press #4 Send Data or press the down to #4, then press Enter. You will be presented with the following menu options: Communications Menu • Connect via Modem • Via Cradle • Test Press #1 or Enter to connect via Modem. This will bring you to the screen where you will need to enter a phone number. An error message will appear on the screen if the cable is not connected to the scanner properly
Transmitting of Scan Data cont’d. The number you enter will remain in the scanner for future use until removed or changed.
Transmitting of Scan Data cont’d. • Outside of Virginia Beach enter 18773111926 (no spaces). • For local numbers enter 3187790 (no spaces). • If you are transmitting from the store you must enter 9, or whatever number you use for an outside line, followed by one of the numbers above. • Overseas locations must contact Michael Bondmass in the Virginia Beach office for further instructions. When all numbers have been input, press enter key. At this point you will hear the dial up connection tones. When connected to the server you will hear and see series of beeps and messages.
Screen states that transmission is complete by displaying the number of line items that have been successfully sent and received by Eurpac 444444 scan sent 444444 scan rec’d Transmitting of Scan Data cont’d.
Clearing the Scanner After Transmission • From the Main Menu screen select #5 Utilities or press the down to scroll down to select Utilities and press Enter. • Select Erase File. The scanner will play a little tune and you will be returned to the Main Menu, letting you know that the scanner has been cleared.
Other Noteworthy Transmitting Items • At the end of a transmission, if the scanner asks you to upgrade ALWAYSpress “Y” or “Enter” to accept upgrade. This will upgrade the software programs that reside on your scanner with enhancements or bug-fixes. • After upgrade, reset modem by cycling the power (turning the modem off and then on again). You will have to put in the phone number again after an upgrade. • Scanner will always ask if you want to add to existing file when prior data has not been cleared from the scanner. Cannot proceed when files exist unless you enter “Y”NOTE: Always erase files after successful transmission. • Always have scanner plugged into an electrical outlet when transmitting a scan. • As with the older style scanners, always connect phone line from the modem directly into the phone jack. Do not connect through fax machine or do not use phone system at exchange. It is best to find an open line, such as the line used by a fax machine (but disconnect fax and plug your phone cable from the modem directly into the phone jack). • If you have any questions please feel free to AR at 757.460.1060 ext. 134,183,115,or 163.
Hot Keys & Helpful Information Y = YES * = BACK ONE STEP Up = Find Item Function Down = Review Last Scan or Change Quantity
Returns All returns must be completed with store personal. Please see attached return documents for further detailed instructions. To scan out a return you must do the following: • You must be at the Main Menu screen. • 2. Press #3 for Returns or down to • select Returns. Press the Enter key.
Returns cont’d. 3. Input the Store Account Number Press the Enter key. 4. You will see the Eurpac Returns screen. (See picture next page) 5. Scan all the Manufacturers UPCs on the back of the product. This scan will be used by A/R to record product removed from the store as a return.
Returns cont’d. • Upon completion of the UPC scan, press the Asterisk * key to back out of the program and re-enter your account number, enter the box number (see instructions below), and begin the Richter part of the scan. The Richter scan is for the Navy’s benefit and will result in the creation of a bar-coded return document for the Navy to scan from. Box Numbering Instructions Prior to scanning the first item for the first box you will see the blinking cursor. Enter 0000000000001 (twelve zero’s and a one). This is how you will record Box Numbers. Take note that the Account Number is displayed in the left corner and the Activity Function in the right.
Returns cont’d. • There is no need to separate product by cost and retail like in the past. Scan the Eurpac price ticket and place product in the box. When the box is full, close it and write the quantity of pieces on the outside of the box and proceed to box number 2. • To start box number 2 enter 0000000000002 (twelve zeros and the number 2 as the 13th digit). Continue this procedure until all boxes are full. If your return is over 9 boxes, remember to enter 11 zeros followed by a double-digit number: 10, 11, and so on. • When all returns are scanned and in the boxes you must then complete the following steps: • Press the Asterisk * button until the Main Menu screen appears • At the Main Menu screen press #4 to send data. The same procedures are used for transmitting a return as you would a regular scan.
Returns cont’d. • After all information is transmitted to Virginia Beach, an Eurpac RA document will be created with appropriate barcodes and return faxed to the store or rep. The RA number will already be on the bar-coded RA document when faxed out. • Confirm that the box quantities listed on the final page of the RA document match the quantities recorded on each of the individual boxes themselves (refer to the Navy Return Policy for complete instructions).
Troubleshooting If you encounter problems with scanning or transmitting, call the Auto-Replenish team for further instruction. In the event of equipment failure, no parts should be shipped back to Eurpac without authorization from the Auto-Replenish team.