Download

1 / 32
320 likes | 427 Views
Oceanic Imaging Consultants, Inc. Software • Services • Systems. Professional seafloor mapping software, created by surveyors, for surveyors. 1144 10 th Avenue, Suite 200 Honolulu, HI 96816-2442 (808) 539-3706 • info@oicinc.com. OIC_NAP .

E N D
Oceanic Imaging Consultants, Inc. Software •Services •Systems Professional seafloor mapping software, createdby surveyors, for surveyors 1144 10th Avenue, Suite 200 Honolulu, HI 96816-2442 (808) 539-3706 • info@oicinc.com
OIC_NAP Supplemental Navigation and Attitude data filtering and smoothing software for GeoDAS Concept: • Read .OIC or foreign files • Transform navigation and attitude of sensor • Filter navigation and attitude of sensor • Export/import navigation and attitude • Compensate for bias
Why filter the data? OIC_NAP (OIC Navigation and Attitude Processing) allows users to pre-filter navigation and attitude information from data files. In OIC_NAP you can: • Remove noise • Smooth and interpolate data • Transform sensor position, pitch, roll, heading, course, depth and altitude data.
The difference is obvious. Same data after smoothing in OIC_NAP Raw data
Opening OIC_NAP Double-click on the OIC_NAP icon located on your desktop
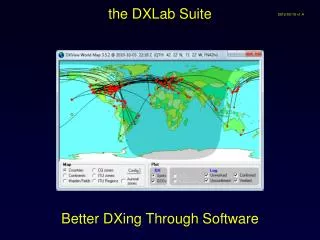
The OIC_NAP GUI and Panels Menu bar Attitude / Environmental Panel Toolbar Display Panel Navigation Panel Navigation Graphics Panel (showing a navigation path) Attitude Graphics Panels
Toolbar Attitude/Environmental Latency Import/Export Data Help Index Open Save Header Save Data Convert Files to OIC Convert Nav to Course Convert Nav to Speed Geodetic Projection Navigation Latency Layback Bias & Scale Vessel Draft Tide Level
Display Panel The Display panel (found to the left of the Navigation Editing Panel on the OIC_NAP interface) allows you to select which data type you wish to process, for OIC files that contain more than one type of data. It also offers you a Symbols toggle, to have the data plots drawn with or without symbols, indicating the location of the data. By default, symbols are off, and data plots are drawn with simple lines linking points. To enable plotting of symbols, toggle the Symbols button to ON.
Navigation Panel Use the options within the Navigation panel to aid in processing Navigation data. • The Navigation panel • consists of several tools • to assist in processing • data, including: • ·Navigation Tool Bar • (graphics control and • editing icons) • ·Navigation Filter • Coefficients pane • ·Navigation Source panel • ·Process button
Navigation Graphics Panel The Navigation Graphics panel will show the navigation of the boat and the layback between the fish and boat geo-referenced within a grid in either UTM or Latitude/Longitude degrees, minutes, and seconds. The raw data is shown in red while the final interpolated data is shown in black.
Attitude Environmental Panel • The Attitude/Environmental panel consists of several tools to assist in processing data, including the: • ·Attitude Tool Bar • ·Attitude Icons panel • ·Attitude Source mini-menu • ·Attitude Filter-Coefficients • panel • ·Process button • ·Display buttons
Attitude Graphics Panels Heading Course Pitch Roll Depth Altitude
Datum Conversion This option allows you to transform sensor and vessel navigation from one coordinate system to another. Select Navigation > Geodetic Transformation on the Menu Bar. A “Transform Sensor and Vessel Navigation” dialog window (seen below) should appear. Next, press the Configure button.
Coordinate System Selection Choose your Grid, Zone, Datum,Projection, Hemisphere, click OK, then click the Transform button (in the “Transform Sensor and Vessel Navigation” dialog window).
Choose files to convert to OIC format. Select File > Convert to OIC Format.
New .OIC files have now been created in the same file directory that your raw files were stored.
Import/Export Choose the Import/Export option on your Menu Bar to import or export Navigation or Attitude data to or from a text file. This pop-up window appears to allow you to choose indexing format and check boxes to select one or more elements.This can be very useful if you need to do something to the data that OIC_NAP is unable to manage right now, like the Fourier transform for example. This is also very useful for merging navigation or other meta-data processed outside of OIC_NAP.
Filtering and Smoothing Here is what data typically looks like when first opened in OIC_NAP
Navigation Panel Filter Coefficients Filter Coefficients are set with Median Span (for filtering outliers) set at 7, and Mean Span (for smoothing) set at 21. After input of numbers, click on the Process button in this same section. Note: Symbols is On and data points appear on graphics panel.
Filtered data forms a red, smoother path that follows closely to original path, seen in magenta.
Zooming into Navigation Graphics Panel Click here Then, click here First click the circled button in the Navigation Panel Next, follow these steps below… The box zooms in on the data points
Attitude/Environmental Panel Filtering and Smoothing When smoothing data in the Attitude Panel, you may want to check your source and smooth one item at a time by clicking the buttons available or in the drop-down menu, or all at one time by selecting All in the drop-down menu.
Bias and Scale Transformation The Attitude Bias & Scale Transform option allows you to linearly modify any header Attitude/Environmental component by Bias (additive) and Scale (multiplicative) factors. Choose a component, such as Heading in the main GUI’s Attitude/Environmental Panel, then select Attitude/Environmental > Bias & Scale Transform under the Menu bar option. The pop-up window will appear. Make sure the Bias is set at 0 and select the All radio button under the Apply section. (You can also choose a portion of the data by selecting the Subset radio button then input the ping numbers to set the start and end of the subset.) Click Apply to apply your settings, Undo to revert back, and Close to close the dialog box.
Click on the Heading button and set your Attitude Panel Filter Coefficients and choose the Process button.
Data appears on the GUI processed in several ways – raw, uniqued, edited, medianed, meaned, and processed.
Lay-back/Cable-out This option allows you to account for offsets between the primary navigation sensor (GPS) which is considered to be at the (0,0) coordinate on the vessel, and the sensor, which may be mounted elsewhere, and then displaced actively from that mount point (by letting out cable).
Select Navigation > Layback/Cableout or click on the Layback icon on the Toolbar
This window appears… choose one of: cable-out: constant (type in a constant length in the text box) or select recorded values method: fish heading or delayed nav Click OK.
Once your data has been processed, select the RED save button. This overwrites the .OIC files made at the beginning.
End OIC_NAP Training You may now exit OIC_NAP and start GeoDAS-Desktop for data playback and review, or continue your smoothing and editing process within the OIC_NAP program.