Download
1 / 12
120 likes | 204 Views
Regression Analysis in Microsoft Excel. MS&T Physics 1135 and 2135 Labs. Background. Often, we seek to derive a value for some physical constant from our measured data by fitting a trendline to a plot. These trendlines are found by regression analysis.

E N D
Regression Analysis in Microsoft Excel MS&T Physics 1135 and 2135 Labs
Background Often, we seek to derive a value for some physical constant from our measured data by fitting a trendline to a plot. These trendlines are found by regression analysis. Additionally, sometimes there’s no obvious way to determine the error involved in the measurement. In these instances, an estimate of error can still be obtained using statistical methods. In Excel, the Analysis ToolPak add-in provides a Data Analysis feature with many useful functions. This tutorial covers adding and editing plots and trendlines, calculating averages and standard deviations, and using the Regression tool in Data Analysis to find quantitave estimates of error in calculated values. MS&T Physics 1135 and 2135 Labs: Regression Analysis
The Data MS&T Physics 1135 and 2135 Labs: Regression Analysis Consider the table excerpt at right. The first column (a) is a list of numbers increasing by a fixed amount. This will serve as our independent variable in the discussion to follow. The second column (b) is simply 5 times the first: b = 5a. The third (c) is the product of the first two: c = ab = 5a2.
Adding a Plot Do not use line plots, as they won’t provide accurate trendlines. Do not use the various connected scatter plots, as the connections obscure trendlines. In the Insert tab, select the disconnected scatter plot. MS&T Physics 1135 and 2135 Labs: Regression Analysis
Adding Trendlines Here we have a plot with two series, B vs A and C vs A. Make sure your plots have appropriate titles and legends. Trendlines can be added to each series by right clicking and choosing Add Trendline. MS&T Physics 1135 and 2135 Labs: Regression Analysis
Notes on Trendlines Any trendline you add should have the equation displayed on the chart. The R2value is optional, but can tell you how well the line fits the data. Sometimes your equation will have peculiar terms that are statistical artifacts; the quadratic trendline on the previous slide is a good example. Set Intercept can fix this, but usually isn’t necessary. Choose the trendline that best fits theory, even if it doesn’t fit the data particularly well. Comparing the trendline equation to theory provides experimental results, and this can only be done if the two have the same functional form. MS&T Physics 1135 and 2135 Labs: Regression Analysis
Simple Statistics You will often need to calculate average values. Type “=average(<range>)” in a cell to calculate the average value of the cells in <range>. You can use standard deviation as an estimate of measurement error when there is no obvious error associated with the measuring device (i.e. our triple beam balances). Type “=stdev(<range>)” in a cell to calculate the standard deviation of the cells in <range>. In both cases, you can select the range by clicking and dragging or by using the arrow keys on the keyboard while holding the shift key. You can also hold the control key while clicking to select a discontinuous range, but many Excel functions cannot use discontinuous ranges as arguments. MS&T Physics 1135 and 2135 Labs: Regression Analysis
Adding the Regression Analysis ToolPak You will likely have to add the Analysis ToolPak the first time you use it. Click File>Options to bring up the Options Dialogue. In the Add-Ins tab, click Go… and check the box for Analysis ToolPak in the Add-Ins Dialogue. Click OK. MS&T Physics 1135 and 2135 Labs: Regression Analysis
Linear Regression: Input In the Data tab, Click Data Analysis, choose Regression in the dialogue that pops up, and click OK. The Regression dialogue asks you to specify the X (blue) and Y (green) ranges. Since it’s only being given one column in the X range, Excel will calculate a linear regression analysis. MS&T Physics 1135 and 2135 Labs: Regression Analysis
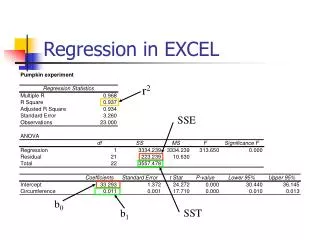
Linear Regression: Output Here is the output. The only parts we want are the cells in the green box. This is all based on y=mx+b X Variable 1 is slope: m=coefficient, Δm=standard error. Intercept is y-intercept: b=coefficient, Δb=standard error. MS&T Physics 1135 and 2135 Labs: Regression Analysis
Quadratic Regression: Input Repeating the process, we can also perform higher order polynomial regressions. This time, the X range contains two columns. Excel will now calculate a quadratic regression analysis. MS&T Physics 1135 and 2135 Labs: Regression Analysis
Quadratic Regression: Output Here is the important part of the output. The rest has been left off. The relevant equation now is y=ax2+bx+c The regression algorithm used in Excel assumes the first column of X corresponds to the linear term and the second is the quadratic term: y=ax2+bx1+c Our data wasn’t set up that way; it was a product: y=5x1x2 Excel fit our column c to a linear combination of columns a and b instead of a product, so it got different coefficients, but still fit the data remarkably well with an R2 of 0.933803694. MS&T Physics 1135 and 2135 Labs: Regression Analysis