Download
1 / 7
70 likes | 277 Views
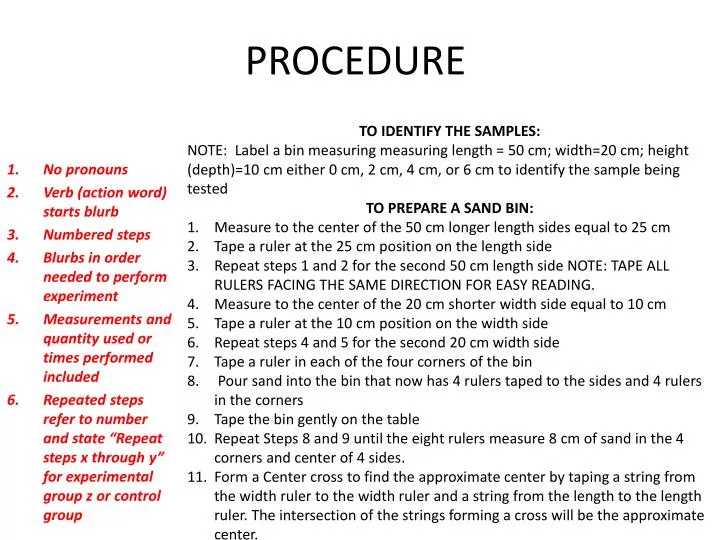
TO IDENTIFY THE SAMPLES: NOTE: Label a bin measuring measuring length = 50 cm; width=20 cm; height (depth )=10 cm either 0 cm, 2 cm, 4 cm, or 6 cm to identify the sample being tested TO PREPARE A SAND BIN: Measure to the center of the 50 cm longer length sides equal to 25 cm

E N D
TO IDENTIFY THE SAMPLES: NOTE: Label a bin measuring measuring length = 50 cm; width=20 cm; height (depth)=10 cm either 0 cm, 2 cm, 4 cm, or 6 cm to identify the sample being tested TO PREPARE A SAND BIN: Measure to the center of the 50 cm longer length sides equal to 25 cm Tape a ruler at the 25 cm position on the length side Repeat steps 1 and 2 for the second 50 cm length side NOTE: TAPE ALL RULERS FACING THE SAME DIRECTION FOR EASY READING. Measure to the center of the 20 cm shorter width side equal to 10 cm Tape a ruler at the 10 cm position on the width side Repeat steps 4 and 5 for the second 20 cm width side Tape a ruler in each of the four corners of the bin Pour sand into the bin that now has 4 rulers taped to the sides and 4 rulers in the corners Tape the bin gently on the table Repeat Steps 8 and 9 until the eight rulers measure 8 cm of sand in the 4 corners and center of 4 sides. Form a Center cross to find the approximate center by taping a string from the width ruler to the width ruler and a string from the length to the length ruler. The intersection of the strings forming a cross will be the approximate center. PROCEDURE No pronouns Verb (action word) starts blurb Numbered steps Blurbs in order needed to perform experiment Measurements and quantity used or times performed included Repeated steps refer to number and state “Repeat steps x through y” for experimental group z or control group
Procedure Continued • Insert a ruler into the center to verify 8 cm depth has been achieved. If 8 cm depth is not measured, repeat steps 8 through 11 until 8 cm depth is measured at the 8 rulers and the center cross position • Use a level to verify the surface is level at 8 cm depth THROUGHOUT the bin in no less than five positions in the four quadrants(corners and center of quadrants) and the center of the bin. If the sand is not level repeat steps 8 through 13 as needed to achieve level depth at 8 cm TO SETUP RULER/THERMOMETERS • Use a table as a flat surface and hold a thermometer with the fluid resting on the flat table. • Hold a plastic clear ruler resting flat on the table behind the thermometer so the thermometer and ruler lines for units are clearly visible • Without moving the ruler or thermometer from the flatness of the table, using clear tape, secure the thermometer to the ruler. NOTE: The 0 degree line on the thermometer is above the 0 cm line on the ruler. This is enable the liquid in the thermometer to be below the sand and the ruler to be above the sand at 0 cm for the control group reading. And the weight of the walker at 0 cm is also given consideration with this design.
Procedure Continued • Repeat steps 14 through 16 for four additional rulers. • Measure to the center of the four quadrants formed by the string. • Insert a ruler/thermometer into the centers of the 4 quadrants to the sample depth identified on the labeled bin. • Insert the fifth ruler/thermometer at the cross formed by the string to the sample depth identified on the labeled bin. TO SET UP THE SUNLAMP DISTANCE AND ANGLE FROM THE BIN: • Measure to the center of the sunlamp and mark with a dot made by an overhead marker • Measure 20 cm above the center (over the cross made by the strings) and hang the sunlamp center dot in a linear position to the cross string. TO COMPLETE SETUP PROCEDURE: • Repeat steps 1-22 to make 3 additional bins.
Procedure Continued EXPERIMENTAL PROCEDURE: • Setup 4 bins into quadrants with 0 cm at first quadrant, 2 cm at second quadrant, 4 cm at third quadrant, and 6 cm at forth quadrant. NOTE: Temperature readings will be rotated clockwise starting at 0 cm bin and start at center then clockwise within the bins as well. REFER TO DATA TABLE • Turn on the four sun lamps • Turn on timer and wait 30 minutes • Starting at center 0 cm and rotating through temperature taking order on data table check temperature every 30 min for 9 hours
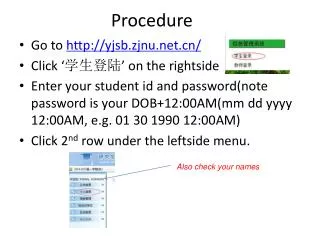
Procedure drawing (not a photograph)Demonstrating position of 9 rulers and 2 strings to from cross for approximate center ruler ruler ruler ruler ruler ruler ruler ruler ruler
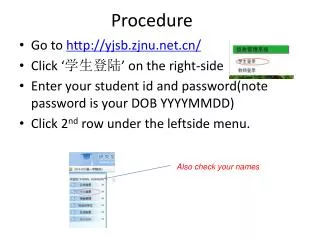
Procedure drawingDemonstrating 6 cm thermometer position Thermometer is marked at 6 cm and inserted into the 8 cm deep sand. Resulting in 2 cm of sand below the thermometer. ruler ruler ruler ruler ruler ruler There are 4 depth samples of 0 cm, 2 cm, 4 cm, and 6 cm There are 5 trail readings of temperature per sample for a total of 20 trials. 5 trials at 0 cm which is the control group. 5 trails at 2 cm, 4 cm, and 6 cm which is 15 trials. ruler ruler ruler
DATA DEPTH OF SAND AT 0 cm, 2 cm, 4 cm, and 6 cm VERSUS TEMPERATURE