Download
1 / 1
20 likes | 125 Views
How to use this SPARKlab Authoring Template ( PowerPoint 2007 for Windows). Save this file as a PowerPoint Presentation (. pptx ) with the name of the SPARKlab you intend to create: Office button > Save As > PowerPoint Presentation

E N D
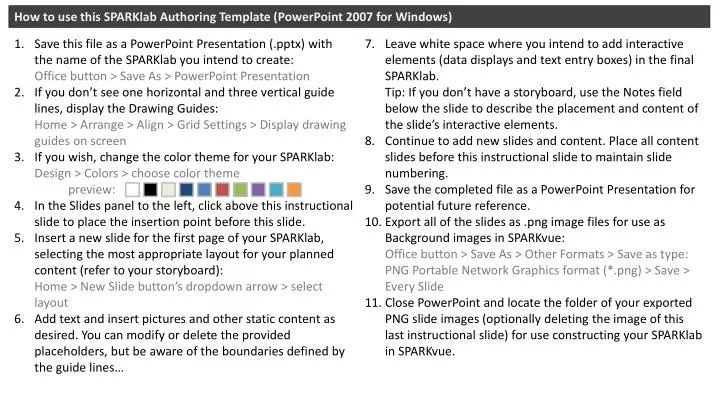
How to use this SPARKlab Authoring Template (PowerPoint 2007 for Windows) Save this file as a PowerPoint Presentation (.pptx) with the name of the SPARKlab you intend to create:Office button > Save As > PowerPoint Presentation If you don’t see one horizontal and three vertical guide lines, display the Drawing Guides:Home > Arrange > Align > Grid Settings > Display drawing guides on screen If you wish, change the color theme for your SPARKlab:Design > Colors > choose color theme preview: In the Slides panel to the left, click above this instructional slide to place the insertion point before this slide. Insert a new slide for the first page of your SPARKlab, selecting the most appropriate layout for your planned content (refer to your storyboard):Home > New Slide button’s dropdown arrow > select layout Add text and insert pictures and other static content as desired. You can modify or delete the provided placeholders, but be aware of the boundaries defined by the guide lines… Leave white space where you intend to add interactive elements (data displays and text entry boxes) in the final SPARKlab.Tip: If you don’t have a storyboard, use the Notes field below the slide to describe the placement and content of the slide’s interactive elements. Continue to add new slides and content. Place all content slides before this instructional slide to maintain slide numbering. Save the completed file as a PowerPoint Presentation for potential future reference. Export all of the slides as .png image files for use as Background images in SPARKvue:Office button > Save As > Other Formats > Save as type: PNG Portable Network Graphics format (*.png) > Save > Every Slide Close PowerPoint and locate the folder of your exported PNG slide images (optionally deleting the image of this last instructional slide) for use constructing your SPARKlab in SPARKvue.