Download

1 / 13
130 likes | 236 Views
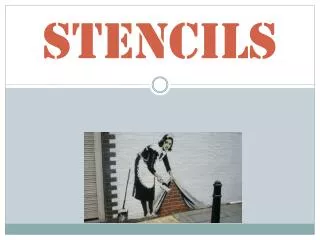
Ordered Stencils http://www.earthwater-stencils.com/order.html. Stenciled image is10" x 24" with 2" letters. Stenciled image is 10" x 24" with 2" letters. How to stencil http://www.klickitatcounty.org/SolidWaste/ContentROne.asp?fContentIdSelected=991940641&fCategoryIdSelected=-1671944469.

E N D
Ordered Stencilshttp://www.earthwater-stencils.com/order.html Stenciled image is10" x 24" with 2" letters. Stenciled image is10" x 24" with 2" letters.
How to stencilhttp://www.klickitatcounty.org/SolidWaste/ContentROne.asp?fContentIdSelected=991940641&fCategoryIdSelected=-1671944469 • Tools Required: • Broom (wire brush & whisk broom to clean gutter before painting ) • Stencil • Safety Cone • Duct Tape • Latex Glove • Water Base Traffic Marker Spray Paint (traffic zone latex spray paint (note: 1 can = about 10 drains) • Cardboard windbreak • One plastic bag for each stencil (used for transporting stencils with wet paint accumulation • Map of stencil area
2. Place stencil so it can be read from the street. Tape stencil to ground. Try to get stencil to lay as flat as possible. Avoid blocking stencil lettering with tape. Place safety cone next to stencil so vehicles will not run over the stencil.
3. A sleight wind will causes paint to drift. • Use a wind break during application. For best results your wind break should be about one inch smaller than the stencil. • Use only water base traffic marker paint. • Use a spray can or a spray applicator. • Avoid getting paint in the storm drain.
4. Apply paint in two light coats allow at least 10 to 20 minutes between applications. Take care to avoid excess paint oozing under the stencil.
Cleanup Place each stencil in a plastic bag for transportation. To remove paint, remove stencil from plastic bag, lay flat and allow to dry for one to two weeks. Dry paint will flake off.
Material’s Listhttp://www.rctc.edu/program/lbdp/Adopt_a_River/storm_drain.html#3 • For the Painting • For the Debris • For the Clean-up
For the Painting: • Stencil (s) • Paint that meets your states' standards We recommend either white or green depending on the surface being painted. • Paint Stirrers • Paint Brushes(3") • "Wet paint" Signs • Masking Tape • Drop Cloths
For the Debris: • Data Cards/ Pencils/ Clipboard • Trash Bags • Gloves • Broom
For the Clean-up • Newspaper and Rags • Coffee Cans and Lids • Mineral Spirits or Paint Thinner (small amount)