Download
1 / 27
270 likes | 382 Views
CS297 Graphics with Java and OpenGL. Blending. The Redbook. Material from the Redbook is extensively used throughout these slides. Code has been translated from C++ to JOGL based on example from the book. Overview. Blend colours to achieve such effects as making objects appear translucent.

E N D
CS297 Graphics with Java and OpenGL Blending
The Redbook • Material from the Redbook is extensively used throughout these slides. • Code has been translated from C++ to JOGL based on example from the book
Overview • Blend colours to achieve such effects as making objects appear translucent. • Smooth jagged edges of lines and polygons with antialiasing • Create scenes with realistic atmospheric effects, fog
Blending • Alpha values are specified with glColor*(), when using glClearColor() to specify a clearing colour and when specifying certain lighting parameters such as a material property or light-source intensity. • Pixels on screen emit red, green, and blue light, which is controlled by the red, green, and blue colour values. • When blending is enabled, the alpha value can be used to combine the colour value of the fragment being processed with that of the pixel already stored in the framebuffer. • Blending occurs after scene has been rasterized and converted to fragments, but just before final pixels are drawn in the framebuffer.
Blending • Without blending, each new fragment overwrites any existing colour values in the framebuffer, as though the fragment were opaque. • With blending, can control how (and how much of) existing colour value should be combined with the new fragment's value. • Thus you can use alpha blending to create a translucent fragment that lets some of the previously stored colour value "show through." • Colour blending lies at the heart of techniques such as transparency, digital compositing, and painting.
Blending • Think of the RGB components of a fragment as representing its colour and the alpha component as representing opacity. • Transparent or translucent surfaces have lower opacity than opaque ones and, therefore, lower alpha values. • For example, if you're viewing an object through green glass, the colour you see is partly green from the glass and partly the colour of the object. • The percentage varies depending on the transmission properties of the glass • If the glass transmits 80 percent of the light that strikes it (that is, has an opacity of 20 percent), the colour you see is a combination of 20 percent glass colour and 80 percent of the color of the object behind it.
The Source and Destination Factors • During blending, colour values of the incoming fragment (the source) are combined with the colour values of the corresponding currently stored pixel (the destination) in a two-stage process. • First you specify how to compute source and destination factors. • These factors are RGBA quadruplets that are multiplied by each component of the R, G, B, and A values in the source and destination, respectively. • Then the corresponding components in the two sets of RGBA quadruplets are added. • Let the source and destination blending factors be (Sr, Sg, Sb, Sa) and (Dr, Dg, Db, Da), respectively, and the RGBA values of the source and destination be indicated with a subscript of s or d. • The final, blended RGBA values are given by(Rs.Sr+Rd.Dr, Gs.Sg+Gd.Dg, Bs.Sb+Bd.Db, As.Sa+Ad.Da)Each component of this quadruplet is eventually clamped to [0,1].
The Source and Destination Factors • You use glBlendFunc() to supply two constants: • one that specifies how the source factor should be computed • one that indicates how the destination factor should be computed. To have blending take effect, you also need to enable it: • gl.glEnable(GL.GL_BLEND); • note that gl.glBlendFunc(GL. GL_ONE, GL.GL_ZERO) gives the same results as when blending is disabled;
Sample Uses of Blending • One way to draw a picture composed half of one image and half of another, equally blended, is to set the source factor to GL_ONE and the destination factor to GL_ZERO, and draw the first image. • Then set the source factor to GL_SRC_ALPHA and destination factor to GL_ONE_MINUS_SRC_ALPHA, and draw the second image with alpha equal to 0.5. • This pair of factors probably represents the most commonly used blending operation. • If the picture is supposed to be blended with 0.75 of the first image and 0.25 of the second, draw the first image as before, and draw the second with an alpha of 0.25.
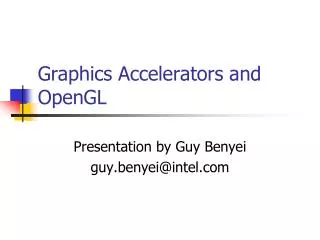
Sample Uses of Blending • set the source factor to GL_ONE , destination factor to GL_ZERO draw the first image(s). • source factor to GL_SRC_ALPHA ,destination factor to GL_ONE_MINUS_SRC_ALPHA, and draw second image with alpha equal to 0.5.
Sample Uses of Blending • set the source factor to GL_ONE , destination factor to GL_ZERO draw the first image(s). • source factor to GL_SRC_ALPHA ,destination factor to GL_ONE_MINUS_SRC_ALPHA, and draw second image with alpha equal to 0.75.
Sample Uses of Blending • set the source factor to GL_ONE , destination factor to GL_ZERO draw the first image(s). • source factor to GL_SRC_ALPHA ,destination factor to GL_ONE_MINUS_SRC_ALPHA, and draw second image with alpha equal to 0.9.
alpha = 0.5 alpha = 0.75 alpha = 0.9
Sample Uses of Blending • Destination factor to GL_ONE and the source factor to GL_SRC_ALPHA. • Draw each of the three images with an alpha equal to 0.3333333.
Sample Uses of Blending • The blending functions that use source factor • GL_DST_COLOR • GL_ONE_MINUS_DST_COLOR • destination factor • GL_SRC_COLOR • GL_ONE_MINUS_SRC_COLOR • Allow you to modulate each colour component individually. • Equivalent to applying a filter • For example multiplying • red component by 80 percent, • green component by 40 percent, • blue component by 72 percent • would simulate viewing the scene through a photographic filter that blocks 20 percent of red light, 60 percent of green, and 28 percent of blue.
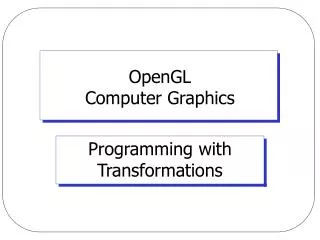
Sample Uses of Blending • Consider, picture composed of three translucent surfaces, some obscuring others, and all over a solid background. • Assume the farthest surface transmits 80 percent of the color behind it, the next transmits 40 percent, and the closest transmits 90 percent. • Draw the background first with the default source and destination factors • Then change the blending factors to GL_SRC_ALPHA (source) and GL_ONE_MINUS_SRC_ALPHA (destination). • Next, draw the farthest surface with an alpha of 0.2, then the middle surface with an alpha of 0.6, and finally the closest surface with an alpha of 0.1.
Solid alpha = 0.2 alpha = 0.6 alpha = 0.1
Antialiasing; jaggies Lines, especially nearly horizontal or nearly vertical ones, can appear jagged. These jaggies appear because the ideal line is approximated by a series of pixels that must lie on the pixel grid. The jaggedness is called aliasing,
Antialiasing; jaggies Alpha value for a square overlapped by geometric line is given by percentage of square covered by line
Antialiasing Points or Lines • Enable with • gl.glEnable(GL.GL_POINT_SMOOTH) • gl.glEnable(GL.GL_LINE_SMOOTH) • Then enable blending, common setting is • gl.glBlendFunc ( GL.GL_SRC_ALPHA , GL.GL_ONE_MINUS_SRC_ALPHA ); • For further details see Chapter 6 of the Redbook
Fog • Computer images sometimes seem unrealistically sharp and well defined. • Antialiasing makes an object appear more realistic by smoothing its edges. • Additionally, you can make an entire image appear more natural by adding fog, which makes objects fade into the distance. • Fog is a general term that describes similar forms of atmospheric effects. • It can be used to simulate haze, mist, smoke, or pollution.
Fog • When fog is enabled, objects that are farther from the viewpoint begin to fade into the fog color. • You can control the density of the fog. • That determines the rate at which objects fade as the distance increases, as well as the fog's color. • Fog is applied after matrix transformations, lighting, and texturing are performed, hence it affects transformed, lit, and textured objects.
Fog gl.glEnable(GL.GL_FOG); FloatBuffer fogColor = FloatBuffer.wrap( new float[ ]{0.0f,0.0f,0.0f,0.0f} ); gl.glFogi(GL.GL_FOG_MODE,GL.GL_EXP); gl.glFogfv(GL.GL_FOG_COLOR, fogColor); gl.glFogf(GL.GL_FOG_DENSITY, 0.0255f); gl.glHint(GL.GL_FOG_HINT, GL.GL_NICEST);
Fog • Fog blends a fog color with an incoming fragment's color using a fog blending factor f. • This factor, f, is computed with one of the three equations on the next slide and then clamped to the range [0,1]. • Let z be the eye-coordinate distance between the viewpoint and the fragment center. • Let density be the value set with the commandgl.glFogf(GL.GL_FOG_DENSITY, 0.0255f); • Let Ci be the current colour of the fragements RGBA • Let Cf be colour assigned with gl.glFogfv(GL.GL_FOG_COLOR, fogColor); • Then the fog colour C is defined as follows: