Download

1 / 43
470 likes | 613 Views
Mousetrap Cars. A basic and refresher workshop for this Mechanical Engineering Challenge. OK… Now Let’s Dig In…!!!. Bonus Points for whoever knows this game…!!!. What is a Mousetrap Car?.

E N D
Mousetrap Cars A basic and refresher workshop for this Mechanical Engineering Challenge
OK… Now Let’s Dig In…!!! Bonus Points for whoever knows this game…!!!
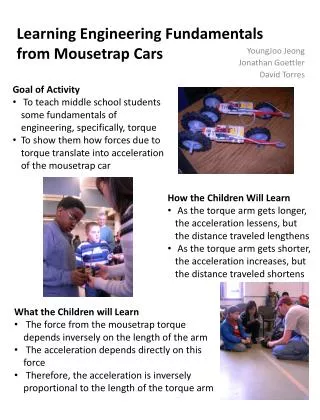
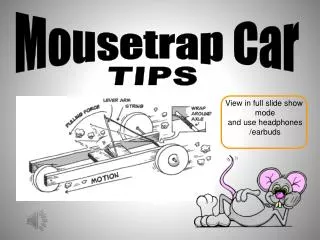
What is a Mousetrap Car? • A mousetrap powered car is a vehicle that uses a mouse trap for a motor and a string to transmit force. In this method one end of a string is attached or tied to the arm/bail on the mousetrap and the other end of the string is wound around an axle. • By winding the string around the axle, the mouse-trap's spring is wound creating stored/potential energy. When the mousetrap car is released the mousetrap’s spring unwinds the string off of the axle causing the wheels to turn and off the vehicle goes.
Encourage and promote the integration of STEM standards into the building and designing processes of the mousetrap car • Explain Guidelines of the competition • Help you teach your students: • Problems solving skills • How to budget their time • Cooperative behavior • Engineering and design concepts Let’s Focus On Purpose & Objectives of this Session
Science Technology Engineering Mathematics Scientific Inquiry Build Techniques Design Processes Manipulating variables to maximize N (See Formula) Rotational Inertia Research Assembly Manipulating variables to Maximize F (See Formula) Rolling Friction Materials Testing Measurements Wind drag Simple Machines Troubleshooting Speed Tradeoff Concepts Redesign Potential & Kinetic Energy Torque STEM [ideas] of Mousetrap Cars
Building a Winning Team • A “Solid” SECME Mousetrap Car team is composed of a combination of students with different skills and abilities i.e. • Researcher / Planner • Drafter / Designer • Builder / Tester • The coordinator should monitor student progress to assure that they understand the STEM concepts, follow the guidelines, and meet deadlines.
Calculating the Score [Overall] The overall team score in the competition is a sum of the following: • Performance - - - - - - - > [Max 100 points] • Technical Report- - - - - > [Max 100 points] • Design Drawing - - - - - -> [Max 50 points] • Team Interview - - - - - - > [Max 50 points] • NOTE:Team Interview will have a 75 pts max for the National competition (see guidelines)
Evaluation Guidelines • REQUIREMENTS • Each Mousetrap Car Engineering Design team must have three (3) students & competition requires participation in these four areas: • Mousetrap Car Construction and Run • Technical Report on Mousetrap Car • Design Drawing of Mousetrap Car • Team Interview with Judges
Evaluation Guidelines CAR CONSTRUCTION AND DESIGN This is an overview [* * *Read Official Guidelines Carefully* * *] • A standard mousetrap MUST be used (4.5x10cm & ~ 25g) • Understand the components of a standard mousetrap • The mousetrap spring must be the sole power source • Original mousetrap spring and base must remain intact and unaltered. Locking lever and bait holder may be removed. Bail may be straightened but unaltered. NOTE: For experienced builders, gears & pulleys are allowed as long as ALL the other guidelines are adhered to.
Evaluation Guidelines (cont) CAR CONSTRUCTION AND DESIGN This is an overview [* * *Read Official Guidelines Carefully* * *] • The spring must be visible and/or accessible for judges. • The car must have a minimal of 3 wheels • Cars will be tested on a smooth flat surface. Distance is measured from the farthest point of travel, utilizing a straight line to connect the two points. • There will be two (2) runs for each car; the better performance run will be used for the final scoring
Calculating the Score [Performance] • It’s time to some numbers…! • Two (2) formulas are used to calculate the Performance score for the car’s run: I’m getting hungry…!
Solving for N w = mass of the mousetrap (25 grams) W = total mass of completed car (in grams) D = distance (measured in a straight line from starting point to stopping point in centimeters) L = length of car in centimeters (furthest of front to furthest of rear) T = time (seconds) cars travels from start to stop N = Performance score
Solving for F • N = Performance score from • NL = maximum performance score of all cars • F = Final Performance score (to be combined with Technical Report, Design Drawing, and Team Interview scores)
Key Points to Consider with (W) • A good mousetrap car is designed around the two (2) formulas and not around just how far it can go. • W = total mass of completed car (grams) • Your goal is for the total mass/weight of the car to be as LOW as possible and can be achieved by: • Decreasing the mass of the wheels (cut out insides) • Choosing light building materials (glue, tape, foam, etc.) • Minimize decorative paint, tape, stickers, etc.
Key Points to Consider with (D) • D = distance (measured in centimeters) • Your goal is for the mousetrap car to travel as far as possible… In a straight line…! • Regardless of the car’s path, the value of D is measured from the starting point to the end point utilizing a straight line. In the examples below, A and B are the start and end points, respectively, with D being the actual distance. NOTE: There are NO required minimum or maximum distance(s) to travel
Key Points to Consider with (L) • L = Length of the car (from the furthest of front to the furthest of rear) measured in centimeters • Your goal is the minimize the length of the car while retaining the properties that make it perform well
Key Points to Consider with (T) • T = Time (measured in seconds) • Your goal is for the mousetrap car to travel as fast as possible… In a straight line…! Speed is calculated as distance divided by time. Your goal is for the car to not only travel as far as possible (distance) but to also arrive at your maximum distance with the lowest time which essentially means the cars is FAST…!!!
N = (.625) x (250) + (250) N = 156.25 + 250 N = 406.25 Analysis of Mass Calculation (W) • W = 45 grams • W = 40 grams N = (.555) x (250) + (250) N = 138.88 + 250 N = 388.88 A small decrease of 5 grams of (W) increases the (N) value by 4.47%
Analysis of Time Calculation (L) • L = 15 cm • L = 10 cm N = (.625) x (166.66) + (250) N = (.625) x (250) + (250) N = 104.17 + 250 N = 156.25 + 250 N = 354.17 N = 406.25 When the longest dimension (L) of the car is decreased by 5 cm, (N) increases by 14.7%...!
Analysis of Time Calculation (T)(D/T = Speed) • T = 10 sec • T = 15 sec N = (.625) x (250) + 166.66 N = (.625) x (250) + (250) N = 156.25 + 166.66 N = 156.25 + 250 N = 322.91 N = 406.25 If you decrease (T) by 5 seconds your (N) value increases by 25.81%...! Speed Up…!!!
Technical Report Guidelines • As a part of the Design Competition, the team is required to write a Technical Report describing the design, construction, and operation of the Mousetrap Car. Parts of the Technical Report are: • Structure • Table of Contents • Abstract • Introduction • Design NOTE: Please see Official Guidelines for specific details • Construction Procedure • Operation • Conclusion/Recommendations • Acknowledgements (Optional) • Appendix (sketches/tables/charts) ALSO NOTE: Take EXTREME caution regarding plagiarism
Design Drawing Guidelines • The mousetrap car drawing in required to illustrate the actual car built (photographs or computer generated drawings will NOT be allowed). • The size of the engineering paper is to be the standard ANSI C 17” x 22”, plain, non-grid, 16 pound vellum sheet. Allow the required 1” border on all sides. Actual drawing is to cover an exposed area of 15” x 20” of the paper. NO MOUNTING OR FRAMES BUT DRAWING MAY BE LAMINATED FOR PROTECTION IF DESIRED. • All dimensions are required to be illustrated on the drawing
Design Drawing Guidelines 4) The scale and the units are required to be indicated on the drawing 5) The team’s Mousetrap Car Drawing is required to show front, side, and top views 6) All parts of the car are required to be labeled. 7) Ink pens, pencils or markers may be used
Design Drawing Guidelines 8) The title legend is to be drawn in the bottom left corner of the drawing inside the 1” border with the following information: Team name School Name School District Team Member’s Names and Grade Levels School Coordinator’s Name Date of Competition AT ALL COMPETITIONS, THE MOUSETRAP CAR DRAWING WILL BE JUDGED ON: (See guidelines for details) 1)RESEMBLENCE (Between the actual mousetrap car and drawing) 2) SCALE 3) NAMING/LABELING (of all of the parts used) 4) APPERANCE/NEATNESS
Team Interview Each student team will be interview by a panel of judges discussing the car’s design and testing as well as the Design Drawing & Technical Report • Team members are interviewed as a group • Each member is expected to be able to serve as spokesperson • The interview will be conducted apart from the performance and scoring of car NOTE: Please see Official Guidelines for specific details
Team Interview • The interview will take place between the Design Drawing and Technical Report scoring and performance runs • The interview will be one element in arriving at the overall score in competition. The Team Interview will be judged on: - Teamwork - Application of Technical Principles - Knowledge of Design - Oral Communication Skills
Final Key Points • Teachers should focus on STEM standards along with the design and build of Mousetrap Cars • Teachers should ensure that students design, build, test, troubleshoot and rebuild as much as necessary to thoroughly grasp the STEM concepts regarding Mousetrap Cars in order to be ready for both Regional and National Competition • Students should design and build their cars around the formulas to: • Minimize the total mass of the car (W) • Maximize the distance car travels in a straight line (D) • Minimize the size of the car (L) • Minimize the Time (T)… FAST CAR…! • Remember… STEM, STEM, STEM…!!!
One Last Thing • Please visit the National SECME website’s for more information and details and at www.secme.org • Educational Resources – STEM National Standards • Please enjoy some pictures on the next 4 slides…!
Pictures of Mousetrap Cars • Decrease the mass of the wheels by cutting out the insides of large wheels
Pictures of Mousetrap Cars NOTE: Build Instructions Next
Materials for Construction • 1 - Victor mouse trap, • 2 - CDs (rear wheels) • 2 - front wheels(small black) • 2 - red CD inserts • 1 - wood axle (¼” x 3½”) • 1 - metal axle (1/8 ” x 2 ½”) • 1 - drinking straw • 2 - large screw eyelets • 2 - small screw eyelets • 1 - dental floss • 1 - zip tie • 1 - small vinyl tubing (3.5mm) • 1 - large vinyl tubing (5mm) • 2 - balloons • 1 - small brass nail (optional) • 1 - Phillip head screw (optional) • Tools • Super glue • Ruler • Pencil • Pliers • Hammer • Scissors • Push pin • Clear tape
Preparing the body Remove the REDparts from the mousetrap • Bail hook • Locking lever • Staples/fasteners
Chassis Prep for Axles 0.8 cm • Turn mousetrap over to the flat blank side • Using the pencil and ruler, draw a parallel line 0.8 cm from each edge of the mousetrap • Make sure the lines intersect 0.8 cm 0.8 cm
Preparing The Body • Use the push pin to make holes at the intersections of the vertical and horizontal lines. • Screw in the eyelets: • small eyelets go on the mousetrap end with the writing Front Wheel Axle Small Screw eyes for Front Wheel Axle Back Wheel Axle: Flip side is V Large Screw eyes for Back Wheel Axle
Install Axles • Insert the metal axle into the small eyelets and wooden axle into the large eyelets • Cut two ¼” pieces of the straw (or small tubing) and put on metal axle (outside of the small eyelets) • Cut two ¼” pieces of the 1/8 clear tubing and put on wooden axle (outside of the large eyelets)
Chassis Prep for Axles • Place the red CD inserts into the CDs. • Cut balloons into strips and place along the outside edge of the disk. • Install CDs on both ends of the wooden axle • Place the cable tie on the wooden axle in between the screw eyes (optional) NOTE: You will probably need to few dabs of super glue if the red CD insert spins/slides inside the CD and/or on the wooden axle
Transmission • Take a dental floss and tie it to the middle of the bail • Place a little dab of glue on the string where it attaches to the bail • The string length should extend the span 1.5 times the length of a mouse trap
Winding The Car • If you use the zip tie, make a loop with the dental floss and put the loop over the zip tie • If not, make an L shape and wrap the dental floss directly on the wooden back axle • Wind the axle away from you tightly, gradually lifting the bail until it is all the way down • Hold the bail down, put the car on the floor, release the bail and WATCH IT GO…!!!
The Formula and its components w= the mass of the mousetrap= 25 g W= the mass of the completed mousetrap car D= the total Distance traveled straight from start to finish(in cm) L= the length of the car in cm T= the time of travel start to finish in seconds N= the total points N= (w/W) x (D/L) + (D/T)