Download

1 / 117
1.19k likes | 1.45k Views
Job Scheduler Tutorial. Job Scheduler Automated Database Administration. Marion Morrison & Sourabh Tripathi. Start. Tutorial Content. Overview. Schedules. Definitions. Create a Schedule. Usage. Modify a Schedule. Architecture. Delete a Schedule. Security Roles. Jobs.

E N D
Job Scheduler Tutorial Job Scheduler Automated Database Administration Marion Morrison & Sourabh Tripathi Start
Tutorial Content Overview Schedules Definitions Create a Schedule Usage Modify a Schedule Architecture Delete a Schedule Security Roles Jobs Scheduled Jobs Create a Job Create a Scheduled Job from a Job Modify a Job Create a Scheduled Job from Scratch Delete a Job Modify a Scheduled Job Execute a Scheduled Job Disable a Scheduled Job Enable a Scheduled Job Delete a Scheduled Job Prev Next
Tutorial Content (cont.) Job History Templates Templates Job History Current JS Templates Purge History Create a Job from a Template Job Output JS Administration Configure Job Scheduler Configure sybmgmtdb Prev Next
Overview • Job Scheduler is: • an ASE feature beginning with release 12.5.1. • a central component of Sybase’s self-management and resource. tuning initiative and is designed to meet the needs of it’s growing self-management infrastructure. • Job Scheduler enables: • database administrators to perform database maintenance and routine tasks with minimal human intervention. • users to create and schedule jobs, mix and match them and share them with other users. Prev Next Back to Start
Definitions • Job – Definition of the specific work to be performed. • Currently all jobs are SQL. • A job is generic until it is scheduled. • Schedule – A definition of when a job is to be executed. • May be repeating or non-repeating. • Supports date and time constraints. • A schedule is generic until attached with a job. • Scheduled Job – Any job bound to any schedule. • A job may be bound to multiple schedules. • A schedule may be bound to multiple jobs. • Only scheduled jobs are executable. Prev Next Back to Start
Definitions (cont.) • What we mean when we say: • Job Scheduler Server: The ASE where Job Scheduler is installed and running. • Target Server: The ASE where a scheduled job is run. • JS Task: An ASE internal task that determines when scheduled jobs should run and notifies the JS Agent to run them. • JS Agent: An external process that gets the job information from the sybmgmtdb and connects to the target server and issues the job commands. • sybmgmtdb: The database that stores all the job, schedule, and scheduled job information, including job output and history. Prev Next Back to Start
Usage • Primary goal of Job Scheduler is to facilitate automation of routine DBA tasks, particularly those that tune and manage an Adpative Server. • User Activities in Job Scheduler: • Create, modify and delete jobs. • Create, modify and delete schedules. • Create, modify and delete scheduled jobs. • Administer scheduled jobs. • Execute immediately through ‘run_now.’ • Enable/Disable a scheduled job. • View history and output of each execution. • Administer Job Scheduler. Prev Next Back to Start
Security Roles • Job Scheduler adds new roles to ASE to prevent inappropriate access, modification and deletion of jobs, schedules, scheduled jobs, and job history and output data. • js_user_role. • Create and manage their own jobs and schedules. • Run their own or shared scheduled jobs. • js_admin_role. • Everything js_user_role can do. • Manage other users jobs, schedules and scheduled jobs. • Perform Job Scheduler administrative tasks. Prev Next Back to Start
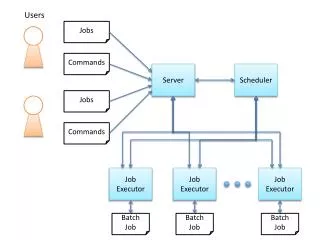
ASE ASE c:\> sp_…. c:\> sp_…. Architecture ASE Plugin Job Scheduler windows Job Scheduler Server Target Server ASE JS Agent job info ASE JS Task job id job, schedule, admin data scheduled job info scheduled job info sybmgmtdb Job Scheduler stored procedures Prev Next Back to Start
Getting Started • Most JS activities can be accomplished from either the graphical user interface or from the stored procedures that come with the Job Scheduler. • In the next sections of the tutorial, we will create a job and a schedule and then bind the two to create a scheduled job. • We start at the Job Scheduler folder in the ASE Plugin. Prev Next Back to Start
ASE Plugin Click here to display JS content Prev Next Back to Start
Role Differences • Only Users with js_admin_role can view all jobs, schedules and scheduled jobs. • Next couple of slide show the admin role using jobs as an example. This user has no jobs of his own, but has js_admin_role. Prev Next Back to Start
Viewing All • Right-click on Jobs folder. Prev Next Back to Start
Viewing All (cont.) • Click on the “Show jobs for all users” option. This is a toggle option; to turn it off, just click on it again Prev Next Back to Start
Create a Job • To use the job wizard: • Click on Scheduled Jobs folder. • Click on Jobs folder. • Double click on Add Job. Prev Next Back to Start
Create a Job (cont.) • Enter the name of your job. • A job is an ASE object so its name must follow the same identifier rules as other ASE objects. Prev Next Back to Start
Create a Job (cont.) • Enter a description for your job. • This should help you and others understand what your job does. • Ignore the Templates box for now; they are covered in another section. Prev Next Back to Start
Create a Job (cont.) • Enter the T-SQL that makes up your job. • You can use the SQL editor to create and edit your SQL. • You can also load your SQL from a file or paste it into the Job Definition box. Prev Next Back to Start
Create a Job (cont.) • Now it’s time to set some job properties, like: • Can there be multiple executions at the same time? • Can others use your job to create a scheduled job? • Should a scheduled job created from this job run as you or as the person who created the scheduled job? Prev Next Back to Start
Create a Job (cont.) • This property adds a check to prevent runaway jobs that may not finish or terminate properly. It is inherited by all scheduled jobs that are created from this job. • This is the maximum amount of time the job should be allowed to run. Prev Next Back to Start
Create a Job (cont.) • Prior to completing your job, review the job summary for correctness. Use the Back button to go back and make any corrections. • If all is well, click Finish to create your job. Prev Next Back to Start
Create a Job (cont.) • New job shows up in the Jobs folder. • Pertinent details of the job are shown for a quick survey of existing jobs. Congratulations, job created! Prev Next Back to Start
Modify a Job • Find your job in the Jobs folder and right-click directly over it. • Select the Properties menu item. Prev Next Back to Start
Modify a Job (cont.) • The Properties window allows you to modify most job properties. Only users with js_admin_role can change the job owner. Prev Next Back to Start
Modify a Job (cont.) • We can modify the T-SQL as needed. Prev Next Back to Start
Modify a Job (cont.) • We changed this job to be shared and to always run as the owner (jsuser) and changed the amount of time the job can run. • Click OK to save the changes. Prev Next Back to Start
Modify a Job (cont.) Congratulations, job modified! Prev Next Back to Start
Delete a Job • Owners can delete their own jobs, but users with js_admin_role can delete the jobs of other users. • Find the job in the Jobs folder and right-click directly over it. • Select the Delete menu item. Tip: you can select multiple jobs for deletion by holding down the shift key while clicking on job names. Prev Next Back to Start
Delete a Job (cont.) • Confirm the deletion. Prev Next Back to Start
Delete a Job (cont.) • Note: a job associated with a schedule can not be deleted, until all scheduled jobs using it are deleted. Congratulations, job deleted! Prev Next Back to Start
Create a Schedule • To use the Add Schedule wizard: • Click on Scheduled Jobs folder. • Click on Schedules folder. • Double-click on Add Schedule. Prev Next Back to Start
Create a Schedule (cont.) • Enter the name of your schedule. • A schedule is an ASE object so its name must follow the same identifier rules as other ASE objects. Prev Next Back to Start
Create a Schedule (cont.) • Enter a description for your schedule. • This should help you remember more about your schedule. • This is where you can also choose to share your schedule with others. Prev Next Back to Start
Create a Schedule (cont.) • Specify a time range. • You can specify a start time for the schedule or a time range for repeating schedules by choosing the ‘Between’ option. Prev Next Back to Start
Create a Schedule (cont.) • TIME OUT: • The server time can be displayed as a 12-hour or 24-hour clock. This is a Windows server configuration (control panel->region options->time tab). • The Start and Between time values must be stated in a 24-hour clock for now (look for a more flexibility in the future). • The “Between” start time means that on days when your repeating scheduled job runs, this is the time frame during which it will run. • For non-repeating jobs that select the “Between” option, only the beginning time is used. Prev Next Back to Start
Create a Schedule (cont.) • Now it’s time to select a start date. • Use the calendar drop-down list to find the correct month and year. Then click on the desired date. • Alternatively, you can modify the date in the first textfield. • The default date is the current date. Prev Next Back to Start
Create a Schedule (cont.) • Now it’s time to select an end date, for example: • We choose no end date, i.e., jobs using this schedule will be scheduled to run indefinitely. • Uncheck the “No end date” to select a end date and create limited schedule. Prev Next Back to Start
Create a Schedule (cont.) • Now it’s time to specify recurrence of the schedule: • Schedules can repeat every N minutes, N hours or N days. • Schedules can be restricted to certain days of the week or month (not valid with repeat interval of “days.” ). Prev Next Back to Start
Create a Schedule (cont.) • A schedule can be limited to specific days of the week. Prev Next Back to Start
Create a Schedule (cont.) • A schedule can be limited to specific days of the month. • Notice the “Last day of the month option.” Don’t get caught off guard selecting the 29, 30 or 31 when you really mean the last day of the month. Prev Next Back to Start
Create a Schedule (cont.) • Prior to completing your schedule, review the schedule summary for correctness. Use the Back button to go back to make any corrections. • If all is well, click on Finish to create your schedule. Prev Next Back to Start
Create a Schedule (cont.) • New schedule shows up in the Schedules folder. • Pertinent details of the schedule are shown for a quick survey. Congratulations, schedule created! Prev Next Back to Start
Modify a Schedule • Find your schedule in the Schedules folder and right-click directly over it. • Select the Properties menu item. Prev Next Back to Start
Modify a Schedule (cont.) • The Properties window allows you to modify schedule properties. Only users with js_admin_role can change the schedule owner. Prev Next Back to Start
Modify a Schedule (cont.) • We can modify the description, time-range and sharing options from here if needed. Prev Next Back to Start
Modify a Schedule (cont.) • We can modify the start and end dates from here, if needed. Prev Next Back to Start
Modify a Schedule (cont.) • We can modify the recurrence options from here, if needed. Prev Next Back to Start
Modify a Schedule (cont.) Congratulations, schedule modified! Prev Next Back to Start
Delete a Schedule • Owners can delete their own schedules, but users with js_admin_role can delete the schedules of other users. • Find the schedule in the Schedules folder and right-click over it. • Select the Delete menu item. Prev Next Back to Start
Delete a Schedule (cont.) • Confirm the deletion. Prev Next Back to Start