Download

1 / 8
80 likes | 190 Views
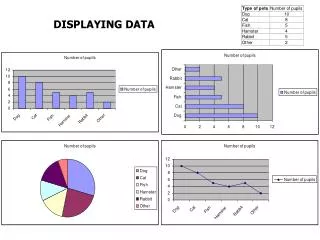
Displaying a Data Table. Defining the Data Source Creating a Data Binding Displaying the Data. Displaying a Data Table. Creating a Data Driven Web page in Dreamweaver is a five-part process. First, you define the site for use with a server model.

E N D
Displaying a Data Table Defining the Data SourceCreating a Data BindingDisplaying the Data
Displaying a Data Table • Creating a Data Driven Web page in Dreamweaver is a five-part process. • First, you define the site for use with a server model. • Second, you create the page upon which you will display the data. • Third, you define the data source. • Fourth, you create a data binding. • Fifth, you display the data.
Create an ASP Page • Pull down the File menu and choose New to bring up the New Document dialog. • Select the Dynamic Page category to make the Dynamic Page options appear. • Select ASP JavaScript and click the Create button; the new page appears. • Pull down the File menu, choose Save, and save the file in your site’s local root folder.
Defining the Data Source • If the Databases window is not visible, pull down the Window menu and choose Databases. • Click the plus-sign button and choose Custom Connection String. • When the Custom Connection String dialog appears, enter the name of the connection and your connection string.
The Connection String • In this course, the connection string is:"DBQ=C:\webs.oet.udel.edu\fthstudents\databases\yourLastName\yourDatabase.mdb;DRIVER={Microsoft Access Driver (*.mdb)}“ -or- "Provider=Microsoft.Jet.OLEDB.4.0;Data Source=C:\webs.oet.udel.edu\fthstudents\databases\yourLastName\yourDatabase.mdb“ Type the name of your database here. Type your last name here.
Create a Data Binding • Click the Bindings tab of the Application window, or pull down the Window menu and choose Bindings. • Click the plus sign button and choose recordset to make the recordset dialog appear. • Customize the Name field. • Choose the connection. • Select the data table. • Select the data fields. • Click OK.
Display the Data • Click to position the cursor at the spot on the page where you want to display the data. • To display an entire Recordset at once, from the Application category of the Insert bar, choose Dynamic DataDynamic Table. Application category of the Insert bar Click the arrow to drop down the Dynamic Data menu and choose Dynamic Table
Test the Page • Press F12 to test the page. This publishes and tests the page all in one step. • You can also use the Put Files button to publish the site.