Download
1 / 30
310 likes | 1.08k Views
Excel Tutorial 11 Connecting to External Data. Objectives. Import data from a text file Work with connections and external data ranges Define a trusted location Understand databases and queries Use the Query Wizard to import data from several tables Edit a query

E N D
Objectives • Import data from a text file • Work with connections and external data ranges • Define a trusted location • Understand databases and queries • Use the Query Wizard to import data from several tables • Edit a query • Import data into a PivotTable and PivotChart New Perspectives on Microsoft Office Excel 2007
Objectives • Create a Web query • Retrieve data from the World Wide Web • Use hyperlinks in a workbook • Access data from an XML document • Work with XML data maps New Perspectives on Microsoft Office Excel 2007
Examining Data Sources New Perspectives on Microsoft Office Excel 2007
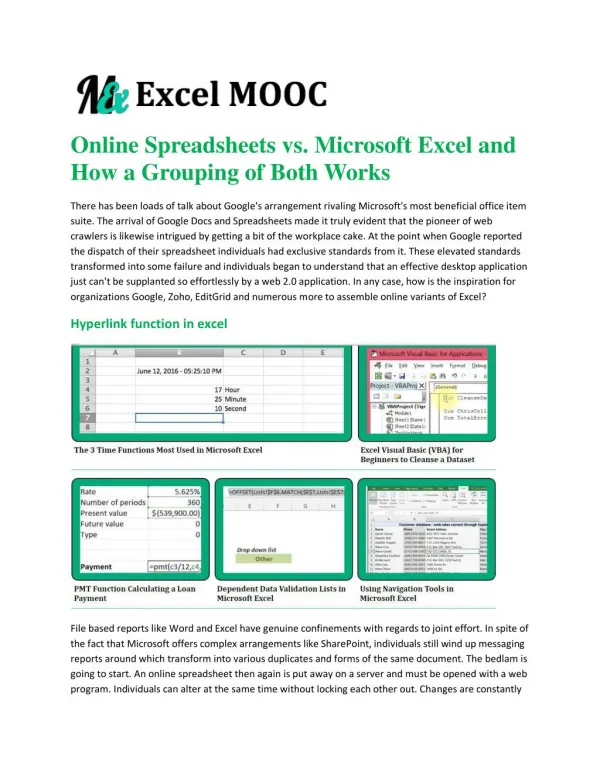
Working with Text Files • A text file contains only text and numbers without any formulas, graphics, special fonts, or formatted text • In the Get External Data group on the Data tab, click the From Text button • In the first step of the Text Import Wizard, choose how the data is organized, and then specify the row in which to start the import • In the second step, set the column breaks by clicking a location in the Data preview window to insert a column break, double-clicking a column break to delete it, and dragging a column break to move it to a new location New Perspectives on Microsoft Office Excel 2007
Working with Text Files • In the third step, specify the data format for each column by clicking the column, and then selecting the appropriate data format option button, or skip import columns by clicking the column in the Data preview window then clicking the Do not import option button • Click the Finish button • Specify where to insert the imported text, and then click the OK button to import the text file into the worksheet New Perspectives on Microsoft Office Excel 2007
Working with Text Files New Perspectives on Microsoft Office Excel 2007
Editing the Properties of an External Data Range • Click any cell in the range containing the external data • In the Connections group on the Data tab, click the Properties button • To define a name for the data range, enter the name in the Name box • To specify how the external data is refreshed in the workbook, check the appropriate check boxes in the External Data Range Properties dialog box • Click the Close button New Perspectives on Microsoft Office Excel 2007
Refreshing External Data • To manually refresh a data range: • In the Connections group on the Data tab, click the Refresh All button arrow • Click Refresh to refresh the currently selected data range or click Refresh All to refresh all of the connections in the workbook • To automatically refresh a data range: • Select any cell in the data range, and then, in the Connections group on the Data tab, click the Properties button • Click the Refresh every check box and then enter a minutes value to refresh the data range at regular intervals • Click the Refresh data when opening the file check box to refresh the data when the user opens the workbook New Perspectives on Microsoft Office Excel 2007
Refreshing External Data • To manually refresh a connection: • In the Connections group on the Data tab, click the Connections button • Select the connection in the Workbook Connections list, and then click the Refresh button • To automatically refresh a connection: • In the Connections group on the Data tab, click the Connections button • Click the Properties button • Click the Usage tab in the Connection Properties dialog box, and then select the Refresh options New Perspectives on Microsoft Office Excel 2007
Refreshing External Data New Perspectives on Microsoft Office Excel 2007
Defining a Trusted Location • Click the Office Button, and then click the Excel Options button • Click Trust Center in the Excel Options list, and then click the Trust Center Settings button • Click Trusted Locations in the Trust Center list, and then click the Add new location button • Click the Browse button to locate the trusted location, specify whether to include subfolders • Click the OK button in each dialog box New Perspectives on Microsoft Office Excel 2007
Defining a Trusted Location New Perspectives on Microsoft Office Excel 2007
Introducing Databases and Queries • A database is a file that stores a collection of related data New Perspectives on Microsoft Office Excel 2007
Running Microsoft Query to Connect to an Access Database • In the Get External Data group on the Data tab, click the From Other Sources button, and then click From Microsoft Query • In the Choose Data Source dialog box, specify MS Access Database as the data source, select a database file, and then click the OK button • In the first step of the wizard, select the columns from the different tables to include in your query, and then click the Next button New Perspectives on Microsoft Office Excel 2007
Running Microsoft Query to Connect to an Access Database • In the second step of the wizard, filter the data by selecting the columns to filter, specifying the nature of the filter in the Only include rows where list boxes, and then click the Next button • In the third step of the wizard, specify the sort order for the data values in the query, and then click the Next button • In the last step of the wizard, specify whether to return the query data to Excel, view or edit the data in Microsoft Query, or save the written query to a permanent file for use later New Perspectives on Microsoft Office Excel 2007
Running Microsoft Query to Connect to an Access Database New Perspectives on Microsoft Office Excel 2007
Editing a Database Query • In the Connections group on the Data tab, click the Connections button • Select the connection used by the database query, and then click the Properties button • Click the Definition tab in the Connection Properties dialog box, and then click the Edit Query button • Change the query definition using the dialog boxes provided by the Query Wizard New Perspectives on Microsoft Office Excel 2007
Editing a Database Query New Perspectives on Microsoft Office Excel 2007
Importing Data into PivotTables and PivotCharts New Perspectives on Microsoft Office Excel 2007
Importing Data into PivotTables and PivotCharts New Perspectives on Microsoft Office Excel 2007
Importing Data into PivotTables and PivotCharts New Perspectives on Microsoft Office Excel 2007
Working with Web Queries • To create a Web query: • In the Get External Data group on the Data tab, click the From Web button • Enter the URL of the Web site or the folder path to a local file in the Address box of the New Web Query dialog box • Click the selection arrows for the parts of the Web page you want to retrieve • Click the Import button New Perspectives on Microsoft Office Excel 2007
Working with Web Queries • To set the Web query format options: • Open the Connection Properties dialog box for the query • Click the Edit Query button on the Definition tab • Click the Options button and select the format options in the Web Query Options dialog box • To save a Web query: • Open the Connection Properties dialog box for the query • Click the Edit Query button on the Definition tab • Click the Save Query button in the Edit Web Query dialog box and specify the filename and location of the Web query file New Perspectives on Microsoft Office Excel 2007
Working with Web Queries New Perspectives on Microsoft Office Excel 2007
Importing Data from the World Wide Web • In the Get External Data group on the Data tab, click the Existing Connections button New Perspectives on Microsoft Office Excel 2007
Importing Data from the World Wide Web New Perspectives on Microsoft Office Excel 2007
Importing Data from the World Wide Web New Perspectives on Microsoft Office Excel 2007
Loading an XML Data Map • In the XML group on the Developer tab, click the Source button • In the XML Source pane, click the XML Maps button • Locate and select the XML document file • Click the Rename button within the XML Maps dialog box to define a name for the map New Perspectives on Microsoft Office Excel 2007
Loading an XML Data Map New Perspectives on Microsoft Office Excel 2007