Download
1 / 28
280 likes | 383 Views
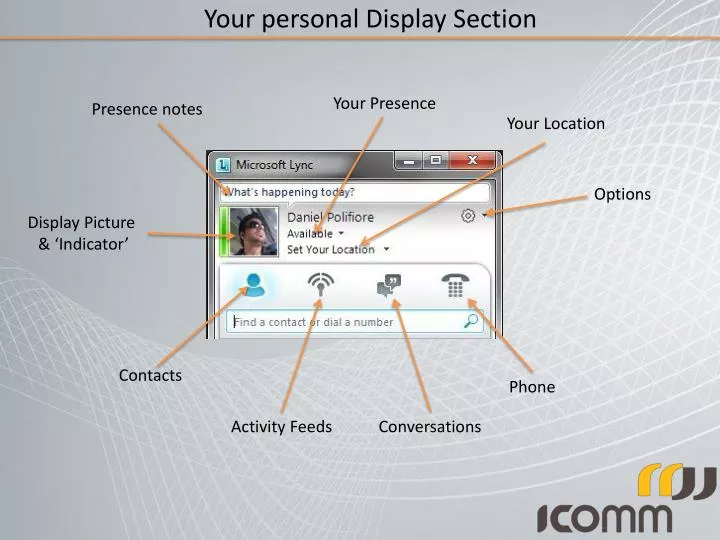
Your personal Display Section. Your Presence. Presence notes. Your Location. Options. Display Picture & ‘Indicator’. Contacts. Phone. Activity Feeds. Conversations. Presence. Coloured visual representation. - Available - Busy - Do Not Disturb Set your own

E N D
Your personal Display Section Your Presence Presence notes Your Location Options Display Picture & ‘Indicator’ Contacts Phone Activity Feeds Conversations
Presence Coloured visual representation. - Available - Busy - Do Not Disturb Set your own 2. Automatic through outlook Notes - Say what you are doing Coloured indicator Set Location - Where you are right now. Note: Presence is a visual indicator, which allows people to see what you are doing and if you are available to communicate.
Navigation screens Conversations Phone Contacts Activity Feeds
Contacts List You can also change the view of the contact list to view by Groups, Status, or Relationship. display picture What is Andrews presence status? Where is Andrew? Note: Your contacts list will provide a listing of all contacts you have added to Lync.
Adding Contacts Step 1 Step 2 Quick search box STEP 2: As you start to type the name of the person you wish to add, Lync will begin to narrow down the results! click + Step 3 STEP 3. Once you have found the contact you wish to add, click on the ‘+’ to add the contact, then select which contact group you wish to have them in.
Adding Groups Under “contacts” 1 STEP 1: Right click on any existing group. STEP 2: Select ‘create new group’. STEP 3: Give your new group a name. 3 2 Now you can drag-and-drop existing contacts into that group!
Contact Cards If you click or hover over a particular contact, you will see their ‘contact card’. Send E-mail Send IM Call Contact More Options
Contacts Types There are Three different types of contacts in Lync. 1. LYNC CONTACTS show the person’s presence, and display picture. You can contact this person by IM, voice call, video call, e-mail, or Lync call. 2. PERSONAL CONTACTS is a contact listed in your Outlook contacts, but is not on your company’s global directory. These contact generally do not have Lync, so you cannot see their presence, and can only email them, or voice call them if they have a phone number attached to their contact card in Outlook. 3. FEDERATED CONTACTS Lyncusers are empowered to add their own contacts, those who work for organizations with federated Lync deployments, to their own Lync external contacts groups 4. PHONE CONTACTS is a contact that is essentially just a speed-dial listed in your contacts. You can see the display image is of a phone instead of a person. You can only voice call these contacts.
Activity Feeds You can change the view 3 ways: ALL: updates from your contacts FREQUENT: Updates from only your most frequent contacts MY ACTIVITIES: Only shows your updates/changes Note: The Activity Feeds button is similar to looking at a news feed in Facebook. It provides you with a summary of peoples activities changes and updates that have taken place.
Conversations You can change the view 3 ways: ALL: All conversation lists MISSED: Any missed conversations (also saved in Outlook) CALLS: Only show calls (no IM/video) The ‘Conversations’ view will show you a list of Phone Calls,IM’s and Video Calls. Note: By clicking on ‘View more in Outlook’, Lync will open Outlook and navigate you to the folder where all conversations are stored.
Phone You can use the numbers on your keyboard to type a number here You can use the number-pad in Lync to dial your number, and click ‘CALL’ to place the call. Note: The ‘Phone’ is a virtual control for dialling a number on Lync and is especially useful for selecting a queue. New voicemail messages If you click on ‘view more in Outlook’ you can view your voice mail as voice and an email.
Instant Messaging Instant Messages to your work-mates can be a big time-saver, and they are easy to use as well Step 1 Double left-click on contact Step 2 Step 3 Type your message. (try and be nice-ish) Press ‘Enter’ and wait for a reply!
Instant Messaging To add another person to the conversation: Step 1 Click on ‘People Options’ to display the drop-down Select ‘Invite by name’ Step 2 Click invite to invite Step 3 Select person Double left click
Instant Messaging Conversation window Group Conversation You can also simply just click on a contact and drag them into the conversation.
Calling using Lync There are three different types of call you can make in Lync. Voice calls A standard voice call using a number listed in the contact card, or a new number. LYNC calls A call that connects from your computer directly to the contact’s computer, using Internet or Intranet rather than a phone line. Voicemail Place a call directly to the contact’s voicemail inbox. Simply click on the type of call you would like to make to start the call.
Call Controls Lets step through the call control options in Lync’s Call window... Transfer options Video Calling People Options Device List Sharing Options
Call Controls Sharing with current call. The Device options for current call. Transferring your call
Call Controls The ‘Call Options’ Drop-down contains a few miscellaneous options that can be very helpful within certain calls. Other options ‘People Options’ To add participants
Transferring calls If you want to transfer the person straight through, this is referred to as a cold transfer. By selecting one of your phone numbers, you can transfer the call to another one of your phones, ie, your mobile. 1. Click on the ‘transfers’ button By selecting ‘another person’, your contacts list will re-appear. 2. Select your contact (or dial a number) and click ok to transfer the call straight through!
Warm Transfers If you need to speak to the other person before transferring the call through, You would use a warm transfer. STEP 1: Place your caller on hold. STEP 2: Start a second call as normal STEP 3: When ready, select ‘current conversations’ and select the person you wish to transfer
Conference Calls The process to conference another caller in is similar that of a warm transfer. STEP 1: Place your caller on hold. STEP 2: Start a second call as normal STEP 3: When ready, select ‘’Merge this call’ and select your other caller.
Share your Desktop After you login to the meeting, you can share your desktop or a program, deliver a PowerPoint presentation, insert a Whiteboard or Poll slide and add attachments among other options. To share your desktop: • Inyour online meeting click Share. • On the Sharedrop down menu, click Desktop. • A bar is displayed at the top of the screen and a glow appears around the screen. • Click Stop Sharing to stop showing your desktop.
Share a program To share a program and the associated windows: Click Share in your online meeting. On the Share drop down menu, click Program. Select the program you want to share. A bar is displayed at the top of the screen, and a glow appears around the application window indicating what is being shared. To stop sharing your application at any time, click Stop Sharing. Stop Sharing
Control Sharing When you start sharing, you’re the only one in control of what is being shown on the meeting stage. You can allow others to take control of your sharing session and you can take back control at any time. Give Control • Click Give Control on the sharing bar at the top of the screen. • Click the name of an individual to share control with, then click OK on the confirmation box to proceed. • This person is now in control of your sharing session and can use their keyboard and mouse to control your shared content. The option to Release Control also becomes available on their Online Meeting toolbar. • To take back control click Take Back Control on the Give Control menu. Give Control OR Note: Only one person can be in control at a time.
Share a Powerpoint Presentation To deliver a PowerPoint presentation: • Click Share in your meeting. • Click Share and click PowerPoint Presentation. • Double click the PPT file you want to share. • The slides will be shown in the Stage area. 5.To move the slides, use the arrows at the lower right corner of the meeting window. To show the thumbnails, click the Show Thumbnails icon. 7. Click Show Presenter Notes to see your notes. 8. Use the controls at the bottom of your meeting to annotate on the slides, use a laser pointer, insert an image, etc. Show Presenter Notes 9. To stop showing the PowerPoint presentation, click Stop Presenting. Annotation Tools Show Thumbnails
Insert a Whiteboard Use the whiteboard to post a note to everyone in the meeting or use as a fresh page on which to brainstorm. Everyone in the meeting can write and draw on the whiteboard. Click Share in your meeting. On the Share drop down menu, click New Whiteboard. 3. A whiteboards page will be inserted in the Stage area. 4. To start writing or drawing on the whiteboard, use the tools on the bottom of the meeting. 5. Click Stop Sharing when you are done.
Meeting attachments To add a file to your meeting, such as a hand out or your presentation for the participants to download: 2. Select the file that you want to upload and then click Open. • By default everyone in the meeting can save the attachment locally. To control access, click the arrow next to the file, point to Make Available to and choose one of the following: Meeting Organizer, Presenters, Everyone. You can change the access level anytime during the meeting. Participants in the meeting can click the Add or View Attachment button and then click the file to download it locally. • Click the Add or view attachments button.
Record a Meeting To record a meeting: Click the More Options button in your meeting and then click Start Recording. The Pause and Stop commands become available at the bottom of the meeting window. Click the Stop button and customize the options on theStop Recording window if needed. By default, Lync saves your recordings in Lync recording format in the location:C:\Users\username\LyncRecordings.Click Browse… to save your recording to a different location. By default the option to save the recording in (.wmv) format is also enabled. If not, check Also create a version that you can publish to others (.wmv) box. This option saves your recording in a single .wmv video format, which you can send to others.