Download
1 / 5
50 likes | 56 Views
SMART Tip Sheets Encounters. INSTITUTE FOR GOVERNMENTAL SERVICE & RESEARCH. Encounters Billable Notes Miscellaneous Notes Encounter Reports.

E N D
SMART Tip SheetsEncounters INSTITUTE FOR GOVERNMENTAL SERVICE & RESEARCH Encounters Billable Notes Miscellaneous Notes Encounter Reports This tip sheet outlines the procedures to document treatment encounters, ancillary services provided by the treatment provider, progress notes and miscellaneous notes rendered by providers. Total Pages: 5 IGSR Technical Support: 301.397.2330 October 2014
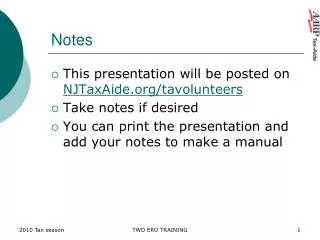
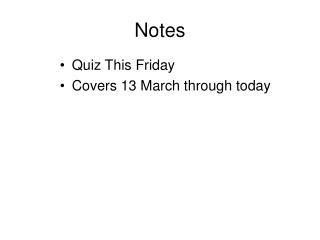
To access the Encounters module, click Encounters from the Left Menu bar Click Add Encounter Record to enter a new Encounter Encounters Background: This module allows you to document client encounters and associated notes. • Entry Steps: Client List, select client, BHA/ADAA Admission/Enrollment, Activity List. • Encounters: To enter an encounter for a client (e.g. individual counseling, etc.). Click Encounters from the left menu bar, click the Add Encounter Record. Note: Click on Review in the Actions Column to review prior entries. • Complete at all required system and agency fields. Note: If the client is a drug court client please enter the Outcome to ensure that it appears on the Client Progress Report. • Click to advance to the next screen. Click to advance to the next screen
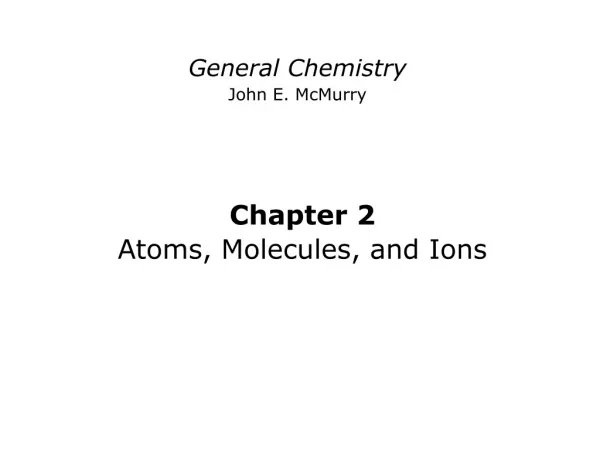
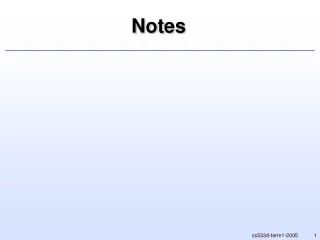
If you would like to share this note with another agency, select Yes to release these notes. When finished, click to advance to the next screen. Encounters - Notes Background: This module allows you to document client encounters and associated notes for services rendered. • Associated Goals & Objectives: If the client has a Treatment Plan in SMART, the associated goals and objectives that were addressed in each particular session by clicking Add Goal or Add Objective and selecting the appropriate ones. • Signed/Unsigned Notes: This screen contains a Signed/Unsigned note function. To make an editable note, enter your note in the Unsigned Note field and click Save or Finish. However, to electronically sign the note (thereby making it uneditable), enter the note in the Unsigned Note box and then click Sign Note. Note:If the signed note contained erroneous information or if you need to enter more data, simply enter the new information in the Unsigned Note box and click Sign Note again. • Release these Notes: Release these Notes defaults to ‘No”, meaning that the note will not be consented even if the encounter is module is consented to another agency. By selecting ‘Yes’, if encounters are shared through the consent process, this note will also be included . • Click to advance to the Ancillary Services Screen. • Click Save or Finish after completing the last screen. • To print a list of Encounters for this client, including the notes, click Print Report and a report will generate. To sign a note, click Sign Note. To print a report of encounters, click Print Report.
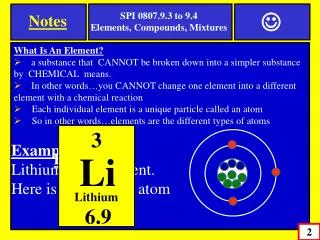
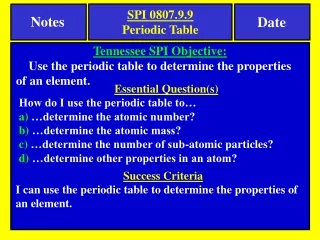
To enter a new Miscellaneous Note, click Add New Misc. Note To access Miscellaneous Notes, click Notes Miscellaneous Notes Background: This module documents Miscellaneous Notes (e.g. phone calls, emails, crisis, etc.) • Entry Steps: Login, Select Facility, Client List, select client, Activity List. • From the Activity List, click Notes, then click Add New Misc. Note. Complete all system and agency required fields. • Signed/Unsigned Notes: This screen contains a Signed/ Unsigned note function. To make an editable note, enter your note in the Unsigned Note field and click Save or Finish. However, to electronically sign the note (thereby making it uneditable), enter the note in the Unsigned Note box and then click Sign Note. Note:If the signed note contained erroneous information or if you need to enter more data, simply enter the new information in the Unsigned Note box and click Sign Note again. • Release these Notes:Release these Notes defaults to ‘No”, meaning that the note will not be consented even if the encounter is module is consented to another agency. By selecting ‘Yes’, if encounters are shared through the consent process, this note will also be included . • Click on Save or Finish. Helpful Hint: A. Use the Alert feature by clicking the Alert hyperlink to indicate if the client requires immediate follow-up. The client’s name will appear in Red on the Client List if the Alert feature is used. B. The Miscellaneous Notes screen becomes non-editable once you click Save or Finish. • Miscellaneous Notes Report: After clicking Save and while you are still within the encounter record, single-click the Print Report icon to generate a report of the listed notes for this particular client. To print a report of the Miscellaneous Notes for this client, click Print Report Click Finish, when done. Click Sign Notes to sign your notes.
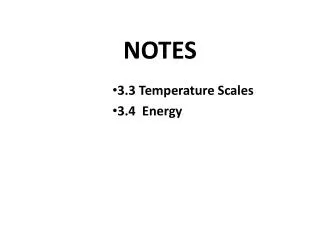
Click Print Notes to print all notes for this client, Encounters and Miscellaneous Notes. Print Notes Background: This function allows you to generate all notes for a particular client, including the Encounters and the Miscellaneous Notes. • Print All Notes: From the Left Menu Bar, click Notes on to pull up the Notes List screen. This generates both the Encounters and the Miscellaneous Notes. • Click Print Notesat the top right. • Enter the desired date range (e.g. 1/1/09:2/1/09) in the Note Date field, and click Go. • Click Export to export your data in MS Excel, where the data can be saved to a local machine and reports and queries can be written . Note: Please be sure that when exporting client information that all efforts are made to adhere to Title 42 Code of Federal Regulations and HIPAA. • ClickFinish to return to the Notes List screen. Enter the date range, and click Go to generate the report.