Download
1 / 26
260 likes | 423 Views
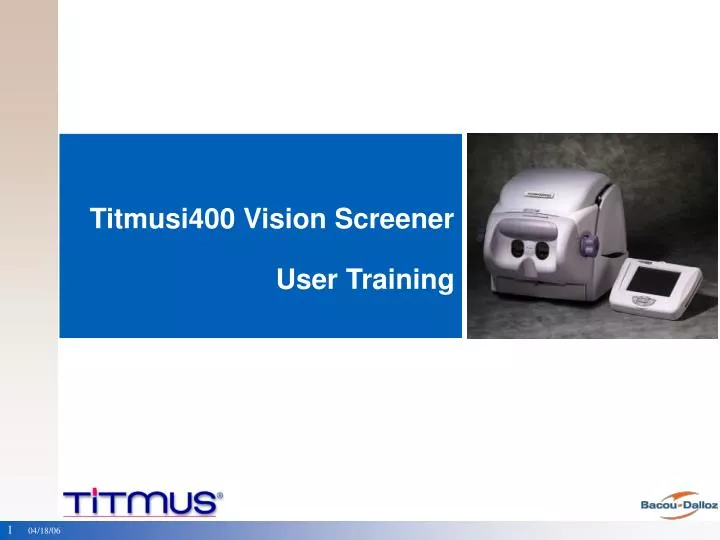
Titmusi400 Vision Screener User Training. Overview Introduction Step 1 - Unpacking the vision screener Step 2 - Review Features Step 3 - Testing Far / Near vision testing Patient Seating Height Adjustment Step 4 - Care and Maintenance. Titmusi400 Vision Screener Introduction.

E N D
Overview • Introduction • Step 1 - Unpacking the vision screener • Step 2 - Review Features • Step 3 - Testing • Far / Near vision testing • Patient Seating • Height Adjustment • Step 4 - Care and Maintenance
The TITMUSi400 Vision Screener • ONE instrument with a variety of screening tests • Device with controlled test distance for FAR / NEAR vision, hence precision and accuracy • Simple to learn and user-friendly • Can complete a comprehensive tests in 5-10 minutes • Many more tests and better control as compared to a wall chart
TITMUSi400 Features • Ergonomics – proper position while testing • Membrane panel for ease of testing • Built-in Portability • New Fluorescent Light Source – long life • Electronic sensing of correct head position • Foam Headrest – no more head rest tissues (paper) • Many advantages over the earlier Models (OV7, TII, T2)
Unpacking • If received in case, remove instrument from case using handle • Unlock the handle (use BOTH hands)
Unpacking • Unlock bottom lock using one hand to pull tab and other hand to raise instrument • Lift and remove membrane panel. Not tabs to mount back
Unpacking • Remove internal packing foam • Turn knobs so that white dot matches purple dot (USE BOTH HANDS TO TURN KNOBS)
TITMUSi400 – External Features • Handle for transport • Top Cover to access slides • Slot for plus lens • Lever for Far/near lens • Foam Headrest • Electronic head sensor • Lens for Far/Near • Handle unlock • Knob to raise/lower instrument • Instrument unlock • Side pocket
TITMUSi400 – External Features • Membrane Panel • Handle • Fuse • ON/OFF switch
TITMUSi400 – Membrane Panel • Bulb condition indicator • Peripheral vision screening • Day/night illumination • Test slide advance/reverse • Slide position indicators • Reset • Head position indicator, sensor deactivate • Left/Right eye occlusion (activate shutters) • Test distance indicator (far/near/intermediate)
Operating Far/Near Lever • Operator can sit on any side of instrument • Pull to move far/near lever towards you, push away to move away from you • FAR (mountain), NEAR (book)
Far Vision Testing • Lever in FAR position • Ensure drum assembly is in FAR position. White dot on knob should match purple dot
Near Vision, Natural Line of Sight • Lever in NEAR position, test at optimal line of sight • Turn BOTH knobs so the progressive lens wearer can see most clearly (natural line of sight – looking downwards)
Using intermediate lens • Ensure lever is in FAR position • Place intermediate lens with label facing the front • DO NOT turn knob when int. lens is in the instrument
Patient Seating • Ensure patient is comfortably seated – straight back, forehead placed on headrest • INCORRECT position – back not straight, neck tilted backwards
Patient Seating • Patient correctly seated will activate the head sensor • When head sensor is activated, slides can be seen (clicking sound of the shutters opening) • If a patient tends to move his/her head a lot, shutters will open/close. In this case, override the sensor
Height adjustment • Instrument is designed for patient comfort in order to test efficiently and accurately • Can fit children or adults, standing or seated • To raise/lower the instrument – use BOTH hands on the knobs
Preparation for testing • Place instrument on table of sufficient height • Unlock handle, bottom lock and raise instrument • First connect panel to instrument as shown using panel cord. Then connect power cord to instrument and turn switch ON. • Test all membrane switches on membrane panel to ensure proper operation • Ensure lenses are clean, use cleaning towlettes or fog cloths
Preparation for testing • Place record forms near instrument • Avoid positioning the instrument near strong glaring light to prevent glare while testing • Ensure patient is comfortably seated • Raise the instrument for comfortable viewing, based on patient height • Ensure lever is in FAR position • Ensure drum assembly is in FAR position. White dot on knob should match purple dot.
Care and Maintenance • Clean viewing lenses as needed, use towlettes supplied in accessory case • Clean headrest between tests using a disinfectant solution.
Care and Maintenance • Exterior of instrument may be cleaned with a soft cloth dampened in mild solution of soap and water • Test slides are in a completely enclosed module, hence cleaning is rarely required • Use dust cover to protect instrument when not in use • Slide illumination lamp has a life of over 10,000 hours. Membrane panel will indicate if it needs replaced.