Download
1 / 26
270 likes | 683 Views
Digitizing. Katie Stanley 3-20-03. Overview. Manual Digitizing Heads-up Digitizing Common Errors Summary Heads-up Digitizing Tutorial. Manual Digitizing. Simplest , easiest, and cheapest method of capturing vector data from existing hardcopy maps

E N D
Digitizing Katie Stanley 3-20-03
Overview • Manual Digitizing • Heads-up Digitizing • Common Errors • Summary • Heads-up Digitizing Tutorial
Manual Digitizing • Simplest , easiest, and cheapest method of capturing vector data from existing hardcopy maps • Operates on the principle that it is possible to detect the locations of a cursor or puck passed over a table inlaid with a fine mesh of wires
Manual Digitizing (cont.) • Accuracies • 0.003 inch (.075 mm) to 0.010 inch (0.25 mm) • Tablets • 12” x 24” for small tasks • 50” x 32” for larger tasks
How to Digitize • Vertices defining point, line, and polygon objects are captured using manual or stream digitizing methods • Point Mode • Click on “puck” to define each vertex • Stream Mode
Control Points • Minimum of 4 known points (more are better) • Used to attach a real coordinate system to spatial data when digitizing • Often referred to as TIC’s • Generally, attempt to choose points to cover the extent of the map
Rubber Sheeting • Mathematical process used to approximate spatial coordinates for all features once a set of control points have been defined • Includes rotation, translations, and scale change
Stream Digitizing • Partially automates the digitizing process • Instructs the digitizer control software to automatically collect vertices every time a distance or time threshold is crossed • Much faster, but produces larger files with redundant coordinates
Heads-up Digitizing • The simplest way to create vectors from raster layers is to digitize vector objects manually straight off a computer screen using a mouse or digitizing cursor • Widely used for selective capture • E.g. land parcels, buildings, and utility assets
Common Errors • Overshoot – digitized line extends too far • Undershoot – digitized line too short • Dangling Arc – only one node at an endpoint • Dangling Node – only one arc attached • Unclosed Polygon – all arcs do not connect
Common Errors (cont.) • Slivers – boundaries of adjacent polygons overlap • Gaps – boundaries of polygons that supposedly share a common border don’t touch due to “double digitizing” • Attribute errors – attribute data entered incorrectly
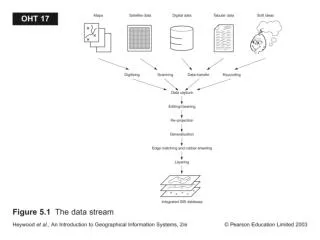
Manual Digitizing Summary • 5 steps for digitizing • Step 1 The map document is attached to the center of the digitizing table using sticky tape
Manual Digitizing Summary (cont). • Step 2 • Because a digitizing table uses a local rectilinear coordinate system, the map and the digitizer must be registered so that vector data can be captured in real-world coordinates. This is achieved by digitizing a series of four or more well distributed control points (also called reference points or tic marks) and then entering their real-world values. The digitizer control software (usually the GIS) will calculate a transformation matrix and then automatically apply this to any future coordinates that are captured.
Manual Digitizing Summary (cont.) • Step 3 • Before proceeding with data capture it is useful to spend some time examining a map to determine rules about which features are to be captured at what level of generalization. This type of information is often defined in a data capture project specification.
Manual Digitizing Summary (cont.) • Step 4 • Data capture involves recording the shape of vector objects using manual or stream mode digitizing. A common rule for vector GIS is to press button 2 on the digitizing cursor to start a line, button 1 for each intermediate vertex, and button 2 to finish a line. There are other similar rules to control how points and polygons are captured.
Manual Digitizing Summary (cont.) • Step 5 • Finally, after all objects have been captured it is necessary to check for any errors. Easy ways to do this include using software to identify geometric errors (such as polygons that do not close or lines that do not intersect), and producing a test plot that can be overlaid on the original document.
Overview • Labor Intensive ($$$) • Slow • Many potential inaccuracies • Requires rigorous editing
Heads-up Digitizing with ArcGIS • Add the new feature classes to the data frame that holds your source map • Turn on the Editor toolbar (View>Toolbars> Editor)
Heads-up Digitizing with ArcGIS (cont.) • Click Editor>Start Editing • Select the layer you’d like to edit from the Target drop-down list
Heads-up Digitizing with ArcGIS (cont.) • Select the Create New Feature task from the Task drop-down list • Click the sketch tool (pencil)
Heads-up Digitizing with ArcGIS (cont.) • If digitizing point features, a single left-click with the sketch tool will create a new point
Heads-up Digitizing with ArcGIS (cont.) • If digitizing line or polygon features, left-clicking will place a vertex. Vertices should be placed along the length of the map feature. A line or polygon feature is completed and added to the feature class by double-clicking on the last vertex or by right-clicking and choosing Finish Sketch
Heads-up Digitizing with ArcGIS (cont.) • After a feature is added click the Attributes button to access a dialog box where you can enter the attribute values for the newly added feature
Heads-up Digitizing with ArcGIS (cont.) • Continue digitizing features in the feature class. To add features to a different feature class, choose another layer in the Target drop-down list. • When all editing is complete, choose Editor>Stop Editing. • Note: it is a good idea to periodically save your work when digitizing a lot of features by clicking Editor>Save Edits