Download
1 / 11
110 likes | 117 Views
QC2 Process Steps. Quality Checking your Personnel Folders. The following steps are to be followed once SchoolFront has completed the scanning, QR Coding/Parsing, and the 1st round of QC (Quality Check) processes for your districts personnel files. . Navigate to “All Personnel Files”

E N D
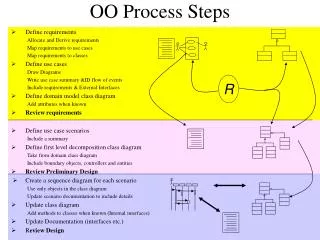
QC2 Process Steps Quality Checking your Personnel Folders
The following steps are to be followed once SchoolFront has completed the scanning, QR Coding/Parsing, and the 1st round of QC (Quality Check) processes for your districts personnel files. • Navigate to “All Personnel Files” • This will bring you to the grid, "District Personnel File Management".
To make sure you are completing the 2nd round of the QC process, next you will need to filter the records. For information on filtering, please see our article: "Filtering Records". • At the top of the grid, go to the following columns: • "Date Last Edited Column" - filter from the date provided to you by your SchoolFront account representative to ensure you are doing the final check of records that have already been checked by SchoolFront's QC1 process. • From QR Coded Scan – filter by “Checked”
A new screen will pop-up and you will enter the dates to have the records filter by. For the “From QR Coded Scan” Column, the pop-up will look like this:
Next, filter by Employee Name *You can save this search so you can re-visit the employee and by-pass the prior steps if you don't have time to get through the whole file: • Click the Binoculars next to the drop down Menu, "No Saved Searches" • Enter the Grid View Name you wish to save it as and Click Save • When you re-visit District File Management, this name will now appear as and option in the drop down menu now named "Saved Searches".
You will now see the employee and all of their consequential files and folders:
Once you have an employee displayed, you can also filter by the following: • Human Resource Folder Name • File Name • For example: Pre-Employment/References • Then your grid would look similar to this (we've blocked out the employee name here to show the example):
Viewing Employee Folders and Files • To verify that the file name is in the correct folder and vice versa, click the "View Icon" (circled in red): • This will then *download a PDF of the document. As long as the file type and it's corresponding folder are correct to what the document actually is, then you can move onto the next file. *It is recommended that after you have completed the QC process of the file, you remove the downloaded PDF’s from your computer.
Downloading PDF Packages to View • It may be helpful to compile a PDF package of the files. You can select multiple files to download as PDF’s and review them at once. This is helpful if you have more than one monitor, and want to review the PDF’s on one screen and make the changes in SchoolFront on another. • This can be accomplished a few different ways, depending on what you are in need of. You can click "PDF Package" link (circled in red) and that will download everything on your screen into 1 PDF file. • You can select files one at a time by checking the boxes (also shown in the red circle). Or you can select all files at once by clicking the black check mark box (black arrow pointing to it); or de-select files by checking the white check mark box (white arrow is pointing to it).
Changing the File/Folder • If a file needs to be moved to a different folder, click on the pencil icon:
Changing the Folder • A window will display and you can now change the file destination folder. Select the appropriate folder from the drop down and hit Save Changes. • The File Name field is editable here as well if this is incorrect.