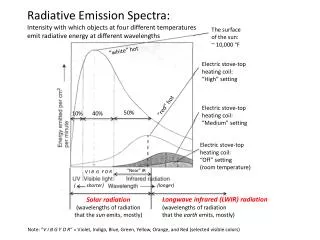
Download

1 / 78
780 likes | 800 Views
Heating Coil Simulation. Workshop 12 ANSYS CFX 5.7. Introduction. The objective is to set up, solve and post-process a simplified CFD problem which illustrates fluid flow and conjugate heat transfer.

E N D
Heating Coil Simulation Workshop 12 ANSYS CFX 5.7
Introduction • The objective is to set up, solve and post-process a simplified CFD problem which illustrates fluid flow and conjugate heat transfer. • The mesh resolution used in this workshop will not necessarily obtain accurate results, but will enable the participants to work through test cases in the limited time available.
Workshop Outline • Analysis of a heating coil surrounded by moving fluid • Open an existing workbench project containing the Design Modeler geometry • Open CFX Mesh: Set mesh parameters and create mesh • Preprocess: set fluid domain physics, boundary conditions, initial conditions, solver parameters • Solution: monitor residuals, review out files • Post-process
Heating Coil Workshop Double click on to start the CFX5.7 launcher ...
Getting Started • Ensure that the Working Directory is set • Copy the following files to your working directory • HeatCoil.wbdb & HeatCoil.agdb • Click on the CAD2Mesh icon to start the ANSYS Workbench environment
Starting CFX Mesh • Select Open Project and open the HeatCoil.wbdb database. • On the project page, select on the Design Modeler database HeatCoil.agdb • With the Design Modeler database selected, click on Generate CFX Mesh.
Mesher Environment • Mesher window appears as tab on the Project Page • Layout is similar to Design Modeler with parts tree on left • Meshing Progress from top to bottom of Tree • Feedback from mesher appears at bottom left
Mesher Environment • Perform tree functions by right-clicking on objects • Suppress or unsuppress geometry parts/bodies for easier viewing • Mouse Usage: • to rotate (default) • + shift to zoom • + ctrlto translate
Mesher Environment • Left clicking on selected objects in the tree allows you to change attributes of that object • To change the geometry view from solid (opaque) to transparent mode, left click on Geometry • Set % Transparency to 67 using the slider bar or by typing in a number. Experiment with different transparencies and shine
2D Region Creation 1 • Define 2D regions for placement of CFD boundary conditions • Right-click on Regions to Insert a new Composite 2D Region • Composite regions can consist of one or more surfaces
2D Region Creation 2 • Create the 2D Region “cinlet” to define the nearest end of the cylinder • To select a location on the geometry, click None under Composite 2D Region at bottom left • Pick the nearest end of the cylinder
Save Often • Save your work often ! • Save after each significant change to the mesh definition • Click Save As … and save in your working directory • For subsequent saves, simply click Save
2D Region Creation 3 • Surfaces selected for 2D regions will appear as green in the viewer window • Unfinished region definitions appear with a red-circled exclamation mark • Click Apply to finish defining the new 2D region. Marks should disappear
2D Region Creation 4 • Create 3 more 2D regions: • coutlet for the far end of the cylinder • hinlet for the end of the coil nearest to the inlet • houtlet for far end of the coil
2D Region Creation 7 • We will now create a region coil thatdefines the surfaces of the coil which will be in contact with the fluid. • Set the display to transparent so that the interior structures of the geometry become visible • Left click the Geometry object in the tree • Use the slider bar to adjust the transparency
2D Region Creation 9 • Orient the geometry so that you are viewing the side of the cylinder • Insert a new 2D Region “coil” • Click on None to set the Location • Box select the coil to include all the coil surfaces. Note that the ends of the coil have already been assigned to hinlet and houtlet
2D Region Creation 6 • All the selected coil surfaces should turn green. • Holding down the control key select the two end surfaces of the coil (previously defined as hinlet and houtlet) to deselect them • Click on apply to assign the selected surfaces
Mesh Controls 1 • Some parameters are required to control the density of the tetrahedral mesh produced by CFX-Mesh • Under Mesh in the Object Tree, click on Default body spacing and set to 0.12 mm. • Click on Default Face Spacing. Set Angular resolution to 30 Degrees, Minimum and Maximum Edge Lengths to 0.006 and 0.12 mm respectively
Mesh Controls 2 • Click on Inflation. Set the number of Inflated Layers to 3. Set the Expansion Factor to 1.7. • Inflation controls the mesh near the walls of the geometry (more later …) • Click on Options. Set Overwrite Existing GTM file to Yes.
Mesh Controls 3 • Click on Preview. This section of the tree controls mesh visualization. Set Mesh Render Mode to Wireframe • Set the mesh Face Colour Mode to Uniform and choose a color by clicking on the colored bar • Next, we will select the surfaces on which to display the finished mesh.
Mesh Preview 1 • Mesh Preview allows the definition of surfaces on which to view the mesh before exporting to CFD • Right click on Preview and Insert a Preview Group. Label the group “coilsurface”. • Click on None under Preview Group to select surfaces and box select the entire Coil • Click Apply to accept the selection
Mesh Preview 2 • Create a second Preview Group called “all” • Click on None to select the defining surfaces • Box Select the entire geometry • Click Apply to accept the selection
Mesh Generation 1 • CFX Mesh generates surface meshes first, then makes the volume mesh • To generate a surface mesh for the coil, left-click on the coilsurface Preview region and select Generate This Surface Mesh • A progress bar appears at the bottom of the window. • When the coil surface mesh is complete, it appears in the viewer
Mesh Generation 2 • To generate a surface mesh for the coil, left-click on the all Preview region and select Generate This Surface Mesh • A progress bar appears at the bottom of the window. • When the surface mesh is complete, it appears in the viewer
Mesh Generation 3 • Next we will define the characteristics of the mesh near the walls of the geometry • Insert Inflated Boundary “cylinder” and set the maximum thickness to 0.12 mm • Click on None next to Location box and select, the inner and outer cylinders. (Note: Use the control key for multiple selections) • Click on Apply to accept
Mesh Generation 4 • Now we will view the changes produced by defining inflation. • Click on Preview and Set Mesh Render Mode to Solid Face • Right-click on Preview region all and generate the surface mesh • Mesh appears as solid and shaded. The meshed surfaces shown represent the interface between the inflation layer and the tetrahedral mesh
Mesh Generation 5 • Generate the volume mesh (this step writes out a mesh *.gtm file) • Use the icon at the top right corner of the meshing window, • Or right click on the Mesh object in the tree • Volume meshing uses the constraints created during surface meshing • A progress bar will appear at the bottom left of the mesher window
Saving the Mesh file • Save the CFX Mesh database. • Return to the Project Page by clicking the Project Tab • Save the project and exit Workbench
Starting CFX-5 Pre • Click on CFX-Pre 5.7 • The CFX-Pre Splash Screen should appear
Starting CFX-5 Pre • Click on Open Simulation • Set the file type to be GTM Database • Select the GTM file written out by CFX Mesh (HeatCoil.gtm) • Click on Open to start CFX Pre.
Preprocessing 1 • Click on the Physics Tab to start defining the problem parameters • Click Create, Flow Objects and select Simulation Type. • Set the Simulation Type to Steady State. • Click Ok
Preprocessing 2 • Next we will define the working fluid around the coil • Click Create, Flow Objects and select Domain. • Call the Domain “fluid” • Click Ok to Edit the Domain
Preprocessing 3 • The Edit Domains Form has three sections • Under General Options set the location to B2.P3, the fluid to Water and the reference Pressure to 1 atm • Under Fluid Models, set the Heat Transfer Model to Thermal energy and the Turbulence Model to k-Epsilon
Preprocessing 4 • Under Initialization, set the fluid Relative Pressure to 0 Pa. This is the pressure relative to the reference pressure set for the domain • Click on the checkbox next to Turbulence Eddy Dissipation to set it • Leave the initialization as automatic • Click OK to save all the Domain settings and close the form Click on initial conditions checkbox to activate initialization
Preprocessing 5 • Note that the Tree at the left now has a new object called fluid • This is the domain created in the last few steps • Create a second domain and call it coil • Click OK to edit the coil domain
Preprocessing 6 • Set the Location to B1.P3. This should highlight the coil mesh in the viewer window • Set the Domain Type to Solid and select Copper from the Solids List • Under the Solid Models tab, note the the Heat Transfer Option is already set to Thermal Energy • Leave the Radiation Model as None
Preprocessing 7 • Click on Initial Conditions to Activate initialization • Set the Temperature Option to Automatic (this is default if the Initialization is not activated) • Click OK to save the domain settings and exit the form
Preprocessing 8 • Next we will specify a heat source in the coil location • Create a Subdomain • Label it “heatsource” • Make sure the Domain is set to coil • Click OK to accept the selection
Preprocessing 9 • Set the location to B1.P3 (Note: the heat source will be specified for the entire volume of the coil) • Under The Sources Tab, set the Energy Sources Option to Total Source • Specify a total heat source of 50 kg m^2 s^-3 (50 W) • Click OK to save the subdomain setting and exit the form
Preprocessing 10 • Next, we will create inlet and outlet boundary conditions to the fluid domain • Create a boundary condition called “inlet” • Make sure that the domain is set to fluid • Click OK to accept and specify the inlet conditions
Preprocessing 11 • Edit the inlet boundary conditions • Under Basic Settings, set the Boundary Type to Inlet and the Location to cinlet • Under Boundary Details, set the Normal Speed to 0.1 m/s and the Temperature to 300 K • Click OK to save the boundary settings and exit the form
Preprocessing 12 • Note that creating objects automatically adds them to the tree at left • To make changes to any object, simply double click to bring up the appropriate form • The inlet boundary is shown as flow arrows in the viewer • Create a second boundary condition called “outlet” for the domain fluid and click OK to edit it
Preprocessing 13 • Edit the outlet boundary conditions • Under Basic Settings, set the Boundary Type to Outlet and the Location to coutlet • Under Boundary Details, set the Mass and Momentum Option to Average Static Pressure • Set the Relative Pressure to 0 Pa • Click OK to save the boundary settings and exit the form
Preprocessing 14 • We are now ready to set the CFD Solver Specifications • Create a Solver Control Flow Object • This will bring up a form on which the discretization scheme and fluid/solid time scales can be set
Preprocessing 15 • For most problems, only the Basic Settings Tab is used • The default discretization is High Resolution and is also most accurate and robust. • The fluid will have a much shorter timescale than the solid • Use a physical timescale of 0.01 s for the fluid and 5 s for the solid • Set the Conservation target for equation balances to 0.01 • Click OK to save and exit the form
Preprocessing 16 (optional) • Click on File -- Export ccl to save the problem setup • Turn off ‘Save All Objects’ and select the Flow & Library objects. • Save the setup as coil.ccl • Saving setup files will allow the boundary conditions to be read in quickly if the grid is changed • The .ccl file is a text file that can be edited using any text editor
Preprocessing 17 • Click on File -- Write Solver (.def) file to write a file to the solver • Save the setup as HeatCoil.def • Set the Operation to Start Solver Manager and turn ON the Report Summary Interface Connections option. • Click OK to save and exit the form
Preprocessing 18 • Minimize the Solver Manager window. • Notice that a domain interface has been automatically created by PRE, to connect the fluid and solid domains. • Click OK on the information window. • Save the CFX Pre database and exit. • Restore the Solver Manager window.
Starting the Solver • On the Define Run form click on Start Run to start the solver
The Solver Manager Workspace • All the functions available from the icons at the top of the Solver Manager window are also available from the Workspace menu • Use the Workspace menu or the icon tool tips to see what various icons do • Note that once a workspace has been changed, this custom setting can be saved and recalled when needed