Download
1 / 11
110 likes | 306 Views
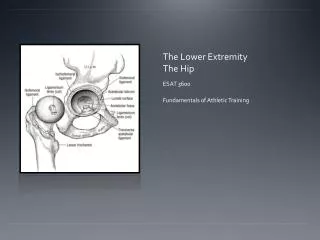
Lower Extremity H&P: Knee Exam. WEEK 1 ORTHO CURRICULUM. General Ortho Physical Exam Maneuvers. Inspection Palpation Range of Motion Stability Special Tests Always think about the joint above and below where the pain is and examine that joint. INSPECTION.

E N D
Lower Extremity H&P: Knee Exam WEEK 1 ORTHO CURRICULUM
General Ortho Physical Exam Maneuvers Inspection Palpation Range of Motion Stability Special Tests Always think about the joint above and below where the pain is and examine that joint
INSPECTION • Look for redness, swelling, warmth -> think septic arthritis • Look for effusion – occurs in acute injury • Is the effusion mild, moderate, or severe? • Look for displacement of the patella • Baker’s cyst – swelling over posterior aspect of the knee • Don’t forget to watch the patient walk • Is the patient able to bear weight? • Does the patient have an antalgic gait? (limping gait) Indicates pain with weight bearing
PALPATION • Grasp the lower extremity just distal to the knee and push upward, attempting to “milk” any effusion that may be present • If there is a significant effusion, you will see it fill the crevices on the medial and lateral sides of the patella • Palpate the patella – should be mobile • Palpate the entire knee, looking for any point tenderness • Evaluate joint line tenderness with the thumb
RANGE OF MOTION • Normal functional ROM • 3 degrees of hyperextension • 140 degrees of flexion • Always compare the symptomatic knee to the contralateral normal knee • Forced flexion • Patient with a meniscal tear will be unable to tolerate • Limited extension – consider meniscal tear or effusion • Hyperextension – consider PCL tear
STABILITY • Lachman • Evaluates for ACL injury • Posterior drawer • Evaluates for PCL injury • Varus and valgus stress • Evaluates for MCL, LCL injuries • McMurray • Evaluates for meniscal injury
Lachman With the knee flexed at 30 degrees, grasp the inner aspect of the calf with one hand, grasp outer aspect of distal thigh with the other hand Pull on the tibia to assess the amount of anterior motion of the tibia in comparison to the femur ACL injury – increased forward translation of the tibia at the end of movement
Posterior Drawer With the knee flexed to 90 degrees and the patient’s foot flat on the table, grasp the tibia with both hands and push posteriorly Laxity at the conclusion of movement is indicative of a PCL injury
Varus and Valgus Stress Place the patient’s leg over the examination table with one hand over the lateral joint line and the other hand holding the distal portion of the extremity Flex the knee to 30 degrees and apply a varus force (adduction), then apply a valgus force (abduction) Laxity with varus stress indicates LCL injury Laxity with valgus stress indicates MCL injury
McMurray With the knee flexed to 90 degrees, place one hand along the lateral joint line and grasp the foot with the other hand Provide a varus stress on the knee Rotate the leg externally and extend the knee If the patient experiences pain or a click is felt with the motion, a medial meniscal injury should be suspected A lateral meniscal injury can be evaluated with the same test by stabilizing the medial knee, internally rotating the leg and extending the knee
SPECIAL TESTS • Patellar apprehension test • Manually subluxate the patella laterally • In a pateller tendon injury, the patient will not tolerate this test • Patellar grind • Have the patient flex his quadricep, then apply a posteriorly-directed force to the patella • Apley’s test • With the patient prone, flex the affected knee to 90 degrees, grasp the foot and rotate the knee, applying a downward force • Reproduction of pain indicates a meniscal injury • Duck walk • Have the patient attempt to walk while in a squatting position • If the patient is able to walk, he/she likely does not have a meniscal injury Apley’s test Duck walk