Download
1 / 33
390 likes | 530 Views
Project: Seat Sensor System. Implemented in: Dinosaur – Disney’s Animal Kingdom Indiana Jones Adventure – Disneyland Indoors Action-adventure ride!. Presentation outline. Objective and specifications Review original design Construction and functional testing Design changes

E N D
Project: Seat Sensor System • Implemented in: • Dinosaur – Disney’s Animal Kingdom • Indiana Jones Adventure – Disneyland • Indoors • Action-adventure ride!
Presentation outline • Objective and specifications • Review original design • Construction and functional testing • Design changes • Performance and reliability testing • Conclusions
Objectives • Detect presence of person and state of seatbelt • Display output via LED • State 1: Unlatched and Unoccupied • State 2: Latched and Occupied • State 3: Unlatched and Occupied • State 4: Fault
Benefits • Enhance safety features • Automatically verifies seat occupancy • Automatically verifies seatbelt state • Increase hourly ride capacity • Eliminates need for manual seat check • Designed around existing ride equipment
Product Features • LED indicator • Counter to keep track of amount of guests • Affordable safety enhancement • No additional operators are needed • Potential for system expansion • Detect presence of person and state of seatbelt while ride is in motion
Performance Requirements • Indicates 4 states correctly • 99.99% reliability • Implemented with minimal equipment • Accommodate various weights • Waterproof and durable
Original Design • Block diagram Vehicle Control System Seat Sensors Control Logic and PLC Guest Operator LED Display PLC Display Seatbelt Sensors Power Supply
Design Considerations • Power conversion: 24VDC to 5VDC and back • Electrode design • QT310 parameter settings • Seat belt sensor design • PLC hardware and software
Construction: Seat Sensors • Seat sensors • Evaluation Board testing • Circuit construction with custom electrode • Electrode selection and testing • Parameter alteration • Integration
Power Conversions LM317: 28V to 4.87V Transistor: 4.87V to 17V
Construction: Seat Belt Sensors • Seat belt sensors • Hall-effect sensor • 300 Gauss activation • Rated 4.75 – 24V input voltage • Magnet selection • Field strength testing
Inputs – 24V logic 4 inputs for each seat QT310 seat sensor Seat belt sensor Fault Reset x 2 seats = 8 inputs Outputs – 24V logic 4 states for each seat Occupied, Latched Occupied, Unlatched Unoccupied, Unlatched Fault x 2 seats = 8 outputs Programmable Logic Controller (PLC) Signals
Construction: PLC • Read the manual • PLC: 600 pages • PLC programming software: 300 pages • DV-1000 Display: 200 pages • Wiring, programming and compilation • I/O and state testing • Debug and revise • Repeat
PLC Program • Ladder logic • Control relays • Timers • Counters • Implements • State decoder • Fault detection • Seat counters
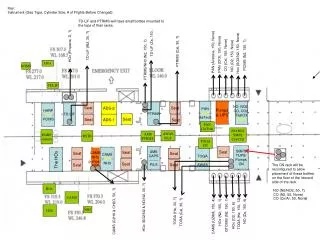
Construction: Integration • Interface sensors and PLC • Physical system construction • Seats and seat belts • Functionality testing and debugging • PCB and packaging
Design Changes: Fault • Original: XOR two sensors • BAD! • New: utilize heartbeat signal • 15us float superimposed on QT310 output, 20ms between beats
Design Changes: Fault • PLC scan time: 20ms. • Fault signal period: 40ms. • PLC Code • Timer resets with Fault input. • “If you can count up to 5… fault.” • PCB power outage, fried IC will trigger fault.
Design Changes • Electrode • 24V supply outputs 28V! • Seatbelt sensors not rated for 28V • Re-calculation of power conversions • Counting display • Added counter for each seat • Interface with DV-1000 display
Electrode Description Max Distance to Activate Sensor 1” Diameter thin metal circular disc with holes 1.25” 2”x3” Thick metal square with holes .63” 3.5”x3” Metal mesh screen 2” Testing • Electrode • Range small enough so as not to detect other seats • Range large enough to accommodate for human movement
Testing • Seat sensor • Various weights of humans tested (45kg, 55kg, 90kg) 50 times each • Output independent of weight • 100% reliability • Various theme park specific objects tested • Book , backpack, jacket, stuffed animal, water bottle, camera, I-Pod, snow globe • Sensor not activated
Seat Belt Sensor • Reliability Testing • Seat belt outputs 16.7VDC when triggered • Data over period of 50 trials per seat belt yields 100% reliable • Fulfills performance requirement of triggering at least 99.9% of time
Magnet data (w,l,t)
Seat belt Sensor • Magnet Placement
Testing: Water Tolerance • 0ml-1000ml in 100ml increments • Soaked cotton and placed it directly on the seat. • Up to 3L of water. • With tub, up to 5L. • Pass!
Design Challenges • PLC programming • Electrode selection • Component casualties • 1 voltage regulator • 3 QT310 chips • 1 latch • 1 resistor • 1 PLC output module
Successes • Met all performance requirements! • Indicates 4 states correctly • 99.99% reliability • Implemented with minimal equipment • Accommodate various weights • Waterproof and durable • Passed all performance tests!
Recommendations • Detect seat and state of seat belt while ride is in motion • Transmit outputs wirelessly • Display outputs on a computer screen instead of via LED’s • Automatic dispatch
Conclusion • It works! • Thanks Mo! • Thanks Disney! • Next step: • Present design to Walt Disney Imagineering • You could be sitting on this one day…