Download
1 / 34
340 likes | 487 Views
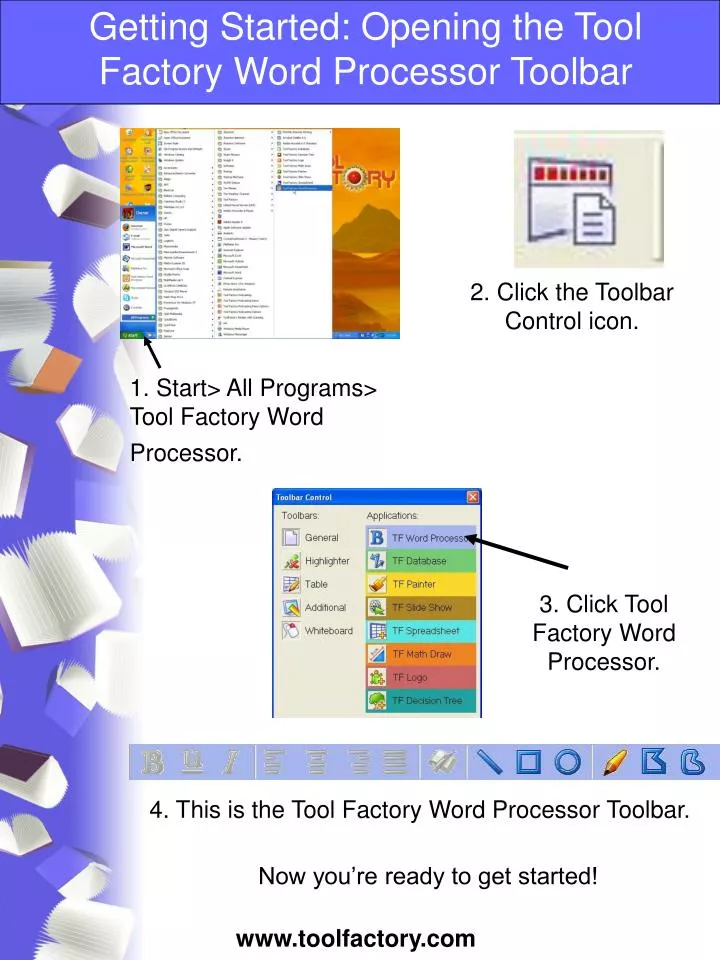
Getting Started: Opening the Tool Factory Word Processor Toolbar. 2. Click the Toolbar Control icon. 1. Start> All Programs> Tool Factory Word Processor. 3. Click Tool Factory Word Processor. 4. This is the Tool Factory Word Processor Toolbar. Now you’re ready to get started!.

E N D
Getting Started: Opening the Tool Factory Word Processor Toolbar 2. Click the Toolbar Control icon. 1. Start> All Programs> Tool Factory Word Processor. 3. Click Tool Factory Word Processor. 4. This is the Tool Factory Word Processor Toolbar. Now you’re ready to get started!
Getting Started: Personalize Tool Bars (CTRL+Shift+T) Click Toolbar Control button. + CTRL+Shift+T for Advanced Toolbar Controls.
Getting Started: Toolbar Explanations General Toolbar Highlighter Toolbar Table Toolbar Additional Toolbar Whiteboard Toolbar
Basic Tools: How to Add and Reposition Text Click anywhere on the page and start typing! Click and drag to reposition. Adjust column width. Drag any corner to resize. Click and drag to rotate.
Basic Tools: How to Copy/Cut/Paste Text Click on the text to select it, or drag a rectangle around it to select. Click either Copy or Cut buttons on the General Toolbar. Click on the page where you would like the text to be pasted. Click the Paste button on the General Toolbar.
Basic Tools: Draw and Reposition Graphics To create a polygon click the button then click on the screen and at every corner. Right click to end. Click and drag to create a line. For a curved polygon click at each peak. Right click to end. Double click to select, click and drag to move. Right click the polygon button to pick pre-drawn shapes.
Basic Tools: Copy/Cut/ and Paste Graphics To Select - Double click or click-and-drag a rectangle around the graphic. Use the handles for transformations. On the General Toolbar click Copy or Cut. Click on the page where you would like your graphic to be pasted and click Paste. Copy Cut Paste
Basic Tools: Adding and Repositioning Images Open the Resource Bank. Find an image by searching through the folders or by entering keywords in the Search box. Once you have found your image drag it onto the page. To move the image click and hold in the center of the image and drag it to the desired position.
Basic Tools: Copy/Cut/and Paste Images To select the image on the page click, hold and drag your mouse over the image or click the image. A red dotted box will appear around the image. Copy Cut Paste On the General Toolbar click either Copy or Cut then select where you want your image to be pasted and click Paste.
Basic Tools: Adding Sound Use the Search box or find your desired sound in a folder. Click this button to open the Resource Bank. Click here. Drag the sound file onto the page and click the icon to make it play.
Basic Tools: Adding Video Click this button to open the Resource Bank. Use the Search option or find a video in one of the folders. Play Drag your video onto the page. To watch it click the Play button.
Basic Tools: Spell Checker and Dictionary Tool Factory Word Processor highlights misspelled words. Click the Spell Check button in the Word Processor Toolbar. Choose a word and click replace. Click next to get to the next misspelled word. Clicking the dictionary checkbox gives you a wider wordlist to choose from.
Basic Speech: Click on the Speech Button Place your cursor in front of the words you want spoken and click the Speech button. The program will speak your text in a computer voice.
Speech: Advanced Speech Options Click to hear text spoken. Select Tools>Options on the Menu bar. Click the Speech tab. Speak on click. Continuous Speak as you type Letters Sounds Part Words Words Sentences
Tools: Graphics Tools Click either Draw, Polygon, or Curved Polygon on the Word Processor Toolbar and click on the page to create your graphic. Freehand Drawing When making a polygon, each left click begins a new line. To end the polygon either make the sides connect or right click. When making a curved polygon, each left click begins a new line. To end the polygon either make the sides connect or right click.
Tools: Graphics Effects Select your graphic and click the Effects button to open the Graphics Effects panel. Edit graphic style 4 Tabs Edit graphic line color Edit graphic fill color Add arrows to your graphic
Tools: Page Effects To access the Page Setup options click on File>Page Setup or click on the Page Setup button to access these menus: Page Tab Adjust page dimensions and paper size. Viewer Tab Adjust what is seen on the page. Background Tab Change the background of your page.
Tools: How to Group Items Together Select all the items you wish you group together. Click here to group the items together.
Text Tools: Text Effects Select your text and click the Effects button or go to Effects>Effects Window. Use the five tabs for your desired effect. The more colors option. Alternately you can access some of the Text Effects from the Word Processor toolbar.
Text Tools: Highlighters Select a color. Left click and drag your mouse across the text. Click this button and repeat the highlighting process to remove the highlight.
Text Tools: Size and Color Gradients Click the Effects button and change the size or color of the first and last letter of the sentence you wish to grade. Click on Effects>Grade on the Menu bar or click CTRL+G. Here is a finished color graded sentence!
Text Tools: Text Frames Click on the page where you want your text frame to appear and on the Menu bar go to Other>Add Text Frame. To create a Newspaper column, first place two text frames side by side. Then, on the Menu bar go to Other>Add Flow/Flow Text. Lock the text frame to the page by going to Other>Lock to Page on the Menu bar. Your text will now flow effortlessly from one column to the other.
Page Tools: Add Additional Pages On the Menu bar click File>Pages Before Current Page After Current Page Cut Page Delete Page TIP: You can also add a page by clicking at the bottom of the page and hitting Enter on the keyboard.
Page Tools: Add Page Numbers Click where you want the page number to appear. Go to Tools>Insert Page Number or press CTRL+P.
Page Tools: Headers and Footers Select the desired text for a header or footer and drag it to where you would like the header or footer to be positioned. All Pages Odd Pages Only On the Menu bar go to Other>Header/Footer and choose if you would like it to apply to all pages or odd pages. Page 1 Here is an example of a finished footer and header.
Page Tools: Lock Objects to Page/Layering Objects Locking to Page 1. Select the object by clicking on it. 2. On the Menu bar go to Tools>Lock to Page. Unlock Items To access a locked item go to Tools>Access Locked Items on the Menu bar. Layering Objects 1. Overlap two objects. 2. Select one object. 3. On the Menu bar click Tools>Move Lower or Move Higher. TIP: CTRL+H raises the selected object while CTRL+L lowers it.
Special Features: Create a Word Bank On the Menu bar go to Other>Create a Word Bank. Enter words into the Word Bank. To save your Word Bank, in the Word Bank go to File>Save. After saving, your Word Bank can be found in the Bank folder inside the Tool Factory Word Processor Folder. You can also designate a path for it to be saved under if you prefer.
Special Features: Draw a Table First activate the Table Toolbar. or On the Menu bar go to Toolbars>Table. Go to the Toolbar Control button and click Table. Click the New Table icon. Click, hold, and drag your mouse across the page to create a table.
Making Links: Create a Link to Another File Place a graphic on the page from the Resource Bank, click on it to select it, and then click on the Links button. Click Browse and locate the file you wish to link to the graphic. “Close Linked File When Current File is Closed” is optional.
Making Links: Create an Animated Page 1. Place a graphic and a line onto the page. 2. Left click the graphic and right click the line. 3. Click the Link button on the Additional Toolbar. 4. Click the Follow Over check box. Now close the Links panel and click the graphic to watch it move across the line.
Making Links: Hide/Show an Object Place a graphic on the page, select it, and click the Link button. Hide When Over. Show When Over. Hide/Show on Click for ___ Seconds. Hidden on Open.
Making Links: Link Sound to an Object 1. Drag a graphic and a sound onto the page. 2. Left click the graphic, right click the sound. 3. Click the Link button. Check the Say box to link written text next to the Say box to the graphic. Check the Sound option to link the graphic and audio file. Click the red Record button to link a recording of your own to the graphic.
Special Features: Record a Sound or Click the Record a Sound button on the Additional Toolbar. On the Menu bar click Tools>Record a Sound. For this feature to work you must have a microphone plugged into your computer.
Special Features: Saving and Networking In the Menu bar click Tools>Choose Options and Templates Folder. Choose which folder you want to save the file under. To access it from another computer just open the folder the file is stored in. You can save different options for different groups. On the Menu bar go to Tools>Options. In the Options Panel click on the dropdown box that says Default and enter a new name. That is now your new group. To lock access to these files, under the Options panel enter a Key. After doing this you can then check Administration, Bank, or both to determine what gets locked off. Click Ok.