Download

1 / 30
300 likes | 376 Views
Welcome to SciTech ePlanner. Planning your Grades 7 & 8 Science & Technology program just got easier…. What is SciTech ePlanner ?. SciTech ePlanner enables you to:. Enter and store class/student data Plan and store lessons and units Meet required curriculum expectations

E N D
Welcome to SciTech ePlanner Planning your Grades 7 & 8 Science & Technology program just got easier…
What is SciTech ePlanner? SciTech ePlanner enables you to: • Enter and store class/student data • Plan and store lessons and units • Meet required curriculum expectations • Assess student achievement • Generate term and year reports
SciTech ePlanner A quick tour
Step 1: CLASS/STUDENT SETUP
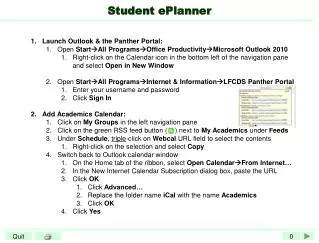
Enter setup menu SELECT CLASS/STUDENT SETUP from the Main Menu
Add class data Enter the class code Select grade level Enter the school year As you enter it, class data will be recorded in the appropriate student setup fields
Add student data Populate your class manually or Import a class list from your school’s database Print your class list by clicking on the print button Now you’re ready to start PLANNING
Step 2: Create a Unit Plan
Enter Planning Menu Click PLANNING on the Main Menu
Enter Unit Plan details Enter a name for your plan Enter the start and finish date Select term Select the grade level The unit plan details you’ve entered will appear in the top right of the screen.
Add units Click on units from the scroll-down menu to add them to your plan If you’re teaching a split 7/8 class, add units from each grade level to your plan by using the drop-down menu
Add sections and lessons Select lessons from the scroll-down menu Select the unit Optional: create and add your own lessons to the plan SciTech ePlanner records your lessons and displays the achievement categories being addressed.
Choose assessment opportunities Click on any section/lesson Nelson assessment opportunities for selected section appear here. Click to select. Optional: You can create and add your own assessment opportunities.
Completing assessment setup For each assessment opportunity you select, do the following: 1. Assign a weight 2. Assign a due date Optional : enter an “Out of” mark Repeat these steps for each assessment opportunity in your Unit Plan Note: Guidelines for weighting assessments are outlined in the manual
Your planning is now complete.You are ready to startrecording student achievement.
Step 3: Enter Assessment Data
Enter Assessment Menu Click ASSESSMENT on the Main Menu
Enter Student Assessment Data Select a Unit Plan You’ve completed ASSESSMENT SETUP as part of your planning Click ENTER ASSESSMENT DATA In CLASS OVERVIEW you can view, edit, and print student assessment data
Select a lesson and enter marks Select a class from the list Select a student Now select an assessment opportunity from the drop-down menu The achievement category assigned to this opportunity will be highlighted
Enter student data Enter mark Enter date handed in Select level of achievement for highlighted categories
Enter student data Use the arrow keys to scroll through the class list to enter assessment data for each student Select a new assessment opportunity and repeat the steps above until all marks have been entered. Click NEXT to continue to the CLASS OVERVIEW
Class Overview Select Class Term, mark, status and achievement level for the selected assessment opportunity will appear for each student.
Step 4: Evaluate & Report
Enter Evaluation/Reporting menu Select EVALUATION/REPORTING from the Main Menu
Select report STUDENT OVERVIEW allows you to review, edit, and print a report for a student. CLASS OVERVIEW allows you to review, edit, print and export assessment data for a class. YEAR OVERVIEW allows you to review, edit, and print student data.
Student Overview Select STUDENT OVERVIEW overview from the menu
Student Overview Select term Select class Select student Add comments & final term grade A summary of student achievement levels in the four categories appears here Click NEXT to advance to CLASS OVERVIEW
Class Overview Select term Select class Review comments & final term grade -revise if necessary Click PRINT to print a report or EXPORT term assessment data to prepare your term reports Click NEXT to advance to YEAR OVERVIEW
Year Overview Select class Review term grades Use Replace Grade to revise term grades Click PRINT to print data or Click FINISH to return to the EVALUATION MENU
Contact your Sales Representative for more information on SciTech ePlanner