Download
1 / 96
1.03k likes | 1.55k Views
Autumn 2003. National Remodelling Team (NRT). © 2003 National Remodelling Team. Remodelling Resources Remodelling Tools V4.1 03.09.03. Module overview. Purpose

E N D
Autumn 2003 National RemodellingTeam (NRT) © 2003 National Remodelling Team Remodelling Resources Remodelling Tools V4.1 03.09.03
Module overview Purpose • The remodelling tools module contains descriptions of a number of tools that may provide valuable help to schools involved in remodelling; the tools are offered in addition to those that a school may already use effectively • The tools help teams to work more effectively; they create inclusion and build commitment • Each tool is described clearly and succinctly so that schools are able to use them readily without the need for training Audience • Remodelling tools will be experienced by everyone who is actively involved in remodelling in schools - SCTs, Consultant Leaders, LEA Remodelling Advisers etc
Remodelling tools summary Tool/technique What is it? When would you use it? Why would you use it? Mobili-sation Discover Deepen Develop Deliver Brainstorming A technique to capture free flowing ideas from a group. 3 3 3 3 To generate wide-ranging ideas in a group. SWOT A framework for structuring an organisation’s strengths, weaknesses, opportunities and threats. 3 To identify and focus upon areas. Brownpaper Technique A technique that uses a large area of brown paper upon which is typically mapped a process – it therefore provides a “high touch” visual representation of a process, including activities, interfaces, decision points and information sources. 3 To enable the school to understand the processes impacted by potential issues. It is also a good technique to gain team by-in involvement. Fishbone Analysis and Five Whys Techniques to help understand the root causes of issues. 3 To understand underlying causes. DILO A technique to map a “Day In the Life Of” a role in the school. 3 3 To understand how roles impact varies. Force-field Analysis A “View” of change in an organisation which maps forces pushing towards change and forces restraining change. 3 To identify the most effective ways to bring about change. Prioritisation Matrix A technique for helping to prioritise options. 3 3 To prioritise options. PSTB Problem Solving/Team Building – a structured approach to problem solving. 3 3 To take an issue and develop an action plan. Six Thinking Hats A way of raising awareness about different styles of thinking. 3 3 To work more efficiently in diverse groups. Stakeholder Mapping A tool to identify the change project’s stakeholders and increase their support. 3 3 3 3 3 To identify ways to align stakeholders.
Remodelling tools – contents Brainstorming Brownpaper Technique Day In the Life Of (DILO) Fishbone Analysis andFive Whys Force-field Analysis Prioritisation Matrix Problem Solving/TeamBuilding (PSTB) Six Thinking Hats Stakeholder Mapping SWOT
Brainstorming What is it? • “The best way to have a good idea is to have lots of ideas” • A technique to capture a group’s ideas relating to a topic or issue • Idea is to capture as many free-flowing ideas as possible When would you use it? • Whenever you have an idea that needs “working” • Whenever you need to involve other people in exploring an issue or idea • Whenever you need to involve other people to explore an issue and/or its resolution
Brainstorming Are there any rules? • People MUST feel free to contribute ideas in a creative manner and so: • No criticism eg “Oh what a silly idea” • No idea is a bad idea • “Free Wheeling” welcome • Quantity of ideas is needed – don’t hang back from just saying what is in your head • No questions during the session • State ideas quickly and in a manner in which no enlargement is needed • Don’t mind stating the obvious • Don’t fear repetition • Do combine and improve on other ideas • Be considerate of the different styles people display during brainstorming – try and create the right environment for everyone to contribute Are there any variations on this tool? • If the group is very large, you may split the group into sub-groups and combine the results at a later stage
Roles In brainstorming it is important that the roles are clear and that one person does not try to undertake two roles • Issue Owner – the person who wants the answer or the output • Facilitator – the person who is facilitating the session and whose tasks are set out on the following slide • Expert – may be an expert in the subject matter • Contributors – people contributing towards the brainstorm
How is it run? • Pre-work • Think about who should be invited – SCT or others? • How are you going to explain clearly what the issue is? • What structure needs to be designed? • One topic area or sub-sets? • Everyone works on everything or break into groups working on parts? • One session or multiple sessions? • Length of session? • Does the brainstorming form part of another activity? • Suggestions: • Keep focused upon the subject • Develop and maintain a tight brief • Keep to time
How is it run? • The session itself ... • The facilitator should run and control the process and should capture ideas with no judgements and contribute few ideas themselves • The facilitator should clearly state the problem or issue and ensure everyone understands • The process/structure should be clearly explained • If there is a time limit, this should be explained • The group should then be encouraged to start contributing ideas • The scribe should note ALL ideas as given – no judgements should be made • After the brainstorming time ... • Any points of clarification can be requested • The group can examine the ideas one by one and either expand, combine or eliminate some • Ideas can then be grouped if they are saying the same thing • If the ideas require prioritising, participants may then be invited to place Post-It notes on the resulting flipcharts with their personal votes for the first, second and third highest positions • The final results should be distributed
How is it run? • What are the outputs? • A wide variety of ideas in a short space of time • If required, a visible output eg a series of flipcharts then summarised into typed or graphical format • Brainstorming can be run as a “3 level” process • Level 1 – Idea generation: objective = volume of ideas • Level 2 – Idea grouping into common themes: objective = structure ideas into common themes • Level 3 – review ideas across themes to see if common threads can be found: objective = identify “nugget” ideas that run across groups/themes
Remodelling tools – contents Brainstorming Brownpaper Technique Day In the Life Of (DILO) Fishbone Analysis andFive Whys Force-field Analysis Prioritisation Matrix Problem Solving/TeamBuilding (PSTB) Six Thinking Hats Stakeholder Mapping SWOT
Brownpaper technique What is it? • The brownpaper technique demonstrates a team building approach that uses the power of the team to develop views on where workload issues might be • A brownpaper is a visual wall display (usually created on brown wrapping paper typically 3ft high and up to 60 ft long) • It documents an entire process or situation • It provides a “high touch” visual of an entire process • It details the actual steps taken and highlights all activities, interfaces, decision points and information sources • The focus for the brownpaper exercise may be chosen by the SCT based on the broad findings presented in the Discover stage
The brownpaper technique can be applied to a variety of processes and in a variety of situations • For example: • As is – actual process in use today • Should be – process or group of activities according to new idea or proposal • Could be – desired activities/process • To be – model for implementation • A key objective of the brownpaper technique is that the SCT explore together the processes or sets of activities under review and their associated strengths and opportunities • Working in this way increases the buy-in and ownership in the results and the remodelling process as a whole • The brownpaper technique can be one of the most powerful and important techniques to build momentum in a change process • The technique can also be used to portray the various parties or roles involved in the process (sometimes called “swim lanes”)
Brownpaper creation has two distinct phases: development and evaluation Development • Brownpaper development is a fact-gathering exercise and as such, all ideas are good ideas • No value judgements are made while the brownpaper is being developed and it is acceptable for participants to disagree on their interpretation of the process Evaluation • Evaluation of the brownpaper is performed after the process/activity flow has been finalised • The results are evaluated for completeness, scale and scope of activities and participation in the processes/activities being investigated • It is imperative that the brownpaper is signed off by the SCT as an accurate picture of the process or activities under review
The brownpaper technique process • Brownpaper creation is iterative; the process flows should be mapped out first in draft using pencil (or with Post-Its) and verified before a final brownpaper is produced. Four stages are normally used to document a process: Step 1 Initial Briefing – oral walkthrough by knowledgeable resource. Take notes and get a good understanding. Step 2 Rough Draft – block out the major flow in pencil on brownpaper with the knowledgeable resource. Use Post-It notes with details on to increase flexibility and reduce rework time. Check for accuracy. Step 3 Brownpaper – use coloured markers to draw the process flow on the brownpaper. Augment the process flow with examples of documents and explanatory narrative. Step 4 Evaluate – creatively display strengths, problems and opportunities that appear in the rough draft (eg rework loops, time lags, multiple approvals). Get sign-off by appropriate members of the SCT and school staff
Each stage of the brownpaper development should phase-in more staff involvement • (Steps 1 and 2) • Start with as few people as possible, specify those people closest to the related work activities • (Step 3) Check accuracy with a few different people • (Step 4) Get strength and opportunity input from a few more people • (Step 4) Final review and sign-off on the brownpaper by participants and key individuals
Conducting initial briefings allows us to gain a good understanding of either the parts or whole of a process under review and identify issues and opportunities • When opening the briefing session, make the appropriate introductions and explain the purpose of the session • It is difficult to draw an ordered process flowchart from scratch when learning about the process. Therefore explain that diagrams and notes produced during the process will probably be messy but that a re-drawn version of the process will be given to them for approval • The following list shows the types of questions that might be asked during an initial briefing session: • “Can you please elaborate on your role and the responsibilities that you have within that role?” • “ Please take me through the process that you perform, manage, oversee.” • “ What are the timescales, volumes, costs?” • “ What review activities do you undertake?” • “ What review processes are you subject to?” • “ Does this diagram represent everything you perform, manage, oversee?” • “ What are the issues that worry you about this process?” • “ What opportunities for improvement do you think exist in this process?”
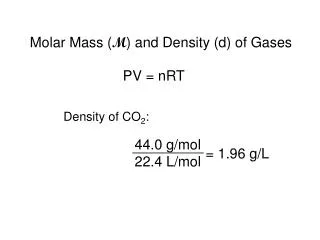
Is this Form complete? Yes, 70% No, 30% Constructing the process flowchart The major part of the process flowchart are the flowcharting symbols and a defined colour scheme: Review a Form • Squares show a task • An activity description should be five words or less • Start the description with an action verb • Diamonds show decisions • Descriptions prompt a Yes/No answer • Indicate what percentage of activity takes which path BLACK GREEN RED Assessment • Black or dark blue markers are used for lines and text • Green ink is used to identify strengths • Red ink is used to identify opportunities and concerns • Clouds show information stores between activity/ information flows
An example of a simple process flowchart Ask partner for money Get money Kiss partner goodbye No No Have enough money With partner over 10 years Have car keys Yes Eat Breakfast Leave house Drive to work Yes Yes No
An example of a simple “swim lane” process flowchart Yes Yes Partner 1 Is breakfast good Eat breakfast Enough cash Ask partner for cash Put cash in wallet Leave home Enough petrol in car Call at petrol station Drive to work No No No Yes Partner 2 Prepare breakfast Give partner cash Garage attendant Fill car up with petrol
The final brownpaper will look something like this Issue/Red flags Strength or weakness Task Links Decision points Live document • …. • …. • …. • ….. <Process Title> Sign-off: • Strengths • …. • …. • …. • ….. • Issues/Flags • …. • …. • …. • ….. • Opportunities • …. • …. • …. • ….. Summaries of strengths, issues and opportunities
The brownpaper should be augmented by real examples • Actual school documents, computer printouts, reports, etc, must be used to illustrate data flow • Augmenting the brownpaper with the documentation is a very effective way of highlighting the issues in a process or set of activities • The flowchart can be augmented with explanations if necessary • It is important that all data flows on the flowchart are broadly quantified: • percentage of volume for various activities • time frames for key steps • number of people performing tasks • work volumes/flows wherever possible • costs • The SCT should review the brownpaper to see if the data is complete and to obtain information to support the proposal • At the end of the paper, post summaries of the strengths, key findings and opportunities on individual sheets of white paper • Make sure that the brownpaper is signed off by its participants and the Leadership Team to show the findings from the brownpaper have authority amongst school staff
Advice and hints for developing brownpapers • Don’t create a finished brownpaper from scratch • Use pencil to do a first draft – it makes it easier to correct mistakes, sends a message that this is not a “done deal”, but a “let’s discover this together” process – the use of Post-It notes produces greater flexibility • Disagreement about how the activity is completed is OK • It is probable that different people perform the same activity differently; that is a significant finding! Try to capture both and get separate agreement • Make not knowing the answer to every question OK • In the process of asking questions needed to identify the activity, it almost always happens that a question will be asked that no one can answer off the top of their heads • Ask for hard copy and complete examples • All key documents should be obtained with “live” information, if possible. Ask for a printed copy of significant computer screens if the function is on-line or interactive between user and system • No value judgements (yet) • The process of creating the initial brownpaper should be a fact-gathering exercise. The evaluation of the information comes later. At this point, all ideas are good ideas • Identify one stream of activity and do it start to finish: then integrate other streams with it • Experience has shown that participants may become confused when trying to understand and document several flows simultaneously • Write explanations directly onto the brownpaper • The only paper attached to the brownpaper should be “live” documents and their Post-It note critiques
A school example of a process flowchart – “arranging cover for sickness” Need computer access Look up in files the periods they teach Update computer with new cover needs 2 Yes Manually analyse cover needs between covering for - Less than 3 days sick - More than 3 days sick 1 Have any teachers telephoned in sick Have I got long-term sick to cover for Check answer phone Secure supply teacher No Yes More than 3 days 7.45 am No Less than 3 days Have I got staff to cover? Finish cover activity No • Strengths • Happens quickly - 45 minutes • Issues/flags • Not all teachers telephone in time • Manual analysis between length of sickness covering for • Sometimes using teachers who have covered a lot recently • Not always using relevant subject teacher for cover • Weakness • Relies upon manual systems at key points Yes Yes 3 Have they covered enough in past week? Does it matter? Are there any other teachers free? Yes Yes No No No 4 Are they in the relevant subject area Does it matter? Yes No No Update cover list and post on staff room wall 8.30 am
School example of a “swim lane” process flowchart Agreeing a new supply teacher to cover short term sickness Supply manager Telephone supply agency Receive supplyteacher Take supply teacher to class Has work been Set? Teach Yes No Supply agency Any supply teachers free? Are they right subject Area? Contact supply teacher No Yes Yes No Does it matter No Yes Supply teacher Assess opportunity Do I want the job? Travel to school Yes No Head of year Set work
Examples of brownpaper opportunities to look for • Duplication – eliminate duplication of work/processes • Redundancy – eliminate situations where two people do the same activity • Frequencyof use – eliminate or reduce reports not read/used; match frequency with need • Accuracy – match appropriate level of accuracy to need • Timelines – the cost of waiting/not getting things on time • Standardisation – the cost of not standardising when it makes sense to • Procedures – the cost of documenting practices • In-sourcing – the cost of making it yourself; making instead of buying • Authorisation – the cost of consensus • Validation – the cost of security checking • Forecasting – the cost of prediction • Waste – the cost of consumption • Specification – the cost of customisation; unnecessary conformance • Storageandsurplus – the cost of holding/storing/archiving • Bestpractices – the opportunity cost of knowledge/skill transfer • Reconciliation – the cost of non-aligned information/data
Remodelling tools – contents Brainstorming Brownpaper Technique Day In the Life Of (DILO) Fishbone Analysis andFive Whys Force-field Analysis Prioritisation Matrix Problem Solving/TeamBuilding (PSTB) Six Thinking Hats Stakeholder Mapping SWOT
Day In the Life Of (DILO) What is it? • A visual way of showing the activities of an individual or group of individuals in a school. It can be used to show a “Week in the life of”, a “Month in the life of” “Term in the Life of” etc. The tool can therefore be used to reflect a number of roles, groups of roles or timeframes • The technique enables a group to drive out a shared view of workload and the underlying issues • It is based upon completion of a workload analysis template A DILO • It documents the entire set of activities for a member of staff/role holder • It provides a high-touch way of showing the extent of someone’s role • It highlights the major areas of work and where the greatest volumes of work are created • A DILO can be done for a single member of staff or a group of staff who have the same role or function and can be synthesis of all the individuals
DILO When would you use it? • During the Deepen phase to help identify roles/people impacting the main issue. It can be used to deepen the school’s understanding of the work/life balance issue • During the Develop phase to show future roles/groups of roles as they might be Are there any rules? • Workload analysis should be completed as honestly as possible
The DILO technique can be applied to a variety of roles and states For example: • As Is – actual activities in use today • Should Be – activities according to job descriptions • Could Be – desired roles • To Be – model for implementation • A key objective of the technique is that both advisers (if present) and SCT explore together the role under review and its associated strengths and opportunities • This increases the buy-in and ownership in the results and project as a whole • The DILO technique can be one of the most powerful and important techniques to build momentum in a project because it looks at the roles in the school • Roles for which the • technique can be used: • Headteacher • Deputy Headteacher • Head of Faculty • Head of Year • Teacher • Subject Co-ordinator • Team Leader • Teaching Assistant • School Administrator • Bursar • Caretaker • etc
Activity analysis Time Time spent (mins) Description of activity Good use of your time (1-5) 1 = low Teaching Admin Plan/ prep Marking Pastoral Cover Meetings Other Before school During school After school Weekend DILO – sample of workload analysis template
Key observations • Opportunities • Issues Sample output of a “Week In the Life Of” (WILO) Effectiveness rating
Remodelling tools – contents Brainstorming Brownpaper Technique Day In the Life Of (DILO) Fishbone Analysis andFive Whys Force-field Analysis Prioritisation Matrix Problem Solving/TeamBuilding (PSTB) Six Thinking Hats Stakeholder Mapping SWOT
Fishbone Analysis and Five Whys • These techniques will assist teams to understand the causes of problems or issues • They encourage teams to find the root of the problem or issue • Without such analysis, teams can often move into “fix it” mode before they really understand a problem or issue. Often this means they end up fixing a symptom and either the problem remains or it reappears in another guise • Fishbone Analysis and Five Whys share many characteristics. Choose the one that feels best for your issue and your team
Fishbone Analysis What it is? • The Fishbone diagram (sometimes called the Ishikawa diagram) is used to identify and list all the possible causes of the problem at hand • This is primarily a group problem analysis technique, but can be used by individuals as well • The process is called Fishbone Analysis because of the way in which the information gathered is arranged visually – like the skeleton of a fish
Level 2 cause Level 2 cause Level 2 cause Level 2 cause Level 2 cause Level 2 cause Fishbone Analysis - example Level 1 cause Level 1 cause Level 1 cause Level 2 cause Level 2 cause Issue Level 1 cause Level 1 cause Level 1 cause
Fishbone Analysis When would you use it? • Usually in the Deepen stage of the process to identify root causes of issues and problem areas • On any of the school’s issues Are there any rules? • Brainstorming works very well in conjunction with this tool and all the rules that apply to brainstorming apply here
Process of Fishbone Analysis • The problem or issue is written down or enclosed in a circle on the right side of a large piece of paper or a brownpaper on the wall • A straight line is drawn to the left (like the backbone of a fish) • The next step involves drawing stems at 45° angle to the backbone line. At the end of each of these stems are listed all of the causes of the problem or issue that can be brainstormed • Branches can be placed on each stem for further breakdowns of each cause • The Fishbone diagram can be brainstormed over more than one session. Professor Ishikawa, who developed the technique, described the process as one in which “you write your problem down on the head of the fish and then let it cook overnight” • When the diagram is completed, the group can begin to analyse the stems and branches to identify the real problems or issues that need to be solved
Fishbone Analysis - example Takes work home Budget constraints No assistant Has an understanding husband Governors given no priority to support Takes work home Job holder never complained Issue Over worked School Secretary Increasing capability of ICT Paid during holidays ICT has increased capacity in the past Likes to be there ICT has increased capacity in the past She works through school holidays Always coped
Fishbone analysis is useful for a number of reasons: • It encourages the team to study all parts of a problem or issue before making a decision • It helps show the relationships between causes and the relative importance of those causes • It helps the team see the total problem or issue as opposed to focusing on a narrow part of it • It offers a way to reduce the scope of the problem and solve less complex issues rather than more complex ones
What is it? A tool to help get to the root cause of an issue It is a variation of the approach used in Fishbone Analysis When would you use it? The Deepen phase when you want to deepen your understanding of an issue and its underlying causes Are there any rules? Best used in conjunction with brownpaper technique and so these rules also apply Participants need to be open and honest The Five Whys
Why Why Why Why Why Why Why Why Why Why Why Why Why Why Why Why Why Why Why Why Why Why Why Why Why Why Why Why Why Why Process of Five Whys • The tool is best used with a number of people – between six and ten is ideal • The tool is best used in conjunction with the brainstorming technique • Clearly define the issue to be tackled and state it on the left side of the paper • Complete the diagram by moving from left to right. Move from the problem/issue statement by asking the question “why?” • Ask the group “why” and capture the responses – this can be done by using Post-Its to arrive at a consensus answer e.g. the issue is “Pupil numbers/intake numbers have dropped” • Responses (the “whys”) might include “the reputation of the school has dropped” or “the catchment area has reduced” • For each response, again ask the question “why?”. Continue to record responses and move across to the right of the diagram. Try to go to five levels of “whys” Issue
This technique offers many of the same benefits as Fishbone Analysis It will often lead to a more thorough analysis than fishbone because it pursues the problem or issue to a deeper level Governors given no priority to support No assistant Budget constraints Jobholder never complained History Governors never been asked for £ for support ICT has increased capacity in the past Jobholder picked ICT up quickly Lack of planning when her hows were created Governors were not aware of risk of relying on one person Increasing capability of ICT Overworked It is quiet Jobholder is a happy, cheery person School secretary Paid during holidays She can catch up Very committed Always coped in the past Likes to be there Works through school holidays He has a busy job Very capable Has an understanding husband Family needs cash Has keyboard skills Takes work home Doesn’t want to let people down It is her nature Jobholder has had ICT training Technology has increased in general She has a large work ethic An example analysis
Possible discussion points from 5 whys example • Ask governors for more budget for second person • Explain risk to governors • Could explore willingness to work through holiday? • Communication with governors is an issue
Remodelling tools – contents Brainstorming Brownpaper Technique Day In the Life Of (DILO) Fishbone Analysis andFive Whys Force-field Analysis Prioritisation Matrix Problem Solving/TeamBuilding (PSTB) Six Thinking Hats Stakeholder Mapping SWOT
Force-field analysis What is it? • Kurt Lewin, a pioneer in the study of change, developed the concept of force-field analysis to enable people to manage change better • Lewin suggests that change results from the relative strengths of competing, driving and restraining forces – the driving forces push the organisation towards change; the restraining forces push against change • Force-field analysis helps to understand the balance of driving forces and restraining forces in respect of a particular change. Based on this understanding a group can identify appropriate restraining forces to remove or decrease and identify appropriate driving forces to increase
Force-field analysis When would you use it? • Usually in the Develop stage of the process to identify the most effective ways to bring about change • The results of an analysis would translate into implementation actions for the school Are there any rules? • Brainstorming works well to identify both driving and restraining forces – so apply usual brainstorming rules • Ensure that you quantify the impact of each force • Analysis is much more powerful when done in a group rather than individually
Force-field analysis • Clearly state what change you are looking to bring about (or perhaps it is an option for change that you wish to explore). Write this at the top of your diagram • Draw a vertical line down from the statement of change. On the right of the line, you can brainstorm the driving forces; on the left of the line, you can brainstorm the restraining forces • For each force, agree a score between 0 and 5 to reflect the extent of the impact (positive or negative) • Draw an arrow where the length is equivalent to the score agreed and the thickness of the arrow is used to represent the relative importance of the force • Brainstorm (or use a problem-solving technique like PSTB) to generate solutions for increasing driving forces and reducing restraining forces
What a force-field analysis looks like Change Restraining forces Driving forces 5 4 3 2 1 0 1 2 3 4 5
Schools example of force-field analysis Employing study supervisors to undertake cover Pupils know the supervisors Can they cope? Supervisors know the pupils Parental objections Staff enthusiastic – improving their working conditions Supervisors cannot set the work Reduction in admin for arranging supply Pupils missing out on learning opportunities Lessons planning and materials are online via intranet Requires staff to teach one more hour per week In this example, the thickness of the arrows is used to indicate importance of the force School updated Cost of ICT No teachers doing cover – better prepared and less stressed ICT training for supervisors Lower stall absence rates -ve impact +ve impact Opposing forces Driving forces


![National Response Plan Overview [date] [location] [presenter]](https://cdn1.slideserve.com/2938297/national-response-plan-overview-date-location-presenter-dt.jpg)