Download
1 / 52
520 likes | 1.46k Views
LMS HMESHER - Automatic Mesh Generation for Complex CAD Assemblies. Iulian Grindeanu, LMS International. Hideaki Ozaki, Honda R&D Co., Ltd., Automobile R&D Center ...

E N D
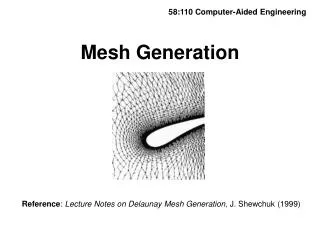
Slide 1:LMS HMESHER - Automatic Mesh Generation for Complex CAD Assemblies
Iulian Grindeanu, LMS International Hideaki Ozaki, Honda R&D Co., Ltd., Automobile R&D Center
Slide 2:Outline
HMesher history Integration in Virtual Lab HMesher basic flow Zonal meshing Examples
Slide 3:HMesher Development
Started from PolyFEM mesher. PolyFEM is a p-type finite element tool Some attributes of PolyFEM mesher Start from CAD geometry Conforming meshes in CAD assemblies Relatively coarse mesh, associated with geometric boundary Agglomeration of tetras into hexas and pentas. QT connections are allowed by PolyFEM solver HMesher as opposite to p-mesher (for an h-type FE) Designed for NASTRAN Sought properties: hexa meshing Coarse mesh Conformity to geometry
Slide 4:HMesher Integration
Part of LMS Virtual.Lab LMS Virtual.Lab is a software suite used to simulate the performance of mechanical systems in terms of structural integrity, noise and vibration, durability, system dynamics, ride and handling LMS Virtual.Lab is based on CAA V5, the open middleware for PLM from Dassault Syst�mes. There are other meshers available in Catia V5 Octtree mesher, INRIA mesher The actual meshing process is done outside CATIA, but geometry extraction and importing of the mesh are done using API tools, CAA interfaces.
Slide 5:HMesher Integration (Cont)
The integration allows for accurate geometry representation, we use CGM tools Local mesh control can be done at the edge and face levels After importing the mesh, we take advantage of the mesh visualization tools, preparation of the input file for subsequent Finite Element Analyses (FE drivers), import of the results and post-processing (FE interfaces), available in Virtual Lab Associativity between mesh and geometry ensure easy application of boundary conditions for FE analysis
Slide 6:Main Analysis and Design Flow
Slide 7:How to build a mesh for something like this?
13 parts 5 assemblies 1 master assembly All parts are in contact Need a conforming mesh for modal analysis
Slide 8:Geometry Extraction
Top-down assembly organization: CATProduct documents CATPart documents Bodies within Part documents Domains Volumes Volumes have a manifold geometry, boundary representation. A topology scan is performed to extract boundary faces, edges and vertices In the end, geometry file is a collection of BRep volumes, that can be in contact along faces, edges Penetrating volumes are not allowed! CATIA geometric tolerance: 0.001 mm
Slide 9:Geometry Extraction: UV parametrization
Each face sits on a surface, which has a uv parametrization. The boundary of each face is represented as a collection of uv curves. 3D Edges have 3 representations: as a segment on a 3D curve, and as 2 uv curves in adjacent faces
Slide 10:Geometry Extraction
Surface types supported by HMesher are PLANE, CANONICAL (Cylinder, Sphere, Torus, Cone) and NURBS. Not all CATIA surfaces are supported by the HMesher. The surfaces that have no correspondent are converted to the NURBS format, using CATIA operators, with a default tolerance of 0.01 mm.
Slide 11:Basic Flow of HMesher
Slide 12:Multiple Solid Processing
Needed for volumes in contact, for conforming mesh an important advantage for finite element analysis, as there are no linkage elements needed. The solids will share nodes, edges and faces of mesh elements
Slide 13:Multiple Solid Processing
Intersection is done in UV space of one of the faces in contact New faces are created with the intersection edges, vertices
Slide 14:Multiple Solid Processing
Face that is common to both solids after multiple solids processing: Non manifold geometry
Slide 15:Multiple Solid Processing: Final mesh
Mesh is compatible along contact face between solids
Slide 16:Basic Flow of HMesher
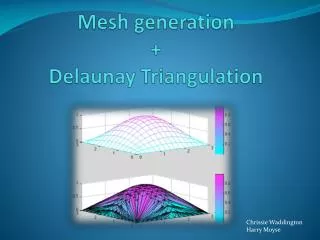
Slide 17:Facetting: Surface Meshing
Start with breaking the boundary geometry edges Performed on each boundary face Constrained Delaunay mesh on each face is mapped on 3D geometry
Slide 18:Surface meshing
Scaled uv space Constrained 2d Delaunay 2d refinement points added in layers
Slide 19:Surface mesh violations
Due to curvature and feature proximity, surface mesh from different faces can intersect, resulting in surface mesh violations mesh size reductions are performed in those cases, to eliminate violations
Slide 20:Basic Flow of HMesher
Slide 21:Surface Mesh Simplification (Blurring)
The most effective way of eliminating the small edges, thin faces and other small features
Slide 22:Solid Meshing. Interior Point Generation
Interior points are roughly on the normals from the closest boundary Normal direction for layer generation Boundary points Points are added in layers from boundary, and are averaged when fronts collide
Slide 23:3D Delaunay
Classic 3d Delaunay , we insert all the points of the surface mesh and interior points in a large enough tetra
Slide 24:Trimming / Untrimming
Conforming Delaunay is performed next: add �trimming� points on the faces and edges until all faces and edges are part of tetrahedralization. Remove outside tetrahedrons Untrimming: Eliminate trimming points if possible, maintaining the topology of the model, but do not consider anymore Delaunay property
Slide 25:Trimming / Untrimming
zoom
Slide 26:Untrimming (Delaunay relaxation)
Slide 27:Trimming / Untrimming explained in 2D
Slide 28:Basic Flow of HMesher
Slide 29:Curve Recovery
Input: Tetrahedralization of the points, and the curved representation of the model. Output: Curved representation of the Tetrahedralization Algorithm: Repeatedly perform the following For each edge on the model boundary, map using the original curve. For each edge on the face interior, map using a geodesic curve, maintaining angles with neighbors For each edge in the interior, map only if necessary to maintain validity Interpolate the interior faces.
Slide 30:Curve Recovery
Slide 31:Hybrid Meshing
[1] Meshkat, S. , Talmor, D. , �Generating a Mixed Mesh of Hexahedra, Pentahedra and Tetrahedra from an Underlying Tetrahedral Mesh�, International Journal for Numerical Methods in Engineering. Volume 49, Issue 1-2 , Pages 17 � 30, July 2000
Slide 32:Hybrid Meshing
Uses a subgraph of the topological dual graph Tetrahedron � vertex in dual graph Interior face � solid edge in dual graph Quadrilateral face on a merged element � dotted edge in dual graph Extended RF graph for a pyramid
Slide 33:Hybrid Meshing
Extended RF graph for a pentahedra (triangular prism)
Slide 34:Hybrid Meshing
Some interesting properties RF Graphs for penta or hexa decomposition are planar The RF-graph of all tetrahedral decompositions of a hexahedron into six tetrahedra has exactly one cycle. The decomposition into five tetrahedra contains no cycles In a tetrahedral decomposition of a hexahedron, a tetrahedron with 3 boundary faces cannot be connected to another tetrahedron with 2 or 3 boundary faces
Slide 35:Hybrid Meshing
Extended RF graphs for hexahedron: there is 1 RF graph for 5-tetrahedron decomposition
Slide 36:Hybrid Meshing
Extended RF graphs for hexahedrons: 5 different graphs for 6-tetrahedron decompositions
Slide 37:Hybrid Meshing
Extended RF graphs for hexahedrons: 5 different graphs for 6-tetrahedron decompositions
Slide 38:Hybrid Meshing
Extended RF-graphs are compact way of storing conceptual templates for a tetrahedral decomposition. Since finding hexahedra and pentahedra in a tetrahedrization involves finding a subgraph that matches a given graph, the use of a graph is somewhat inefficient. Instead, for a given graph, all possible search trees are constructed, one for each root node. These six RF-graphs are converted into 14 search trees in total The algorithm uses actually 31 search trees, for hexahedrons that are composed from more than 6 tetrahedrons (up to 13)
Slide 39:Hybrid Meshing
RF graphs are converted to search trees: example of 2 search trees corresponding to 3-cycle RF graph The solid lines depict the tetrahedra that share a face, whereas dashed lines represent the constraint to find a quadrilateral pair.
Slide 40:Hybrid Meshing
The RF-graph only establishes graph-theoretical conditions for existence of a given polyhedron, i.e. hexahedron or pentahedron. Additional geometry criteria are necessary to ensure the validity of the polyhedron. A backtrack algorithm is involved to find possible search trees for tetrahedrons in the mesh A best solution is committed early if found The process is expensive (60%-80% of total CPU time) Unless there are at least 2 layers of hexas/pentas on the boundary, the mesh cannot be used for stress analysis
Slide 41:Hybrid Meshing
Quality measures: Percentage of volume of boundary bricks/wedges M1 ~90% Percentage of volume of all bricks/wedges M3 ~70% Percentage of number of boundary bricks/wedges M4 ~55% Percentage of number of boundary bricks M5 ~30% Percentage of number of all bricks M6 ~20% Percentage of number of boundary quads M7 ~60% For a good stress analysis, all these measures should be closer to 100%. Nevertheless, this meshes can be used successfully for modal analysis.
Slide 42:Zonal Meshing
In order to mesh large assemblies of relatively complex models, like engine blocks, transmission cases, a modular approach is introduced; we call it zonal meshing. With zonal approach, design changes are not propagated past the contacts between zones The contact surfaces are processed first, then parts are meshed independently, while preserving the surface mesh in the contact area. The most difficult problem is to ensure the compatibility of meshes between parts, at the contact surfaces, effectively constraining the solid mesh to be compatible to the mesh at the common surface. There are theoretical guarantees of when the Delaunay mesh can be constrained (Jonathan Shewchuk): Edge protection criteria
Slide 43:Zonal Meshing
First, create a compatible surface mesh
Slide 44:Zonal Meshing
The final mesh is compatible between solids
Slide 45:Zonal Meshing: Imprint feature
Imprint feature: impose a surface mesh pattern on a face of the solid
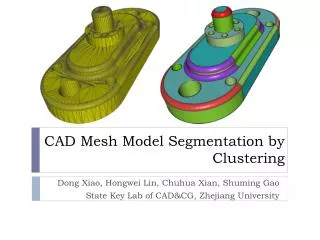
Slide 46:Engine Block Example
13 parts 5 assemblies 4 zonal interfaces 10000 faces 28000 edges
Slide 47:Engine Block Example
Define zonal Interfaces
Slide 48:Engine Block Example
Zonal surface mesh
Slide 49:Engine Block Example
Slide 50:Engine Block Hybrid Mesh
Slide 51:Future Work
Efficiency needs to be increased Merging measures closer to 100% Memory management Robustness and quality will always be issues with coarse meshes
Slide 52:Acknowledgements
Many thanks to Honda R&D Co., Ltd., for continuous support and for driving the whole process forward. Thanks to LMS International for the opportunity to work on the HMesher Thank you for your attention!