Download

1 / 32
320 likes | 327 Views
Buttons in SPM5. Carolyn McGettigan & Alice Grogan Methods for Dummies 5 th April 2006. Overview. Introducing the SPM5 User Interface Help in SPM5 Spatial Pre-processing in fMRI 1 st and 2 nd Level Analysis. SPM5 User Interface. SPM5 User Interface. Preprocessing. Analysis.

E N D
Buttons in SPM5 Carolyn McGettigan & Alice Grogan Methods for Dummies 5th April 2006
Overview • Introducing the SPM5 User Interface • Help in SPM5 • Spatial Pre-processing in fMRI • 1st and 2nd Level Analysis
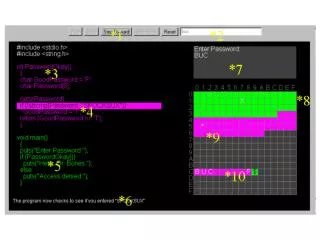
SPM5 User Interface Preprocessing Analysis Inference
SPM5 User Interface Current List of Jobs
SPM5 User Interface Options available for currently highlighted object Current List of Jobs Current value of / information about highlighted object Save/Load as .mat files or XML (“load-xml”, “savexml”) Info about the meaning of current item
Spatial Pre-Processing • Sample Data Set from SPM5 manual • “Mother of All Experiments” (MoAE) • Auditory fMRI data • Single-subject • Whole-brain BOLD/EPI images acquired on 2T Siemens MAGNETOM Vision system • Each acquisition • 64 contiguous slices (64x64x64 3mm x 3mm x 3mm voxels) • 6.05s acquisition • TR=7sec • 96 acquisitions in total • 16 blocks of 6 • So each block 42 sec • Functional data starts at acquisition 4 • Advisable to discard initial few scans due to T1 effects • Structural image also acquired
Spatial Pre-processing • Realignment • Coregistration • Segmentation • Normalize • Smoothing
From start to finish… • Data are available from • http://www.fil.ion.ucl.ac.uk/spm/data/ • Create a new directory for data • Create a subdirectory “jobs” • Open MATLAB • Get into the correct working directory • Type “SPM fmri” • If you’re using SPM for the first time, make sure you “Set Path”, under File in MATLAB. Enter the path to your SPM folder and select the “Add with Subfolders” option
Realignment • Click on “Realign” from drop-down menu
Realignment • Select “New Realign:Estimate and Reslice” • Open “Realign:Estimate and Reslice” option • Highlight Data and select “New Sesson” • Highlight “Session” • Select “Specify Files”
Realignment • Choose all of the functional images in the directory • i.e. images beginning ‘fM000*.img’
Realignment • Save job file as e.g. “realign.mat” in your jobs directory • Press “RUN”
Realignment etc Header files modified with orientation info Mean image for use in coregistration
Coregistration • Click on “Coregister”
Coregistration • Click on “New Coreg:Estimate” • Double-click on “Coreg:Estimate” • Highlight “Reference Image” • select mean fMRI scan meanfM00223_004.img from realignment • Highlight “Source Image” • select structural image sM00223_002.img • SAVE as ‘coreg.mat’ • Press “RUN”
Coregistration • Effects: • SPM implements a coregistration between structural and functional data that maximises mutual information • SPM changes header of source file i.e. sM00223_002.hdr
Coregistration • Useful to check registration of ref and source images at this point • Click “Check Reg” button • Select your source and ref images as before • Navigate images and inspect anatomical correspondence
Segmentation • Click on “Segment”
Segmentation • Highlight Data field • “Specify Files” • select the subject’s registered structural image sM00223_002.img • Optional extras: • “Custom” menu • For extra speed, though not optimal, you can reduce the number of Gaussians per class e.g. to [1 1 1 4]. • Click on “Specify Text” to modify the values. • SAVE as segment.mat • RUN
Segmentation • Effects: • SPM creates grey and white matter images and a bias-field corrected structural image • View with Check Reg • Grey matter image is c1sM00223_002.img • White matter image is c2sM00223_002.img • Check reg against original structural sM00223_002.img Grey matter image • SPM also writes spatial normalisation and inverse spatial normalisation parameters to files in structural directory: • sM00223_002_seg_sn.mat • sM00223_002_seg_inv_sn.mat • THESE CAN BE USED TO NORMALISE FUNCTIONAL DATA Original structural image
Normalize • Click on “Normalize”
Normalize • Select “Normalise:Write” • Allows previously determined warps to be applied to a series of images • Highlight “Data” • Select new “Subject” • Open “Subject” and highlight “Parameter File” • Select sM00223_002_seg_sn.mat from Segmentation step • Highlight “Images to Write” • “Specify Files” • Use filter to select all realigned functional images • Type ^r.* in SPM file selector and click “Filt” • Right-click “Select all” • Done
Normalize • Open “Writing Options” • Click “Voxel sizes”, then “Specifiy Values” • Change values to [3 3 3] • This writes images at a resolution closer to that at which they were acquired • SAVE as “normalise.mat • RUN
Normalize • Effects: • SPM writes spatially normalised files to the functional data directory • Normalised files have the prefix “w”
Smooth • Click on “Smooth”
Smooth • Open “Smooth” • Select “Images to Smooth” • select the spatially normalised files “wrfM00*.img” • Highlight “FWHM” • “Specify Values” • Change [8 8 8] to [6 6 6] • Data will be smoothed by 6mm in each direction • SAVE as smooth.mat • RUN
Smooth • Effects • See right • Normalised functional image above wrfM00223_004.img • Smoothed image below swrf00223_004.img • Note: • SPM5 Manual says “smoothing step is unnecessary if you are only interested in Bayesian analysis of your functional data”
Overview Use SPM Help and the ? Button See SPM5 Manual for everything I’ve included today • fM00223_004.img • Realign • rfM00223_004.img • Coregister • Segment • Normalise • wrfM00223_004.img • Smooth • swrfM00223_004.img