Download
1 / 11
120 likes | 1k Views
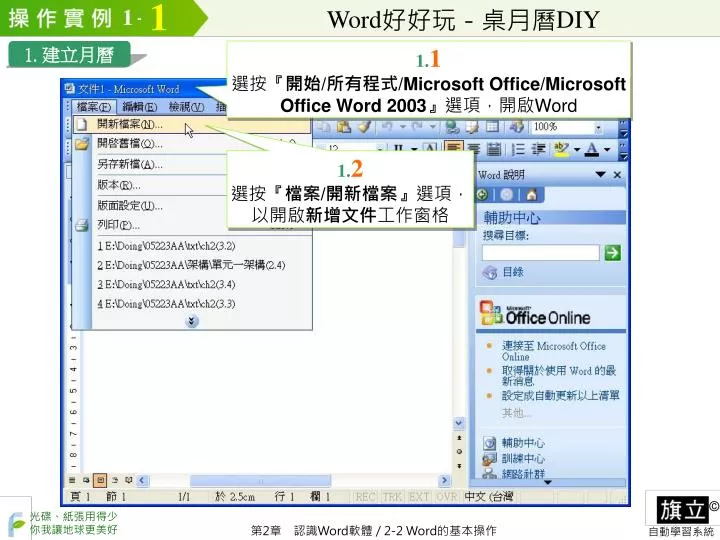
1. 建立月曆. 1. 1 選按『 開始/所有程式/Microsoft Office/Microsoft Office Word 2003 』選項,開啟Word. 1. 2 選按『 檔案/開新檔案 』選項,以開啟 新增文件 工作窗格. 1. 建立月曆. 1. 3 按 "在我的電腦上",以開啟 範本 交談窗. 1. 4 切換至 其他文件 標籤,選 月曆精靈 ,按 確定 鈕. 1. 建立月曆. 1. 建立月曆. 1. 5 按 下一步 鈕. 1. 建立月曆. 1. 6 點選 新潮式 選項按鈕,再按 下一步 鈕. 1. 8

E N D
1. 建立月曆 1.1 選按『開始/所有程式/Microsoft Office/Microsoft Office Word 2003』選項,開啟Word 1.2 選按『檔案/開新檔案』選項,以開啟新增文件工作窗格
1. 建立月曆 1.3 按 "在我的電腦上",以開啟範本交談窗
1.4 切換至其他文件標籤,選月曆精靈,按確定鈕 1. 建立月曆
1. 建立月曆 1.5 按下一步鈕
1. 建立月曆 1.6 點選新潮式選項按鈕,再按下一步鈕
1.8 點選否及A4選項按鈕後,按下一步鈕 1. 建立月曆 1.7 點選縱向選項按鈕,設定以直向列印月曆
1.9 依自己的需求,選擇開始與結束的月份(如2012年九月 ~ 2012年十月),並按完成鈕 1. 建立月曆
2. 列印月曆 2.1 將檔案另存為 "Ans2-1.doc" 2.2 選按『檔案/列印』選項,開啟列印交談窗
2.3 按名稱下拉式方塊,選擇要使用的印表機 2. 列印月曆 2.4 按內容鈕,在開啟的交談窗中,設定列印方向為橫向,並按確定鈕,回到列印交談窗 2.5 按每張紙所含頁數下拉式方塊,選2頁 2.6 按確定鈕,將月曆列印出來
3. 製作桌月曆 3.1 將各月份的月曆逐一割下
離開 3. 製作桌月曆 3.3 將月曆放在CD盒中,即成為實用的桌月曆。同學也可在桌月曆上加上圖畫、照片或貼紙,使桌月曆更美觀 3.2 準備1個CD盒,將內層的封面、封底、底盤取出,再將封面的塑膠框拆下,旋轉後重新裝上,使CD盒能站立