Download
1 / 48
510 likes | 688 Views
Mechanism (CLX-3170 series). Agenda. General Specification Process Disassembly Troubleshooting. Ⅰ. General Specification. Objectives. Understanding the general specifications of CLX-3170,CLX-3170N. Understanding of the feature of major elements. Ⅰ. General Specification. General.

E N D
Mechanism (CLX-3170 series)
Agenda • General Specification • Process • Disassembly • Troubleshooting
Ⅰ. General Specification Objectives • Understanding the general specifications of CLX-3170,CLX-3170N. • Understandingof the feature of major elements.
Ⅰ. General Specification General CLX-3175FN Feature CLX-3170FN Size (WxDxH) 415x373x342mm Weight(w Packing, Inc.Toner) 15.2 kg Power Consumption Avg. Operation 350 W Sleep mode 10W Noise Printing/Copy 48/52 db Standby 27 db
Ⅰ. General Specification Print CLX-3170FN CLX-3175FN Printing Type Color Laser Printing Printing Speed Black 16 ppm(A4)/Color 4 ppm(A4) Print Language SPL-C (Samsung Printer Language) FPOT Cold Approx. 45 seconds (Black) Ready Approx. 14 seconds (Black) Memory 128 MB Resolution Color/Mono 1200 x 600 dpi
Ⅰ. General Specification Scan CLX-3170FN CLX-3170FN Scan method Color CIS Scan Speed Approx. 15 seconds Halftone 256 Levels Scan size Max Doc. width 216mm(8.5”) Effective Scan width 208mm(8.2”) Scan to E-mail Yes Resolution Color/Mono 4800 x 4800 dpi(Enhanced)
Ⅰ. General Specification Copy CLX-3170 CLX-3170N Copy Quality Text, Text/Photo, Photo Copy Speed (SDMC) Black 16 cpm(A4)/Color 4 cpm(A4) Zoom Range 50% to 200% for Platen FCOT Cold Approx. 45 seconds (Black) Ready Approx. 18 seconds (Black) Memory 128 MB Resolution Color/Mono 600 x 1200 dpi (Photo)
Ⅰ. General Specification Paper Handling CLX-3170FN CLX-3175FN 150 sheets Capacity(20lb) Main Tray 150 sheets None Manul Tray None Face Down: 100 sheets/20lb Output Capacity Face Down: 100 sheets/20lb Software Microsoft Windows : 2000/2003/ XP(Include 64bit),Vista MacOS : 10.3,10.4 Supporting OS Microsoft Windows : 2000/2003/ XP(Include 64bit),Vista MacOS : 10.3,10.4
Ⅰ. General Specification CRU CLX-3170FN CLX-3170FN Toner Kit(Std. Coverage) Color(Y,M,C) 1,000 pages 1,000 pages Mono 1,500 pages 1,500 pages Waste Toner Tank 10,000 pages 10,000 pages Image Unit 24,000 pages (Black) 24,000 pages (Black) FRU Fuser 50,000(C)/100,000(M) pages 50,000(C)/100,000(M) pages ITB 100,000 images 100,000 images T2 Roller 100,000 pages 100,000 pages Pick-up Roller 50,000 pages 50,000 pages 100,000 pages ADF rubber pad 100,000 pages
Ⅱ. Process Objectives • Understanding the basic structures and operating principle of each parts • Studying the printing process and electronic photo process • Comprehension of System Layout
Ⅱ. Process System Layout 4 in 1 : CLX-3170FN/CLX-3175FN Scan : Color CIS (1200 x 1200 dpi Optical) Copy speed : SDMC(Single Document Multiple Copy) 16cpm/A4(B/W), 4cpm/A4(Color) Copy Quality Selection : Text,Mixed,Magazine,Photo The most small-sized domestic 4 in 1 MFP
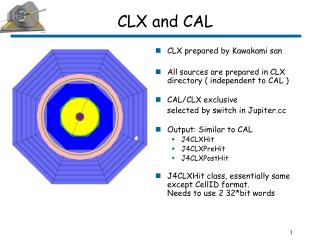
Ⅱ. Process 4 6 8 5 7 3 2 1 System Layout (CLX-3170FN/CLX-3175FN) Paper Input (Cassette) LSU (Laser Scanning Unit) 2 1 2nd Transfer Roller Fuser 4 3 ITB (Intermediate Transfer Belt) 1st Transfer Roller 6 5 OPC (Organic Photo Conductor) 8 Toner Kits (Y, M, C, & K) 7
Ⅱ. Process System Layout 1. Cassette Feeding Method : Cassette Type Feeding Standard : Center Loading Feeding Capacity : Cassette 150 Sheets(75g/㎡, 20lb Paper Standard) No Manual Feeder Paper Detecting Sensor : Photo Sensor (Empty, Registration, Exit) Paper Size Sensor : None
Ⅱ. Process System Layout 2. LSU (Laser Scan Unit) Consisted of LD(Laser Diode) and Polygon Motor Control. Error Phenomenon Polygon Motor Error The Rotation of Polygon Motor can not reach stable. Hsync Error Though the rotation of Polygon Motor reach stable, the signal of Hsync is not occurred.
Ⅱ. Process System Layout 3. 2nd Transfer Ass’y The life span: Print over 100,000 sheets (in 15~30 ℃)
Ⅱ. Process System Layout 4. Fuser Ass’y Heat Lamp : Similar toCLP-300 series Heat Roller : Similar toCLP-300 series 2 Pressure Roller : Similar toCLP-300 series Thermistor : Temperature-Measuring Device Thermostat : Critical Temperature-Detecting Device
Ⅱ. Process System Layout 5&6. ITB (Intermediate Transfer Belt) & 1st Transfer Roller The life span : Print over 100,000 Images The ITB unit includes 1st Transfer Roller
Ⅱ. Process System Layout 7. OPC (Organic Photo-Conductor) The life span: Print over 24,000 Images
Ⅱ. Process System Layout 8. Toner Kits The life span: Color → 1000 images (Standard Coverage Print-Out) Black → 1500 images (Standard Coverage Print-Out)
Ⅱ. Process System Layout 9. Driver Ass’y Power is delivered by gearing of Drive Ass’y. By driving the motor, it supplies the power to the feeding unit, the fusing unit, and the distributing unit. Main Motor is similar to BigBang Main Motor.
Ⅱ. Process 10. SCANNER LAYOUT : Flatbed Layout (CIS movement section) (FLATBED GLASS SIZE) (SHEET SHADING) (CIS sensing location for ADF Copy)
Ⅱ. Process 11. SCANNER LAYOUT : ADF Layout
Ⅲ. Disassembly Objectives • Practicing the skill of disassembly and assembly. • Understanding the basic structures of major part.
Ⅲ. Disassembly 1. Covers 2 1 - Remove the Cassette forward. - Open the Front Cover and then Remove the Toner Kit and ITB. (Before removing ITB, pull out the connector.) 3 - Caution Don’t touch the Belt of WTB and keep free from dust. It can make Engine trouble. - Removed condition
Ⅲ. Disassembly 1. Covers 4 6 4 5 1 3 2 Unscrew 1 point of the back of the Right Cover. Put the main switch ‘ON’ and then remove the Right cover. Remove the Rear Cover. 7 5 4 3 2 1 Remove the Left Cover. Remove the Cover Cable and connector.
Ⅲ. Disassembly 2. Scan/ADF-Unit 1 3 - Unplug 4 connectors from Main PBA. (Scan-Motor, OPE, FFC of CIS,ADF Cable) - Remove the Cover-Jam by raising the Scan unit. 2 4 - Raise the Scan Unit and remove a Holder-Link by pushing both side of the Link. - Remove the Scan unit by raising perpendicularly.
Ⅲ. Disassembly 3. ADF-Unit 1 3 - Remove a Cover-Connector, unplug the connector and pull the hinges upward. - Disassembled condition. 2 - Unscrew 6 points. (Yellow circle)
Ⅲ. Disassembly 3. ADF-Unit 6 4 - Disassemble yellow circle. 5 - Disassembled condition of the Cover-Pick up. - Disassembled condition of the Cover Open Assy.
Ⅲ. Disassembly 4. Scan-Unit 1 3 - Unplug 2 Connectors. - Push out the Holder-Sheet by using sharp tool. 4 2 - Disassemble by lifting up the OPE ASSY. - Unscrew 2 points.
Ⅲ. Disassembly 4. Scan-Unit 6 5 - Unscrew 4 points and disassemble the Scan Standard ASSY. - Disassemble by lifting up the Scan Upper Assy
Ⅲ. Disassembly 4. Scan-Unit 9 7 - Disassembly of FFC : Pull out the COVER-FFC. - Disassemble the Scan Motor under the Scan Standard ASSY 8 10 - Disassembly of OPE-ASSY : Unscrew 4points - Disassembly of CIS : Unplug FFC and disassemble by rotating CIS unit. Remove white Slider-CIS.
Ⅲ. Disassembly 5. Cover-Middle Unit 1 3 Cover-Jam - Unscrew 4 points and disassemble the Cover-Middle. - Unplug Fan Connector from HVPS. 2 4 - Disassemble the Fan. - Unplug 3 connectors and Unscrew 1 points. (USB Host & Speaker & Binful Sensor Cable)
Ⅲ. Disassembly 5. Cover-Middle Unit 5 7 ACTUATOR-STACKER COVER-DUMMY TOP - Disassemble the COVER-JAM and ACTUATOR-STACKER. - Disassemble the COVER-DUMMY TOP under Cover-Middle. 6 - Disassemble the sub-parts.
Ⅳ. Trouble Shooting Objectives • Building ability to deal with various problems raised in the field by reviewing troubleshooting. • Check the solution of each problem. • Check the difference of each Jam.
Copy Problems – Causes and Solutions 1. White Copy Description: Blank page is printed out when copying. Check and Cause Solution • Check the Scanner Cover is properly closed. • Check shading profile. • Check white/black reference voltage on Main PBA.e.q • Check the FFC • Room light can pass through a thin original. • Redo shading profile I the tech mode. • Replace FFC if it is defective.
Copy Problems – Causes and Solutions 2. Black Copy Description: Black page is printed out when Copying. Check and Cause Solution • Check for CIS problem on the Main PBA. • Check shading profile. • Check the CIS harness is properly connected. • Redo shading profile I the tech mode.
Copy Problems – Causes and Solutions 3. Abnormal Noise(비정상적 소음) Description: There is noise when copying. Check and Cause Solution • Check the Scanner Motors, gearbox and rollers. • Check the Motor Drive on Driver PBA. • Check for correct assembly of gears and motor. Ensure no parts are fouling and these are no foreign objects in the mechanism or scanner path. Replace any wrong parts. • Replace the Main PBA.
Copy Problems – Causes and Solutions 4. Defective Image Quality Description: The copied image is excessively light or dark. Check and Cause Solution • Check the shading profile. • Check the gap between original and scanner glass. • Check printing quality. • Redo shading profile in the tech mode. • Remove the abnormal gab between original and scanner glass. • See “Print” troubleshooting.
Ⅳ. Trouble Shooting Scanner, OPE Problems – Causes and Solutions 1. Scan Lock Error Description: CIS doesn’t move. Display ‘scanner lock’ on LCD Description: CIS doesn’t move. Display ‘scanner lock’ on LCD Check and Cause Solution • Check if the CIS is placed right side. • Check the load against the CIS unit. • Check the abnormal system error. • If the CIS is placed right side, place it to left side. • Move CIS unit to left and right side for several times. • Power off and on.
Ⅳ. Trouble Shooting Scanner, OPE Problems – Causes and Solutions 2. Nothing Displayed on LCD Description: LCD does not display anything Check and Cause Solution • Check if OPE connection cable was connected well with main board. • If not, • OPE connection cable • connect well with main • board • 2. After connected well, Try to • reboot the printer
Ⅳ. Trouble Shooting Scanner, OPE Problems – Causes and Solutions 2. Nothing Displayed on LCD
Ⅳ. Trouble Shooting Scanner, OPE Problems – Causes and Solutions 3. Copy image can’t identify. Description: Copy image look like ‘haze line’ Check and Cause Solution • CIS’s flat cable was not • connected well • Retry connect the flat cable on the CISM.
Ⅳ. Trouble Shooting Scanner, OPE Problems – Causes and Solutions 4. ADF copy image can’t identify. Description:Only ADF copy image look like haze line(or white/black line). Check and Cause Solution • Check if Sheet-adf is contaminated with dust. • Check if the Sheet-adf is worn terribley. • Clean the both sided Sheet-adf face with soft cloths. • Replace Sheet-adf as new one.
Ⅳ. Trouble Shooting Scanner, OPE Problems – Causes and Solutions 5. Glass Broken Description: Scanner glass was broken Check and Cause Solution • If the scanner glass was broken • Replace scanning unit Ass’y
Ⅳ. Trouble Shooting Scanner, OPE Problems – Causes and Solutions 5. Glass Broken
Ⅳ. Trouble Shooting ADF Problems – Causes and Solutions 1. Document Jam Description: Document Jam was occurred. Check and Cause Solution • Check if Pad-Adf is worn. • Check if too thick document is put in. • Pull out the jammed document, and replace the Pad-Adf. • Pull out the jammed document. The Maximum document thickness is 0.15mm.
Ⅳ. Troubleshooting Consumption Goods Cartridges should be replaced timely for the good quality of the print. Life : Imaging Unit : 24,000 images Toner Kit : 1,000 images (Y,M,C) & 1,500 images (Bk) Waste Toner Tank : 10,000 images