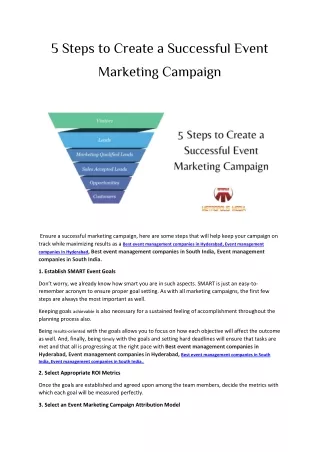
Download

1 / 41
410 likes | 556 Views
Create Event. Create Event. Pathfinder District Web Page Before Logon. Create Event. Step 1. Enter your user name and password. Then press the logon button button. If you don't see the logon button then scroll down the screen. Create Event. Step 2. Screen shot showing the logon button.

E N D
Create Event Pathfinder District Web Page Before Logon
Create Event Step 1 Enter your user name and password. Then press the logon button button. If you don't see the logon button then scroll down the screen.
Create Event Step 2 Screen shot showing the logon button.
Create Event Step 3 After logging on you should have the administrator menu at the top of the screen. Note: if this does not show then contact the web administrator to add it to your role/permissions.
Create Event Step 4 Click the content menu.
Create Event Step 5 Click the Add content menu. Then click the Event menu
Create Event Step 6 The Create Event Screen shows
Create Event Step 7 Enter the desired information in the fields.
Create Event Step 8 Notice the Microsoft Word Like Menu on the edit summary. Entering a summary is as easy as creating a word document.
Create Event Step 9 The paste from Text or Microsoft Word buttons allow you to paste from any document you have on your computer. If you are comfortable creating documents in MS Word then do so and just paste it into the web site>
Create Event Step 10 To Add a Map link then highlight and copying the address.
Create Event Step 11 Open another web page and go to http://maps.google.com and paste the address into the address bar.
Create Event Step 12 Click the Search button.
Create Event Step 13 Click the Link button
Create Event Step 14 Copy the highlighted link
Create Event Step 15 Click the link button in the editing ribbon.
Create Event Step 16 Paste the link into the url.
Create Event Step 17 Click the drop down arrow and select _blank in order to pop the link up in a new window.
Create Event Step 18 Click the Insert button to set the link.
Create Event Step 19 Scroll Down to enter the event date.
Create Event Step 20 Clicking in the date field pops up a calendar to select the date.
Create Event Step 21 Enter the time. Time is maintained on a 24 hour clock. 6:00 pm is 18:00 for time
Create Event Step 22 If the event repeats over a period a time then select the repeat button and enter the appropriate information.
Create Event Step 23 Add an event flyer if there is one.
Create Event Step 24 Click the Choose File button. A browse file window opens. Navigate to the location of the file on your computer and select the file.
Create Event Step 25 After selecting the file click the Upload button
Create Event Step 26 Up to 5 files can be attached to an event with a max size of 2MB each.
Create Event Step 27 An event is not typically going to have a menu item so this box should not be checked.
Create Event Step 30 You can create a new revision by checking the Create new revision. This allows you to restore from a previous version.
Create Event Step 31 Every item can be printed, created as a pdf or emailed. To change that on individual items then remove the necessary check boxes from this section.
Create Event Step 32 This can be changed but it is not necessary.
Create Event Step 33 This defaults to the person creating the content.
Create Event Step 34 All Content is considered publish (viewable on the web site) unless the check is removed. To have an item show in events as well as on the front page then check the Promoted to front page check box. The sticky box will make the item the first one on the list.
Create Event Step 35 This event is posted to the front page so the promote to front page check box is checked.
Create Event Step 36 Click the Preview button to see how it will be displayed.
Create Event Step 37 Scroll to review the preview
Create Event Step 38 Click the Save button
Create Event Step 39 This screen displays the event as it was created and allows changes. See the View, Edit and Repeats link above. NOTE: the error shown is due to the installation on my PC and email is not setup. This will not happen from the hosted site.
Create Event Step 40 Click the Home to see the front page.
Create Event Step 41 This shows the homepage as the content was added. You are now finished posting an Event to the web site.