Download
1 / 33
330 likes | 507 Views
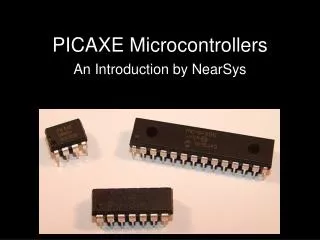
The Picaxe Microprocessor. What is it???. Well, first a large company called Microchip Technology inc. created a Programmable Interface Controller (PIC). A pic is essentially a computer built into a single chip.

E N D
The Picaxe Microprocessor What is it???
Well, first a large company called Microchip Technology inc. created a Programmable Interface Controller (PIC). A pic is essentially a computer built into a single chip. This PIC was designed to be used in thousands of products such as televisions, calculators, microwaves, computers, watches, dish washers, washing machines, telephones, and so on……… Millions of pics were and are being made.
But the limitation of the blank pic was that it had to be programmed by skilled engineers in a difficult to understand language. Also, an expensive programmer was required to program each chip. For a company designing consumer electronics, this was not too much of a hindrance as only one complex program had to be written per batch of electronic goods, and only one programmer could program thousands of chips on a production line.
Then along came Revolution Education, a UK company, funded by gas and oil giants. Revolution Education wrote a program that could be called an operating system, just like Windows on your PC. This made the pic much easier to program. Revolution Education also created an easy to use programming editor, which used the programming language known as Basic to program the pic.
Now students can program the Picaxe processor very easily, and use it for many applications such as:
We have been working on an ASISTM grant with 5 secondary schools. La Trobe Secondary, Diamond Valley College, Lalor North Secondary, Peter Lalor Secondary, and Essendon Keilor College. As part of the grant, students start out with a universal project board; The UniBoard ™ After building and programming the UniBoard, students are then open to build and design their own unique projects. These projects can be ANYTHING to do with electronics, mechatronics, Picaxe chips and science!!
One such project could be: Releasing a Picaxe powered weather balloon to the stratosphere:
The onboard picaxe could log the temperature, light level, atmospheric pressure, humidity. It could also control a camera to take photos of Melbourne…
Other projects could be: A giant LED clock/thermometer just like the Nylex clock in the city An external weather monitor An alarm system The list goes on……
Now it is your turn to program the picaxe processor We will start off by blinking a few LEDs. You will see the UniBoard in front of you. There are three onboard LEDS. Red, Yellow and Green. Each LED is connected to an output pin. Red = pin 0 Yellow = pin 1 Green = pin 2
We can use the “high” and “low” commands to turn the LEDs on and off. See what this program does: Main: High 1 Pause 1000 Low 1 Pause 1000 Goto main
Now let’s use the play command to play a tune: Main: Play 0,1 Pause 1000 Goto main
Now let’s write a program for a stop light Remember red = 0 Yellow = 1 Green = 2
Main: High 0 Wait 30 Low 0 High 2 Wait 30 Low 2 High 1 Wait 3 low 1 Goto main
Thank you! More info is at www.apmp.com.au