Download
1 / 22
220 likes | 303 Views
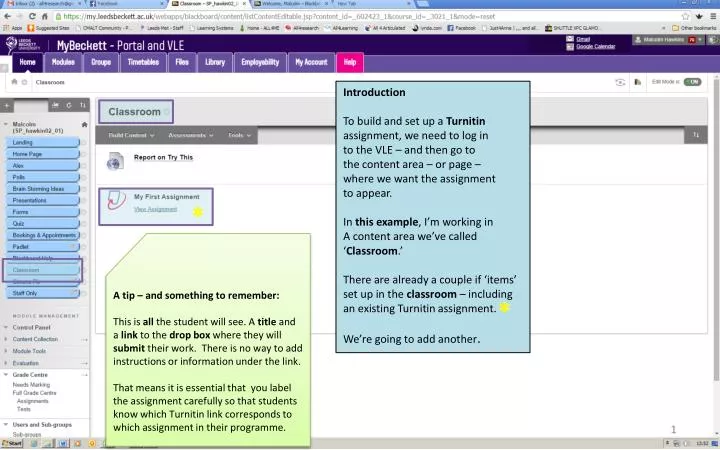
Introduction To build and set up a Turnitin a ssignment, we need to log in t o the VLE – and then go to t he content area – or page – w here we want the assignment t o appear. In this example , I’m working in A content area we’ve called ‘ Classroom .’

E N D
Introduction To build and set up a Turnitin assignment, we need to log in to the VLE – and then go to the content area – or page – where we want the assignment to appear. In thisexample, I’m working in A content area we’ve called ‘Classroom.’ There are already a couple if ‘items’ set up in the classroom – including an existing Turnitin assignment. We’re going to add another. * A tip – and something to remember: This is all the student will see. A title and a link to the drop box where they will submit their work. There is no way to add instructions or information under the link. That means it is essential that you label the assignment carefully so that students know which Turnitin link corresponds to which assignment in their programme. *
Before we start One thing worth mentioning before we begin, is that we are creating a drop box for our students to submit theirwork. The system will keep referring to ‘creating an assignment. And, as you can see, the finished item will say ‘view assignment.’ But it will only be a drop box. There will be no instructions, briefing or marking criteria details. And this (icon, title and link) are all that the student will see. And the title is the only part you can control. So… it is important to label this clearly and unambiguously. Just putting ‘essay’, for example is not a good idea. A tip: Create a sub-folder in your content area labelled with the title and details of the assignment. Then put all the components and all the information needed for that assignment in the folder. Briefing, marking criteria, contacts etc. and the Turnitin link. * *
* * First Steps To set up your Turnitinassignment... Make sure that Edit Mode is ON… …then click Assessments and Turnitin Direct Assignment * *
The ‘Details’ We will enter the details and ‘rules’ here. Anything with an asterisk alongside, must be filled in. We can change and edit the details afterwards if we make a mistake or change our minds. But… Some of these settings need to be defined by the tutor – and the implications understood before using the system, so we will consider those implications as well as the ‘procedure’ as we set up our assignment. Something to remember: Some of the settings and ‘rules’ may be dictated by ‘Organisational Policies.’ Targets for marking and feedback time, for example, will affect the ‘post date.’ If in doubt, check the policies and make sure the Turnitin settings comply. *
Some basics first. The assignment name is crucial. It is all the student will see. There is no way to add any further details or instructions – so this has to be clear, unambiguous and consistent with all other course documents. The contents of the ‘Assignment Description’ box cannot be seen by the student. This is only for your reference purposes. So take care – students have been known to submit in the ‘wrong’ place due to unclear labelling. * *
And some more basics... The number of parts can be changed. If you are asking students to submit multi-part assignments then this box needs to be altered. It will tell the system to create drop boxes that allow submission of the ‘parts’ without each successive entry over writing the previous ones. Most assignments submitted under Turnitin are ‘one part’ assessments – such as an essay or a report. Depending on how we set it up, students can still submit more than once during the ‘life’ of the assignment, with each draft over writing the previous one – and with the tutor (usually) only marking the final version. And finally: We strongly recommend marking out of 100. Always. You can adjust this to match the overall weighting of the assignment – but it is far easier (and more flexible) to mark out of 100 and let the Grade centre or a spreadsheet do the calculations. *
Submission Type. By far the most common type of submission will be a ‘file upload.’ This is where students will ‘send’ you their essay or report – just like attaching it to an e-mail. The finished work will be sent to and stored on Turnitin’s computer system and you will be able to see, review and mark it from there. You can change this setting to ‘file upload’ and this will restrict student choice when they come to submit. If you leave it set to ‘Any’ then it will allow a little more flexibility – and has no effect on the process other than to give the student one more choice – and one action – to take when submitting. * *
Dates and Times. Start date: When the drop box will be available to students. This should match the hand out date. Due Date: The hand in date (deadline). Post Date: When the Turnitin system will pass the marks to the VLE’s grade centre – and make them available to students – if you are marking on-line. Set (and alter) the dates by clicking on the small calendar icon next to each heading. Set the date by clicking on the calendar, and the time by using the sliders underneath. Then click done. Dates: A couple of things to remember. Unless you are going to start marking immediately (or there is a very specific skills related reason) there is no real point setting a due time of 9.00am. We no longer have to collect and collate the papers – so set times accordingly. And consider the Post Date carefully. It needs to reflect the time needed for processing and marking – and the course ‘service aims.’ * *
The details: two key things... This is slightly ‘out of order’ but these two points are: Very important Underpin everything else So we’re covering them first. Students view originality reports. You have a choice – yes or no. In other words, are students allowed to see the results of Turnitin’s analysis? Our strong recommendation is YES. Unless you have very specific and specialised reasons, this option defeats the object of Turnitin. If you are encouraging the use of Turnitin as a tool to help students, this is the one to pick. Allow late submissions. This only refers to submitting through Turnitin. You may think it is better to make latecomers hand in manually. Then you can identify those who missed the deadline – and by how much. However, Turnitinautomatically date and time stamps every submission so there is no problem identifying the late submissions. And, by taking these through Turnitin you are making sure al submissions are safe, accounted for and cannot be lost. And have been checked for originality. Again, our recommendation is to always choose ‘allow.’ *
Reporting Options. Turnitin is designed to scan and assess the work submitted. It looks for and reports on ‘similarities’ – parts of the work that ‘look like’ other, published or previously submitted texts. There are 3 options for how and when that report is presented to you and (assuming you allow it) students. Immediately, first report is final: The report is created soon after submission and all ‘authorised’ parties will be able to see it. But no redrafting or resubmission is possible. It is only useful you have a specific reason (such as testing for suspected plagiarism). If you are encouraging the use of Turnitin as a tool to help students, then this is not recommended. Immediately, can be overwritten until due date: This option also creates and displays the report as soon as possible – but it allows students to submit successive drafts, and so respond to the findings of the report. This is the recommended option – for obvious reasons. On due date (only): The report only appears after the deadline. So no guidance is given and no redrafting or resubmission is possible. Again, not recommended – or useful - in ‘normal’ teaching circumstances. * One tip: The first draft & report will be processed pretty quickly. Successive drafts and submissions will take longer. Sometimes much longer. Students need to be aware of this when planning their work. *
The ‘Checking’… Turnitin’s analysis and report is made by comparing submitted work with several ‘libraries’ of documents. We can adjust exactly what is included in the comparison – and how ‘precise’ the comparison should be. We need to consider each one in terms of our assignment and module goals. As a rule of thumb, it is easiest to leave all these at their ‘default’ settings as that will give the widest range of comparison. Two areas that are worth mentioning are: Excluding quoted material; Choosing yes would mean Turnitin ignored text in quotes. Depending on circumstances this may be the best option. However, it does open up the potential for errors in the analysis – and it can be ‘switched off’ in the final report anyway so it is easier to leave this at no. Check stored student papers; With this set at yes, Turn it in will compare the work to student submissions it has in its archives – including the rest of this group. As such, setting it at yes helps identify inter group plagiarism, collusion and the ‘passing on’ of older work. * *
Marking… Turnitinhas facilities for marking on line – and for reporting the grades. It can also automatically enter the grades we awarded (when marking on line) into the VLE’s Grade Centre spreadsheet. These features can make marking and reporting easier and more efficient - and speed up the communication of grades and feedback These functions (using Turnitin’sGrademarktools) will be covered separately. However there are a couple of things that need mentioning here. Use anonymous marking; It is possible to mark anonymously even when using the on-line systems. For some organisations this is essential. Others exempt on-line submissions from the need for anonymity. The choice here will reflect the rules and policy of your organisation or professional body. Use Grademark; This is Turnitin’s on line marking tool. Here it is set to be used. This doesn’t mean we have to use it, just that it would be available if we wished to. It is also set to use the Turnitin grades and make them ‘public’ at once. Depending on circumstances you may wish to change these settings – not revealing grades until all work has been handed in and marled, for example. * *
Finally… When all the settings are done, we click Submit to save the assignment (drop box) and return to the main screen. The drop box will then be available to students in accordance with the rules we set. *
* * Finishing off? The Classroom content are now looks like this. This is what students would see – and by clicking ‘View Assignment’ they would be able to submit their work. If we want to make changes or edit the rules and settings we can do so. If Edit Mode is ON, we can click the small downward V alongside the assignment title, and choose Edit from the drop down list.
* Making Changes to the settings: The Edit or Modify screens By choosing Edit, we are taken back in to the set up area. Now we will see a choice of 4 headings underneath the assignment title. Choosing Modify will allow us to review – and alter – any of the settings. Clicking Submit will save the changes. Useful information: When you are editing or reviewing a Turnitin assignment the links and headings around the title may seem a little ‘squashed.’ There have been some bugs in the system that cause this. It’s not your screen – or you.
Useful information: You can see the ‘squashed’ text here. If you see this, it’s the Turnitin system that cause it. * Reviewing the assignment – and getting a copy of the work handed in Clicking on Summary displays the assignment details. The start, due and post dates (and times) and grading scale are all shown. Our assignment was a ‘single part’ submission but we can change this directly from here – adding or editing the ‘parts’ of the assignment. And we can export – download – copies of the assignments that have been submitted. So if you want to save a copy of the work on your own machine – for archiving or to mark off line – this is one way to get a copy of the files. All available files will be downloaded in one zip file for you to unpack and use.
Useful information: You can see the ‘squashed’ text here. If you see this, it’s the Turnitin system that cause it. * Checking on Submissions Clicking on Submissions Inbox displays all the assignment that have been submitted, when they were submitted and a summary of the similarity report. If you have marked it using the on-line Grade Mark tool then the grade will be shown. This one is empty. No one has submitted yet…
Useful information: The download will be in the exact original format. So you need to have the appropriate software to open and view it. * * Checking on Submissions… Now someone has submitted. In the Submissions Inbox we can see the student’s name, assignment title and the date and time of submission. We would also be able to see the similarity report and grade. (Neither have been completed for this submission yet.) And by clicking on the assignment title or the similarity score we would see the completed, marked up report for this student. The final two icons allow us to download the assignment – or to remove it from our system. The download icon allows you to save a copy of the submitted assignment in its original format on your machine – for marking off line or for archive purposes.
Checking on Submissions… After Turnitin has processed the work Now someone has submitted – and it has been processed by the Turnitin system. It seems to show an 8% similarity score. If we click on either the score or the assignment title we will be taken to the detailed viewer…
* Useful information: The area on the right shows the sections of the assignment that Turnitin ‘recognises.’ And it shows a ‘percentage’ or degree of ‘similarity.’ By clicking on these, the viewer will display the appropriate section of the assignment in detail. The Report Viewer We can see an exact ‘copy’ of the assignment – together with the results of the analysis. These are divided into 3 basic sections. The most often used are the Originality Reportand the Grademarktool (for on-line marking). Another marking tool, PeerMark, allows peer review and marking of papers using the on-line system – if it is enabled and used. Here we’re going to concentrate on the Originality Report. So we have clicked on the Originality button in the top left.
Useful information: The original source may be displayed for comparison. Often there are legal problems with doing so and a message will inform you that the ‘source’ cannot be displayed here. If you want or need to pursue this further you would need to approach the owner of that source. Checking on Submissions… We can use the report viewer access several different report options and focus in on specific sections of the assignment. Here, we have clicked on the ‘graph’ icon in the very top right corner to change what is displayed in the viewer. The left graph icon shows the overall ‘similarity’ for a section. The right icon breaks this down to the specific sections of the assignment that have ‘similarities.’ Both show the perceived ‘source’ of the ‘match.’
Next… • Submitting a file • Reviewing • Marking On-Line • Reporting To suggest anything that needs to be covered … click here Or to get in touch directly… m.hawkins@leedsbeckett.ac.uk23588 South Lodge G03 a.rudette@leedsbeckett.ac.uk25342 South Lodge G03