Download
1 / 23
230 likes | 375 Views
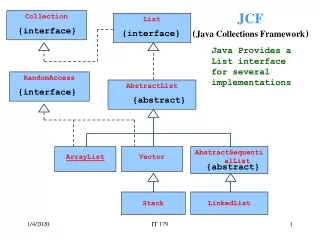
Collection. 陣列的缺點: 長度固定,不能動態增加資料. Colletion 物件架構. Collection 介面. 所有聚集(集合)的 祖先 一個盒子,用來存放 一堆物件. 既然是介面,所有[聚集]一定有下列功能:. add: 新增 remove: 刪除 contains: 是否含有指定物件 size: 聚集中有幾個物件? isEmpty: 是否有物件? Iterator: 瀏覽所有聚集中的物件. List 介面. 可以在集合中,放入 重複 的物件. Collection 介面.

E N D
陣列的缺點: • 長度固定,不能動態增加資料 Colletion物件架構
Collection 介面 • 所有聚集(集合)的祖先 • 一個盒子,用來存放一堆物件. • 既然是介面,所有[聚集]一定有下列功能: add: 新增 remove: 刪除 contains: 是否含有指定物件 size: 聚集中有幾個物件? isEmpty: 是否有物件? Iterator: 瀏覽所有聚集中的物件
List 介面 • 可以在集合中,放入重複的物件 Collection 介面 add:永遠加在最後一個位置的物件 remove:永遠刪除第一個位置的物件 … 被取代的物件 Object get(int index); 傳回指定位置的物件 Object set(int index, Object element); 將指定位置的物件取代掉
ArrayList 類別 • 實作 List 介面
java.util.List Mylist=new java.util.ArrayList(); • 新增一筆資料: • Mylist.add(new Animal(“Cat”)); • 讀取一項資料: • Animal Obj=(Animal) Mylist.get(0); • 刪除一筆資料 • Mylist.remove(0);
ArrayList 基本操作 • 瀏覽整個串列 java.util.Iterator it=MyList.iterator(); while(it.hasNext()) { Animal obj=(Animal)it.next(); System.out.println(obj.name); } 完整範例: PositionAccess
Sort:排序你的物件(由小至大) • 使用的是合併排序法 • 快速: 一定在 n log(n)時間內排序完成 (quick sort: 不保證在 nlog(n)) • Stable: 若兩個物件的key相同,則排序完 成後,兩個物件的順序依然不變. (quick sort 不是stable的排序法) java.util.Collections.sort(list集合, 大小定義)
定義你的物件誰大誰小 java.util.Collections.sort(list集合, 大小定義) • 接受實作java.util.Comparator介面的物件 比較子 Sort(list,newMyOrder() ); class MyOrder implements java.util.Comparator Sort(…) public int compare(Object o1,Object o2) { } 小寫
定義你的物件誰大誰小 java.util.Collections.sort(list集合, 大小定義) class MyOrder implements java.util.Comparator { public int compare(Object o1,Object o2) { if( ((Animal)o1).age > ((Animal)o2).age) return 1; else return –1; } } 按照正常大小順序回傳,則相當於 由小排到大 (natural sort)
範例: 排序你的物件(由小至大) class Animal{ int age; public Animal(int age) { this.age=age; } } import java.util.Collections.*; // for sort java.util.List Mylist=new java.util.ArrayList(); Mylist.add(new Animal(3); Mylist.add(new Animal(1)); Sort(Mylist,new MyOrder()); 完整範例: SortDemo
把集合中的物件放到陣列中 • toArray() • 多個類別在集合中: • 用 Object[] 儲存 • Instance of 動態判斷物件的類別 Object[] MyObject= new Mylist.toArray(); if( MyObject[0] instanceof Animal){ }
把集合中的物件放到陣列中 • 若你確定集合中只有一種類別: • 指定陣列型態物件 如: Mylist.toArray(new Animal[0]); • 轉型成指定型態即可 注意: 是物件 Animal [] MyMatrix=(Animal[]) Mylist.toArray(new Animal[0]); 存放的陣列 轉型 指定物件
範例: 把集合中的物件放到陣列中 class Cat{ String name; public Cat(String name) { this.name=String(name); } } class Animal{ String name; public Animal(String name) { this.name=String(name); } } java.util.List Mylist=new java.util.ArrayList(); Mylist.add(new Animal(“Animal”)); Mylist.add(new Cat(“Cat”)); Object[] MyObject= new Mylist.toArray(); Animal obj=(Animal) MyObject[0]; Cat obj2=(Cat) MyObject[0]; 完整範例: toArray
top Pop operation 使用 Stack • 當你不確定資料的數目 • 可以考慮堆疊(stack) • 重點是把 reference 放進去,非 copy top top Push operation
top top top top 建立與操作 Stack物件 • 建立 Stack 物件 import java.util.Stack; Stack myStack= new Stack(); • 操作 MyStack.push(物件); 注意; 物件參考=(轉型)MyStack.pop(); 物件參考=(轉型)MyStack.peek();
top top top top 操作範例 class Pixel{ int x,y; public Pixel(int y, int x){ this.y=y; this.x=x; } } // push 範例 Pixel P1 = new Pixel(1,2); myStack.push(P1); // peek 範例 Pixel curTopP1 ; curTopP1 =myStack.peek(); //pop 範例 Pixel topP1; topP1=(Pixel) myStack.pop(); 完整範例: StackDemo
使用Map • 儲存時, • 搭配 Key與資料一起放進去. • 取資料時, • 只要輸入Key • 就可以把相對應的資料取出來 Key1 Value1 Key2 Value2
設計你的Key • 取資料時,只要輸入Key • 比較儲存體中的每個Key • 如何比較 Key ? Key1 Value1 Input Key Key2 Value2 你必須自行定義 兩個 Key 是否相等 public boolean equals(Object obj){ 1. 先轉型 2. 比較 obj的資料內容是否相同 }
設計你的Key class ColorKey extends Object { public int Hi, Si, Hh, Sh; public ColorKey(int Hi,int Si,int Hh,int Sh){ this.Hi=Hi; this.Si=Si; this.Hh=Hh; this.Sh=Sh; } public boolean equals(Object obj){ ColorKey Other=(ColorKey)obj; if(Other.Hi==Hi && Other.Si==Si && Other.Hh==Hh && Other.Sh==Sh){ return true; } else return false; } }
現在你可以操作Map • 儲存你的資料 ColorKey MyKey=new ColorKey(1,2,3,5); // 建立 Map 儲存體 java.util.Map Storage=new java.util.HashMap(); // 把資料與Key一起放進去 Storage.put(MyKey,new Integer(123)); • 取出你的資料 注意: 要轉型 // 取出資料 Integer data=(Integer) Storage.get(MyKey);
其他的情況 • 搭配資料的Key已經出現過了! Storage.put(MyKey,new Integer(123)); Storage.put(MyKey,new Integer(567)); 會覆蓋掉 123的資料 • 用來取資料的Key,在Map中沒有出現 Integer data=(Integer) Storage.get(unKnownKey); data = null 完整範例: HashDemo
Hashtable Vs HashMap • HashMap 支援 • Null Key 與 Null Value • Hashtable 支援 • Synchronized