Download

1 / 25
410 likes | 1.61k Views
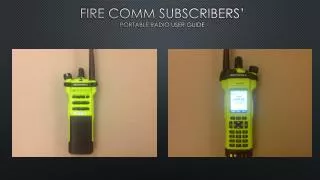
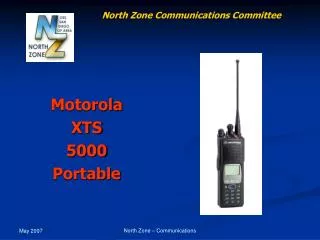
Motorola XTS5000 portable radio. Radio Training v3.11. The Anatomy Motorola XTS5000. Channel/Talkgroup Select. On/Off/Volume. ABC Zones. Antenna. Concentric Keypad Lock Switch. Emergency Button. Nuisance Delete Scan Mode on/off. Speaker. Mic. Purple Button. PTT. Display.

E N D
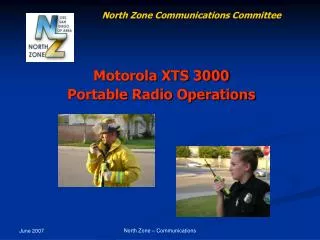
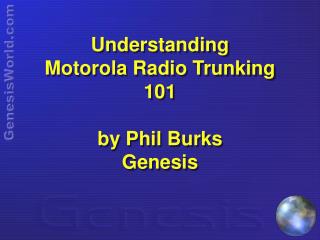
Motorola XTS5000portable radio Radio Training v3.11
The Anatomy Motorola XTS5000 Channel/Talkgroup Select On/Off/Volume ABC Zones Antenna Concentric Keypad Lock Switch Emergency Button Nuisance Delete Scan Mode on/off Speaker Mic Purple Button PTT Display • Multiple Function • Multiple Function 4 Way Navigation Multiple Function Alpha Button Home Keypad
Basic Radio Care PREFACE: Any major maintenance should be performed by a qualified radio technician. Physical • Do not pound, drop, or throw the radio unnecessarily. Never carry the radio by the antenna. • Keep the accessory-connector cover in place when not in use. • XTS5000 radios are ruggedized but care must still be taken to protect audio quality. Liquid Hazards • Do not disassemble or poke vents with objects such as needles, tweezers or screwdrivers. This could create leak paths and the radio’s submergibility will be lost. • If the battery contact area has been submerged in water, dry and clean the battery contacts before attaching to the radio. Otherwise, the water could short-circuit the radio. • If the radio has been submerged in water, shake the radio well so any water that may be trapped inside the speaker grille and microphone port can be removed. Water will decrease the audio quality of the radio. • Avoid subjecting the radio to an excess of liquids, corrosives, solvents or spirits. • Should the radio become soiled, wipe the casing clean with a damp cloth taking care not to allow excess liquid or detergent to be entrapped near the connectors, controls or crevices. Dry with a soft, lint-free cloth. Batteries • Clean battery contacts with a lint-free cloth to remove dirt or grease. • Motorola XTS5000 uses “smart” batteries - last approximately 10 hours before needing a full charge (dependent upon daily usage). High levels of transmission will reduce battery life. Mid and hi have battery status programmed in. • Do not attempt to use a different battery or antenna on your Motorola radio. You reduce tower coverage and could possibly damage the radio.
Display The most common symbols seen on your XTS5000.
On/Off /Volume Knob Power On/Off • Turn the On/Off Volume Control knob clockwise - LED light should flash. • If power-up is successful, you briefly see “SELF-TEST”, then your “home” display. • If power-up is unsuccessful, you see “ERROR XX/YY”. • Turn the knob counterclockwise until it clicks to turn the radio off. Volume • Turn the On/Off Volume Control knob clockwise until you reach the volumeyou desire.
Keypad Lock • To lock your keypad, turn the concentric switch to the open circle. • Your display will quickly flash “Keypad Lock” • Since this is a ‘hard button’ & not a ‘soft key’ linked to the display, the keypad will remain locked, even after turning off the radio, until you move the dial to the hashed circle.
Emergency Button • The orange button located on top of the radio is a “person down” feature. • When programmed, pressing this button gives a visual alert (on display) to others in your group that you are in distress. • To clear an active alert, press and hold down the orange button.
Universal Connector Cover Located on antenna side of the radio; use to connect accessories like an earphone or shouldermic. To prevent damage, shield this portwith the connector cover when not in use. Removal Attaching Insert the hooked end of the cover into the slot above the connector. Press downward on the cover’s top to seat it in the slot. Rub the ball of your thumb from the top to the bottom of the cover while applying pressure toward the radio. This should flex the cover and snap it into place. • Insert a flat-bladed screwdriver into the area between the bottom of the cover and the slot below the connector. • Hold the top of the cover with your thumb while you pry the bottom of the cover away from the radio with the screwdriver.
Microphone • Contrary to popular belief, the microphone is not located within the speaker screen. • Do not cover this small hole with stickers or labels. • Inspect it periodically for dirt and build-up. • Do not poke it with sharp objects to clean (toothpick, knife tip, pen).
The Purple Button • “Site Search” feature • When operating on MARCS, Hamilton County or Butler County, pressing this button searches for a tower site when the radio doesn’t seem to be working on its own, or you’re getting a rejection tone but think you should be hitting a tower. • Analogy: it’s like viewing available wireless networks on your computer and selecting the best signal.
Nuisance Delete • Push while a displayed talkgroup is keyed up to temporarily remove the talkgroup from your scanlist. • I.E. of the 10 talkgroups in your scan list, 3 are on a large fire that you’re following. You want to hear traffic on all 3 talkgroups so you need to stay in scan mode but the other 7 talkgroups are interfering. When one of the seven come across your radio, press Nuisance Delete. You won’t hear from them for the remainder of your focused scanning. • To put the talkgroup(s) back into the scan list, change a function on the radio (change channels, zones, turn the radio on or off) and your scan list will reset to include all programmed talkgroups.
Scanning Scan On/Off Button • Press the button with 2 raised squares to turn your scanning function on/off. The scan icon will appear in your display. • Scanning allows you to monitor traffic on multiple channels that you choose. The radio automatically switches to whichever talkgroup has activity. • Your radio can have several different scan lists.
Editing your Scan List • 1) Press and hold the scan button (bottom side button) until the Z symbol appears. • You will see a small square flash in the upper right corner of the display indicating the programming mode • You will also see SEL, DEL, and RCL displayed as possible selections • 2) ZNUP/ZNDN + change channels to find the talkgroups you want in your Scan List • 3) Press the button directly below SEL or DEL or RCL • SEL = add the currently displayed talkgroup to the scan list • DEL = delete the currently displayed talkgroup from the scan list • RCL = view the next talkgroup in your scan list • OR when adding a priority member, press the button directly below SEL additional times. You will see= this item is in the scan list= (dot) this item is in the scan list as the priority-two member NOTE: Priority-one is automatically the talkgroup you’re sitting on. You can’t edit this. • 4) Press the left or right side of the 4-way navigation button to select more items to be added or deleted. • OR use the keypad to go directly to additional items to be added or deleted • OR Use the 16 position select knob to select additional items to be added or deletedThe maximum number of members for a trunking priority monitor scan list is 15 • 5) Press HOME to switch out of the programming position
Motorola XTS5000 Channel/Mode Select • To select a channel/mode, turn the rotary dial on top of the radio to select specific talkgroups you wish to transmit/receive on. • From “HOME” position (A1), turn the dial counterclockwise and watch the display change from talkgroup to talkgroup in your home zone. Transmit and Receive (PTT) • Turn the radio on and select the desired talkgroup (will appear in the display). • Listen for ongoing conversations; if your talkgroup becomes available, proceed with your transmission. • Press the PTT button to transmit and wait for the talk permit tone (3 beeps). *Talk permit tone is not activated on law radios for safety • When speaking, put the radio to your cheek and talk across the mic. • If you hear a busy signal (honk), wait for a call back tone, key up before the hangtime (fuzz) goes out, then proceed with your call. • Release the “PTT” button to listen. Remember to wait briefly (a breath) before beginning your conversation as the system takes a little time to select an open channel and assign it to you.
Selecting a Zone • Press the blue dotted buttons that correspond with “ZNUP” / “ZNDN” on the display (the current zone will be the first letter in your title line.
Home • Pressing this button brings the radio to the “HOME” talkgroup which is where you will conduct your day-to-day business. • You must press and hold the “Home” button until the display changes to “YOUR HOME”.
Private Calls – Initiating(applicable to full keypad models & some agencies) • Arrow left on the directional button until “CALL” appears on your screen. • Press the key below “CALL” on your display to activate. • The last ID number that private called you appears on the display with the word LIST. • Press the “PTT” button to dial the displayed number OR • Press the button “LIST” to enter the Private Call List OR • Enter a new 6 digit ID number to be called via the keypad • Press the “PTT” button to transmit. • Press and hold “HOME” to exit the call.
Private Calls – Receiving(applicable to some agencies) • When a Private Conversation Call is received, two alert tones will sound and the display will read “CALL RCV”. • Press the button below “CALL” on your display… the last ID number received appears on the display. • Press the “PTT” button to talk; release to listen • Press and hold “HOME” to exit the call.
Page Alert - Initiate • Press the key below the word “PAGE” on your display • The last ID number that paged you appears on the display and the word “LIST” • Press the “PTT” button to dial the displayed number or enter a new 6 digit ID number (if you have a keypad model) • Press the “PTT” button to dial the displayed number • Press “HOME” to exit the feature
Page Alert – Receive • When a Page is received • You hear 4 repeating alert tones, • the LED flashes green, • the call received symbol flashes, • “PAGE RECEIVED” is displayed. • Press the “PTT” button - This dials the displayed ID number as a Private Conversation Call. • Press the “HOME” button to clear the alert and return to the main display
Motorola XTS5000 My ID Your 6-digit radio ID number shows on your radio display. • Press the button directly below “CALL” on the radio display. • Press the left side of the 4-way Navigationbutton to find your ID. • Press “HOME” to return to the home display.
Editing Time & Date Clock: 12-hour or 24-hour setting. When in 24-hour, AM/PM is not available.Date: default setting is MDY. • Press right arrow button to find “CLCK”. • Press white button below “CLCK”. Current setting is displayed. • Press white button below “EDIT”. The first item flashes. • Press up/down arrow button to change the selected field. • Right arrow to the next field & repeat step 4. • Repeat steps 4&5 until the clock is formatted to your liking. • Press SAVE to close the CLCK function. Note: If a call arrives while the radio is in the clock-setting menu, the radio exits clock setting, your changes are lost, and the call information is displayed.
Battery Removal Removal • Flip the radio upside down & find the recessed button on the bottom of the battery. • With one hand on the radio & one hand on the battery, press the button and pull the two pieces away from each other, hinging at the top of the units. Attachment • Line up the top of the battery into the radio • Hinge from the top, bringing the two together until they click into place.
Charging the Battery • Rechargeable “smart” battery designed to last approximately 10 hours • If battery is placed in the Impres charger while it still has some power, a red light appears on the charger and the battery is rapid charged. • Battery life depends on “key-up” time. Know what you want to say before you key-up to transmit. This will spare the life of your battery and show professional courtesy to other users. • Do not use other batteries on the XTS 5000 - this jeopardizes signal strength.
The Telecom Help System guarantees the appropriate person will receive your call/email, providing a quicker response. help@wcoh.net Contact Telecom’s Help System 513.695.HELP (4357)