Download

1 / 72

E N D
ISO Process ▪ Create Master Data – Roles, Users-Go to Slide ▪ Templates for Quality Document-Go to Slide ▪ Quality Document Using Template-Go to Slide ▪ Create Master Data -Item, Customer, Vendor, Equipment-Go to Slide ▪ Enquiry for Part-RFQ-Go to Slide ▪ Equipment And Vendor List-Go to Slide ▪ Issues Management-ECN,ECR,PR-Go to Slide ▪ ISO Document at One Window-Go to Slide
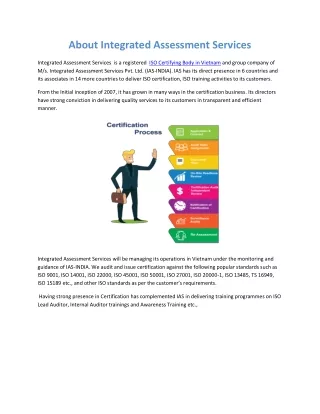
Process Flow Chart Create Roles, Users in Quality Admin Create Template Document Create Quality Document Using Template Quality Document Using Template Templates Document Master Data Create Equipment, Vendor List Create RFQ then Enquiry for Part Create Item, Equipment, Customer, Vendor Equipment And Vendor List Enquiry for Part Master Data Create PR, ECR, ECN for Issue Management Create ISO Document Issues Management ISO Document
Create Users ▪ Click on Users then click on plus icon to create new item. 2.Click Add 1.Click Users Creation of Users
▪ Enter Login Select Logon enable, Enter Name then click on Save & Close icon. 4.Click Save & Close Icon 1.Enter Login 3.Enter Name 2.Select Logon Enable Creation of Users
Create Predefined Roles ▪ Click on Identity then click on plus icon to create new item. 2.Click Add 1.Click Identity Creation of Identity
▪ Enter Name then Click Member and click on plus icon. 1.Enter Name 2.Click Member 3.Click Add Creation of Identity
▪ Select the Identity from search dialog and then click on Select Icon. 2.Click Select Icon 1.Select user Creation of Identity
Save Predefined Roles ▪ Finally then click on save then click on Close icon. 1.Click Save & Close Icon Creation of Identity
Create Templates for Quality Document ▪ Click on Documents then click on plus icon to create new item. 2.Click Add 1.Click Documents Creation of Templates
▪ Click on type then select type from opened window then click on select icon. 3.Click Select Icon 1.Click type 2.Select type Creation of Templates
▪ Enter Document No, Name then Select Editor type and click on Create Document. 1.Enter DOC no. Name 3.Click 2.Select Type Creation of Templates
Created Template Document ▪ Create document template in opened window and click on save button 1.Click on Save button Creation of Templates
▪ Click on save and close icon 1.Click on Save & close icon Creation of Templates
Create Quality Document ▪ To Create Quality Document click Document then click on plus icon to create new item. 2.Click Add 1.Click Documents Creation of Quality Document
Save Quality Document ▪Click on type field , then select type of document and click on select icon. 3.Click on select icon 1.Click on type field 2.Select Type of document Creation of Quality Document
Save Quality Document ▪Click on type field , then select type of document and click on select icon. 1.Enter document no, name, description details 2.Click on Document button Creation of Quality Document
Quality document created ▪ Enter details in opened quality document and click on save button. 1.Click on save icon Creation of Quality Document
▪ Enter details in opened quality document and click on save button. 1.Click Save & close icon Creation of Quality Document
Create New Item ▪ To Create Item click on Item then click on plus icon to create new item. 2.Click Add New 1.Click Items Creation of Item
Create type of Item (Raw Material) ▪ Click on type then select type from opened window then click on select icon. 1.Click type 3.Click Select Icon 2.Select type Creation of Item
▪ Enter Name, Description, Weight then select UOM. 1.Enter Name, Description 3.Select UOM 2.Enter Weight Creation of Item
▪ Click Image, Click External File then Click on Open File. 1.Click Image 2.Click Ext File 3.Click Open File Creation of Item
▪ Click on Selected Image then Click Open. 1.Click Image 2.Click Open Creation of Item
▪ Image browser opens then Click on Select Icon. 1.Click Select Icon Creation of Item
Save Item (Raw Material) ▪ Finally then click on save then click on Close icon. 1.Click Save 2.Click Close Icon Creation of Item
▪ Click Run Search to view created Item. 1.Click Run Search 2.Created Raw Material Creation of Item
Create type of Item (Equipment) ▪ Click on type then select type from opened window then click on select icon. 1.Click Type 3.Click on Select Icon 2.Select Equipment Creation of Item
Save Item (Equipment) ▪ Enter Name, Description, Weight then Select UOM and Image. ▪ Click on Save then Close icon. 1.Enter Name, Description 5.Click Save & Close Icon 4.Select Image 3.Select UOM 2.Enter Weight Creation of Item
Create Vendor ▪ Click on Vendor then click on plus icon to create new item. 2.Click Add 1.Click Vendor Creation of Vendor
▪ Enter Vendor Code, Name, Description, Details then Select Details. 2.Enter name, description 1.Enter Code 3.Enter Details 4.Select details Creation of Vendor
Save Vendor ▪ Finally then click on save then click on Close icon. 1.Click Save & Close Icon Creation of Vendor
Create Customer ▪ Click on Customer then click on plus icon to create new item. 2.Click Add 1.Click Customer Creation of Customer
▪ Select type then Enter Name, Description, PAN no, GST no then Enter Details. 2.Enter name, description 3.Enter Pan no. GST no. 4.Enter Details 1.Select type Creation of Customer
Save Customer ▪ Click on save then click on Close icon. 1.Click Save & Close Icon Creation of Customer
Create RFQ ▪ Click on RFQ then click on plus icon to create new item. 2.Click Add 1.Click RFQ Creation of RFQ
▪Click type and Select type from opened window then Click on Select icon. 1.Click type 3.Click Select Icon 2.Select type Creation of RFQ
Save RFQ ▪ Select type, Customer, Part, PO then Add Attachment. ▪ Click on Save icon. 5.Click Save icon 2 Enter RFW details such as customer, part, po 1.Click RFQ type 3.Tool and part cost filled from selected PO 4. Total cost calculated from part and tool cost Creation of RFQ
Create RFQ Report ▪ Click Report then Click on RFQ Report. 1.Click 2.Click RFQ Report Creation of RFQ
▪ Select Date then Click on Run Report. 1.Select date 2.Click Run Report Creation of RFQ
RFQ Report Creation of RFQ
Enquiry for Part-RFQ ▪ Enter Name then Select Year, Add RFQ then Click on Save & Close icon. 6.Click on select icon 1.Enter Name 2.Select Year 5. Select RFQ 3.Click RFQ 4.Click on plus icon Creation of Enquiry
Enquiry for Part-RFQ ▪ Click on Save & Close icon. 1.Click save & close icon Creation of Enquiry
Create Vendor List ▪ Click on Vendor List then click on plus icon to create new item. 2.Click Add 1.Click Vendor List Creation of Vendor List
▪Enter Name and Select Year. 1.Enter Name 2.Select Yr Creation of Vendor List
▪Click Vendor List, Click Add then Select type from search dialog then Click on Select icon. 4.Click Select Icon 2.Click Add 3.Select vendor 1.Click Vendor List Creation of Vendor List
Save Vendor list ▪ Click on save then click on Close icon. 1.Click Save & Close Icon Creation of Vendor List
CreateEquipment List ▪ Click on Equipment List then click on plus icon to create new item. 2.Click Add 1.Click Equip List Creation of Equipment List
▪Enter Name and Select Year. 1.Enter Name 2.Select Yr Creation of Equipment List
▪Click Equipment List, Click Add then Select item from search dialog then Click on Select icon. 4.Click Select Icon 2.Click Add 3.Select Item 1.Click Equip List Creation of Equipment List