Download
1 / 33
330 likes | 441 Views
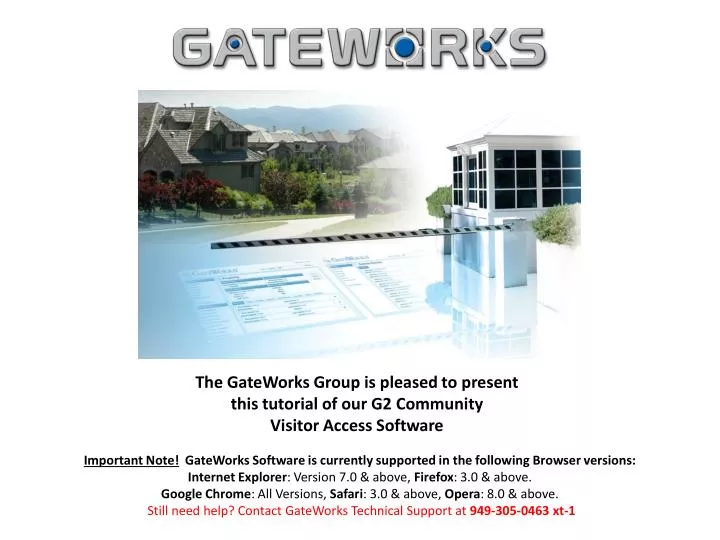
The GateWorks Group is pleased to present this tutorial of our G2 Community Visitor Access Software.

E N D
The GateWorks Group is pleased to present this tutorial of our G2 Community Visitor Access Software Important Note!GateWorks Software is currently supported in the following Browser versions:Internet Explorer: Version 7.0 & above, Firefox: 3.0 & above. Google Chrome: All Versions, Safari: 3.0 & above, Opera: 8.0 & above. Still need help? Contact GateWorks Technical Support at 949-305-0463 xt-1
Table of Contents Logging In Security Setup Home Page Community Amenity Reservations Event Calendar RSVP Documents Photo Albums My Account Contacts Settings Deliveries Vehicles History Visitors Parties Work Orders Pets Support 3 4 5 6 7 9 10 11 12 13 14 19 20 21 22 24 29 31 32
Logging In First time login instructions: Enter your primary phone number in the “Login” box: (ex: 949-123-4567) Your phone number will always be your Login, and any phone number attached to your account can be used. Enter your home address in the “Password” box: (ex: 174 Elm) INCLUDE ANY SPACES IN ADDRESS. You will be automatically directed to the SECURITY SETUP page. (See next page) 1 2 3 4 Returning Users: You can also click on “Need Password Help?” if you have forgotten your password. 3. New Resident Tutorial: If initial login fails, contact property management to ensure phone number is in the database or call tech support: 949-305-0463 xt 1 4. First Time Users: If initial login fails, contact property management to ensure phone number is in the database or call tech support: 949-305-0463 xt 1
Security Setup First time login instructions: Security Setup Page A Step 1: Click “Add Email Address” and enter email. (A) B Step 2: Click “Add Security Question” and enter 3 security questions for password recovery feature. (B) C Step 3: ”Edit Notification Settings” (optional) see pages 17-18. (C) D Step 4:To set a primary/secondary password, click “Edit” to add password. (D) Step 5: To validate summary, click “Confirm and Proceed”. You will be directed to Home Screen. (E) E *After initial security setup completion, your password can be updated at any time in the My Account > Settings > Security section.
Home Page The Home Page gives you easy access to Announcements, Visitor Information and Upcoming Events. Recent Announcements (A) Upcoming Visitors (B) Upcoming Events (C) C A Hint: You can quickly add a new visitor from this screen by clicking “Add Visitor”. (C) B
Community The Community Section gives you a description and link to all community pages. A Community Menu (A) Highlight any section of the menu and click on it to view the page. • Amenities • Announcements • Association Info • Event Calendar • Directory • Documents • Event Calendar • Local Resources • Photo Albums
Amenity Reservations The Amenities Page shows a description of all community amenities and hours of operation. Some amenities will allow you to make a reservation. To Make a Reservation: Step 1: Click the “Make Reservation” link to open the reservation window (A) A
Amenity Reservations Step 2: Select a date to view available times (B) B Step 3: Choose a start time (C) Step 4: If desired, create a note with special instructions for the property manager (D) C Step 5: Enter your email address to receive a notification email about your reservation (E) D Step 5: Click “Save” (F) E F
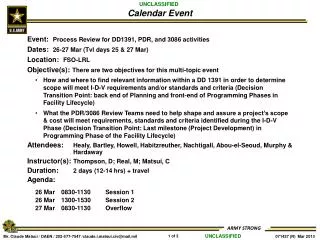
Event Calendar RSVP The Event Calendar Page shows a list of all community events and the event details. Some amenities will allow you to RSVP. To RSVP to a Calendar Event: Step 1: Click the “RSVP” button to open the RSVP window (A) Step 2: Select your response (B) A Step 3: Choose the total number of attendee(s) (C) B C Step 4: If desired, add comments for the manager (D) D Step 5: Click “Save” (E) E
Documents The Documents page lists all pertinent documents to the community (homeowners manuals, community rules, etc.) available for download. To Download a Document Step 1: Click the “Download” button to open a download window (A) A Step 2: Select open or save to manage your file (B) B
Photo Albums Photo Albums are created by an administrator or manager and are made available to residents for viewing. Contact information is provided in a window on the right hand side for residents to submit photos.
My Account A The My Account Section gives you a description and link to all My Account pages. My Account Menu (A) Highlight any section of the menu and click on it to view the page. • Contacts • Settings • Deliveries • Vehicles • History • Visitors• Parties • Work Orders • Pets
Contacts The Contacts section shows a list of contacts and allows you to update and add contact phone numbers and email addresses. You can also indicate the order in which you would like the names to appear. The gate staff will call you to authorize guests if they are not on your guest list (Contact Display Order Window) (A) A A To Add a Contact Step 1: Click the “Add Phone Number” (B) D Step 2: Enter type of contact, a description, and the phone number. Also indicate if it is an emergency contact (C) C Step 3 : Click the “Add Email Address” link and repeat Step 2 (D)
Settings The Settings Page shows allows you to set passwords, edit security questions, Opt-in to the community directory and set up your notifications. B PasswordsStep 1: Click the “Edit” under the Security header to open a password window (A) C A Step 2: Enter and confirm your primary and secondary passwords (B) Step 3 : Click “Save” (C)
Settings Security QuestionsStep 1: Click the “Add Security Question” button to open the Security Questions window (A) B C D Step 2: Select a question from the drop down menu (B) Step 3 : Type the answer in the “Answer” text field (C) A Step 4 : Click “Save” (D)
Settings Directory Opt-InStep 1: Click the “Edit” button under the Directory Opt-In header (A) B Step 2: Select the information you would like to be made available in the community directory. This information will be visible to community residents and property management (B) C Step 3: Click “Save” (C) A
Settings Notifications In the Notification Settings, you are able to set up both email and text notifications for different community items and events. Event Descriptions: Access Devices: If your community has a resident vehicle transponder system managed by our software…you can receive a text message whenever a vehicle enters the property through any gate. Announcements: Receive a text message whenever a new announcement is posted to the website, Calendar Events: Receive a text message whenever a new calendar event is posted to the website. Deliveries: Receive a text message when a delivery has been accepted at the front desk (HighRise Version only) Guest Passes: Receive a text message whenever a pass prints at the gate for a visitor/vendor to your property. RSVP Confirmation: Receive a text message whenever a reservation is approved or denied. New Visitors: Receive a text message whenever a new visitor has been ADDED to your guest list (confirmation)
Settings Notification Settings Step 1: Using the dropdown menu, choose your cell phone provider for any cell phone listed. (Please note: You must enter a cell phone number in the contacts section in order for this feature to work) (A) C D Step 2: Click on each check box for the events you would like to receive a text notification for (B) A B Step 3: Modify your email notifications (Please note: You must create an email address in the contacts section in order for this feature to work) (C) Step 4: Click on each check box for the events you would like to receive an email notification for (D)
Deliveries If you’re using our “High Rise” Condominium version, You will be able to see all deliveries that have been picked up by you from the front desk.
Vehicles View your property vehicle information. Edit and modify if your Association allows. If you have a transponder system on your vehicle for access control at your community, the “Edit” and “Delete” feature may not be available…as you’ll need to update this information with your association management office directly.If you are assigned carport spaces and storage units, this information will be added here by management. A Add VehiclesStep 1: Click the “Add Vehicles” button (A) Step 2: Enter the License Plate Number, Year, Make, Model and Color of your vehicle (B) B C Step 3: Click “Save” (C)
History View your visitor, delivery, and transponder history (if applicable). Check HistoryStep 1: Choose your custom history timeline by clicking on the calendar dropdown menus. (A) A B Step 2 : Click “Refresh” to show a newlist of results (B)
Visitors The Visitors Page shows a list of temporary, permanent and unauthorized guests. View your visitor list to edit or delete as desired. Add a VisitorStep 1: Click the “Add Visitor” button to open the Visitor Details window (A) A
Visitors Step 2 : Select the Type of your visitor – Temporary, Permanent , or Unauthorized. (B) B Step 2 : Any “Previous Visitors” entered to your property are located in the virtual rolodex dropdown. This will auto populate with prior entered data (C) C G D Step 3 : For a new visitor, enter a First Name, Last Name, Company (if applicable), Email, License Plate and Visitor Notes (D) E Step 4 : Choose the days of the week that the visitor is allowed (E) F Step 5 : Click “Save” (F) Step 6 : Visitors will receive an authorized guest email. (G)
Parties The Parties section allows you to create a party and add a list of visitors. Once created, the party list will notify your association management and the security company of your party. You will see their confirmation in the “status” area. Add a PartyStep 1: Click the “Add Party” button to open the Party Detail window (A) A
Parties Step 2 : Enter Party Name and Date (click on mini calendar next to the date window to open calendar screen) (B) B Step 3 : Enter “Start” and “End” time for party. Click on the hour and edit by using your number keys, then click/tab to edit the minute, then click/tab to edit AM/PM. Then click on the UP and DOWN arrow (C) C D E Step 4: Select “New Party” (D) F Step 5 : Enter First Name and Last Name (E) G Step 6 : Add a note for the gate staff if necessary (F) H Step 7 : Click the “Add” button to add a guest to the list (G) Once the guard staff or management have approved the party, your notification will show “Approved.” Your guests will be on the list when they arrive. Click on “Load Previous Party” to load a previously entered party with the same guest list. This can also be edited. Step 8 : Click “Save” (H)
Parties Import a Party Microsoft Office Excel Software Required A Step 1: Enter Party Name and Date (click on mini calendar next to the date window to open calendar screen) (A) B C D Step 2: Enter “Start” and “End” time for party. Click on the hour and edit by using your number keys, then click/tab to edit the minute, then click/tab to edit AM/PM. Then click on the UP and DOWN arrow (B) Step 3: Select “Import Party” (C) Step 4: Click “Template File” to download Excel file ”PartyList.xls” template (D) Step 5: Click “OK” to open with Microsoft Excel (or choose to save the file to your computer) (E) E
Parties Step 6: After opening the “PartyList.xls” spreadsheet, fill out with first name, last name, and any notes for each guest for your party then save the file to your hard drive (remember where you store it for the next step) (F) F Step 7: Click the “Browse” button to locate your saved file (G) G
Parties Step 9: Select “PartyList.xls” Then click Open (H) Step 10: Back on the Party Detail screen, click “Import”. You will see your guest in the list. You can always edit or delete your guests as you like (I) H Step 11: Click “Save” (J) I You will then see your party on the party page. Once the guard staff or management have approved the party, your notification will show “Approved.” Your guests will be on the list when they arrive! J
Work Orders If you’re using our “High Rise” Condominium version, You can click “Add Work Order” to add new work orders into the system. Property Management will be notified of the work order creation. (A) You can also click to Edit and Delete existing work orders on your list. (B) A B
Pets The Pets section allows you to provide information about pets on your property. This information helps management and security staff identify your pet and other pets in the community. Add a PetStep 1: Click on “Add a Pet” (A) A
Pets Step 2: Enter the Name, Type/Breed, Color, Tag and Decription of your pet. (B) A Step 3: You are able to upload two images of your pet. To upload an image, click “Browse” next to the Image File text field (C) Step 4: Locate the image file you wish to upload and click “Open”. Repeat this step for the next image (D) Step 5: Click “Save” (E) B D C
Support Technical Support Please give us a call, click on the link to send us an email, or type in a message and click send… our technical staff will get back to you as soon as possible to help if you are experiencing any difficulty. Thank you very much!
Thank you from The GateWorks Group! We hope you enjoy your new visitor access management solution. Important Note!GateWorks Software is currently supported in the following Browser versions:Internet Explorer: Version 7.0 & above, Firefox: 3.0 & above. Google Chrome: All Versions, Safari: 3.0 & above, Opera: 8.0 & above. Still need help? Contact GateWorks Technical Support at 949-305-0463 xt-1