Download

1 / 21
250 likes | 434 Views
DNA Fingerprinting. Tools and Techniques. Intoducing the microLiter!. A TINY amount…a millionth of a Liter Very difficult to measure because it is SOOO small Incredibly accurate when measured correctly

E N D
DNA Fingerprinting Tools and Techniques
Intoducing the microLiter! • A TINY amount…a millionth of a Liter • Very difficult to measure because it is SOOO small • Incredibly accurate when measured correctly • Tools that measure these amounts are therefore INCREDIBLY expensive…be VERY careful with them!!! • If a milliliter (mL) is 1/1000 of a Liter… • A microliter (μl) is 1/1000 of a millileter (mL) • The greek letter “mu” is used to represent micro (μ) • Let’s PRACTICE • Work through the second page of the packet “DNA Fingerprinting – Practice Worksheet”
The TOOLS • DNA Fingerprinting makes use of tools that can work with incredibly SMALL volumes • We only need a very small sample of DNA • We can run hundreds or thousands of samples at once in small spaces • We can be INCREDIBLY accurate and precise • We can use robotic assistance to run the full analysis
The Micropipette • Are like a normal pipette…but better • They can hold incredibly small amounts of liquid with incredibly high accuracy and precision • This makes them VERY expensive!!! • Two types that we will use: • P20: Can hold up to 20 μl • P200: Can hold up to 200 μl
Setting the Micropipette • Each micropipette has a dial for its particular volume maximum • NEVER set the dial above the MAXIMUM listed, this will damage the micropipette • For a p20…NEVER set above 20 • The three numbers represent the three place values • Starting with the largest POSSIBLE place value • Let’s PRACTICE with the second half of practice worksheet
Techniques for Using Tips • NEVER TILT THE PIPETTE!!! • NEVER USE A NAKED PIPETTE!!! • We use tips to hold liquid, not the pipette itself • Liquids can actually damage (very severely) the internal parts • To pick up a tip, push the pipette into the tip holder • ALWAYS keep the tip box COVERED • This keeps out contaminants • After using ANY liquid, we will switch tips • This will also help minimize the risk of contamination through mixing of samples • To eject a tip, push down on the SIDE button • This is attached to the metal rod that will push down on the tip • Always eject tips into a WASTE BIN
Techniques for using a Micropipette • Push the PLUNGER to the FIRST Stop • DO NOT GO FURTHER THAN THE FIRST STOP • We must create a vacuum in order to pick up liquid • While holding it down, insert the tip into your liquid • DO NOT LET GO UNTIL YOU ARE IN LIQUID • This will pick up air, not the liquid • Release the plunger to pick up the liquid • To eject, move the tip into the desired container • Hold the tip against the inside surface of the container you wish to eject into • Push the PLUNGER to the SECOND Stop to eject ALL liquid • Let’s practice! • Get a pipette each and practice picking up and ejecting a tip, and pushing the plunger to the FIRST and SECOND stop
Using the microcentrifuge • NEVER LOAD IT SIDEWAYS • Like a washing/drying machine, it will spin out of control and potentially break • ALWAYS balance the load • In a 6-holder, this means you can load… • NOT One • Two • Three • Four • NOT Five • Six
Let’s practice!!! • Do activity One and Two on the second instructional handout • Answer the first two questions by converting • Answer questions 3 and 4: the “Lab Observations” • We will discuss and answer remaining questions after returning from break
QoD: Final DNA Fingerprinting Day • Summarize in a few brief sentences what we have done in this multi-day lab. Use and define the following terms: • DNA (mother, baby, suspected father) • Restriction Enzyme (HindIII) • Agar gel • Comb and wells • Loading dye (indigo) • Gel chamber and buffer • Gel electrophoresis
DNA Fingerprinting Day One: Cutting DNA with Restriction Enzyme Day TWO: Casting Gel Add Loading Dye Loading DNA Running Electrophoresis
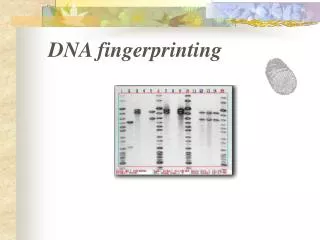
DNA Fingerprinting: Day One • We use a restriction enzyme to cut open our DNA samples • Restriction enzymes are derived from bacteria, and named after them (EcoRI is from E. coli bacteria) • They work like crooked scissors: cut sideways • DNA pieces are run through gel electrophoresis, and spread out based on size. • DNA starts at the negative end and runs towards the positive. • Negative: Black • Positive: Red • We can use the lines of DNA to identify individuals by their DNA fingerprint.
DNA Fingerprinting: Day Two • We added a loading dye to run ahead of and behind the DNA. Since you can’t see DNA in gel electrophoresis, this helps show how far it has run. • We loaded the DNA into gel wells and ran through the chamber for 30-50 minutes • Buffer solution helps conduct electricity • DNA is pulled from BLACK (negative) to RED (positive) end • We are then left with lines of DNA of specific sizes, measured in kbp (Kilobase pairs)
The DNA fragments are pushed with electricity to spread them out. This creates a DNA fingerprint