Download

1 / 21
210 likes | 227 Views
How to create a requisition in self service. Banner 9 2019. Accessing Banner 9 self-service. Under “Finance Information” Click on “Finance Dashboard” This will take you to create your requisition. Getting Started. Click on My Finance Query to: Check the approval status of a requisition

E N D
How to create a requisition in self service Banner 9 2019
Accessing Banner 9 self-service • Under “Finance Information” • Click on “Finance Dashboard” • This will take you to create your requisition
Getting Started • Click on My Finance Query to: • Check the approval status of a requisition • If it has been turned into a PO • View a PDF of the requisition • Click on My Requisition to: • Create • View a draft • Pending • Completed requisitions • Supporting documentation
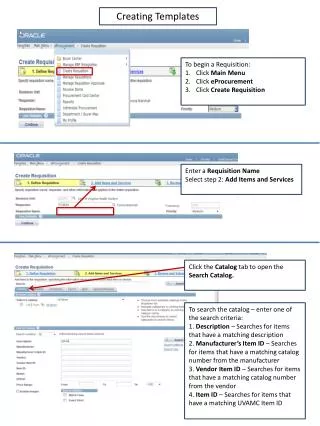
My Requisition • On this screen you can see your drafts, pending, and completed requisitions. • To create a new requisition click on the “Create Requisition” in blue.
Can use the “tab” key to move through boxes • Make sure to click “NEXT” at bottom of screen • Public comment = Document text • Put information about quote: vendor, quote number, date, by who in this box.
On this screen you will enter the requestor information. • Requestor • Transaction date • Delivery date • Requestor email • Public comment will be at the top of the PO • Private comment information for Purchasing • Chart • Organization • Ship to location • Attention to • You do have the option to save as a draft if needed in upper right hand corner. • Click “NEXT” in bottom right corner to move to next screen. • On this screen you will enter the requestor information. • Requestor • Transaction date • Delivery date • Requestor email • Public comment will be at the top of the PO • Private comment information for Purchasing • Chart • Organization • Ship to location • Attention to • You do have the option to save as a draft if needed in upper right hand corner. • Click “NEXT” in bottom right corner to move to next screen
Add Vendor information Above you will see the requisition number. • You can look up the Vendor name using a wild card %vendor% or use the WIN number. • Once you have found your vendor click on “NEXT”.
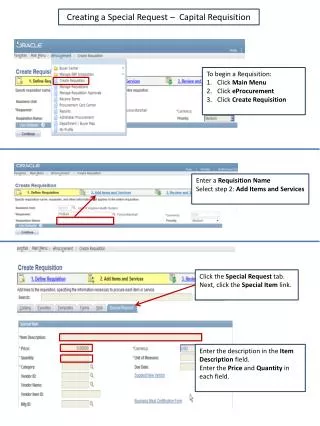
Entering Items • Required now is a Commodity Code for each item being ordered
Adding items to requisition Enter Commodity Code Enter a complete description and part numbers from the quote. • Enter Commodity Code • Unit of Measure • Quantity • Price • Public Comment is text to describe the item being ordered • Click “Save”
Continue adding items or add accounting information To add additional items click “Add item & Accounting” continue adding until ALL items from quote are listed on the requisition. Once all items are entered click on “Add Accounting”
Accounting codes (FOPALS) • Fill in: • Chart ( W or K ) • Fund • Organization • Account • Program • And Activity, Location, Project as needed • Click “Save”
Distribution • Once you have added your accounting code you can chose if you want to distribute the amount to one accounting code or multiple. • If multiple: • Click in Distribution Amount or Percent and type in the appropriate amount. • Click “Save”
Distribution • Enter the amount or % • Click “Split Accounting” • Continue entering accounting codes till paid in full
Distribution On the right hand side of the screen you will see that 50% of the total has been met.
distribution Checking the right side of your screen you should see the “Funding” is now at 100%.
Distribution If you need to check the accounting codes that you are using click on “funding” and the accounting codes will show.
Submitting requisition • Once you have double checked your information on your requisition. • Click “Submit requisition” the blue button in bottom right corner.
Completed requisition • In the top right hand corner you will see a green box showing your Requisition number and that it was completed successfully.
Draft, Pending, or CompletedRequisition • If you need to look up your requisition you can check • Pending • Draft if you have not completed the requisition. • Completed • Search by the search box
Purchasing Department • If you need any help please contact Purchasing or stop by Morgan Hall Rm 214. • Jody Johnson (Purchasing Assistant) ex. 2333, jody.johnson@washburn.edu • Joe Saia (Buyer) ex. 2338, joe.saia@washburn.edu • Sherry Draper (Director) ex. 2312, sherry.draper@washburn.edu