Download
1 / 17
170 likes | 285 Views
Building the G eodatabase with ArcCatalog. Build LandRecords DB. Create the LandRecords file. Start ArcCatalog Navigate to your data download: C: ESRIPressGIST3Data Right click, > New > and create a New folder called MyAnswers R ight click MyAnswer and then

E N D
Building the Geodatabase with ArcCatalog Build LandRecords DB
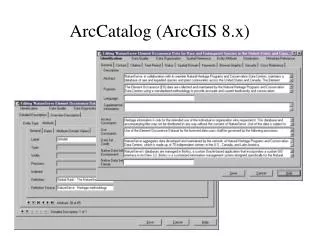
Create the LandRecords file • Start ArcCatalog • Navigate to your data download: • C:\ESRIPress\GIST3\Data • Right click, > New > and create a New folder called MyAnswers • Right click MyAnswer and then • > New > File geodatabase • Call the new file: LandRecords.gdb
Create a feature dataset • We have a feature dataset in our design that contains two feature classes • The dataset requires two things: a name and a spatial reference which ties to a location on the globe • Oleander is in Central Texas, so the reference must be typical of this area • Here we need to decide if our data needs to be stored as projected or unprojected • Also need to define the extent of the dataset
Create the dataset • Right click the LandRecords.gdb file, and • Select New, and then click feature dataset • Type the name of the dataset as: PropertyData and click Next • Then set the spatial reference in the New Feature Dataset dialog • > Projected Coordinate System • > State Plane > NAD 1983 (CORS96) (US Feet) • > select Texas N Central FIPS 4202
NAD_1983_CORS96_StatePlane_Texas_North_Central_FIPS_4202_FtUSNAD_1983_CORS96_StatePlane_Texas_North_Central_FIPS_4202_FtUS WKID: 103545 Authority: ESRI Projection: Lambert_Conformal_Conic False_Easting: 1968500.0 False_Northing: 6561666.666666666 Central_Meridian: -98.5 Standard_Parallel_1: 32.13333333333333 Standard_Parallel_2: 33.96666666666667 Latitude_Of_Origin: 31.66666666666667 Linear Unit: Foot_US (0.3048006096012192) Geographic Coordinate System: GCS_NAD_1983_CORS96 Angular Unit: Degree (0.0174532925199433) Prime Meridian: Greenwich (0.0) Datum: D_NAD_1983_CORS96 Spheroid: GRS_1980 Semimajor Axis: 6378137.0 Semiminor Axis: 6356752.314140356 Inverse Flattening: 298.257222101 > Next Accept defaults for next two screens
Create the feature classes • Now that we have the dataset, we create the two feature classes inside the dataset • Each feature classes requires: • A name (from the design form) • A spatial reference (which is set at the dataset level) • A geometry type • This cannot change later, so make it correctly!
Create the Parcels Feature Class • Right click on the PropertyData dataset • > New > Feature Class • Type the Name and Alias of the New Feature class in the textboxes • Select its type as Polygon Feature in the dropdown list • > Next > accept the defaults • Now define the fields in the feature class
Enter Fields for the Feature Class • Two fields are already defined • ObjectID with Object ID Data Type • Shape with Geometry Data Type • Add other fields for the Parcels feature class: • Enter Field Name, Data Type, Alias, Allow Null values (default is Yes), Default values (if any), and Length (default is 50 for Text) • Do this for all fields … • See the worksheet in the previous slide! • Do not worry about domains and subtypes at this stage • > Finish // creates the feature class; adds it to the feature dataset
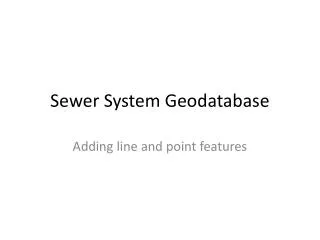
Enter the LotBoundaries Feature Class • Repeat the process of adding the LotBoundaries feature class to the dataset • Right click on PropertyData dataset • > New > Feature Class • Define its name and Alias • Give it a line feature type • > Next > default • Add the fields to the LotBoundaries feature class • Add LineCode under the ObjectID and Shape fields > Finish
Create the Domains • So far, we have defined our dataset and its two feature classes and their fields • Now, we need to introduce data integrity for the feature classes • Domains are defined at the geodatabase level • Two rules regarding domains: • Give a specific (even long) name to the domain to indicate its purpose • Never alter someone else’s domain to fit your needs! If you modify an existing one, the dataset using it will not work anymore • So, always create your own domain
Create the domain • Right click the LandRecords.gdb • > Properties > Domains Tab • Type the domain name (ParcelUseCodes) and description (Use Codes for Parcels) • Select Text for field type. • Select Domain types (there are two types): • Coded Values (is a list of values) • Text can only be Coded values (this is default • Numeric fields can also be used for Coded Values • Range, allows setting the first and last values between which the entered data can fall (works only with numeric type) • Enter A1 under the Code column in the Coded Values Pane • Enter its Description >Apply after each entry • Repeat for all codes …
Create the other two domains • Repeat the process for the ParcelLineCodes • The StTypeAbbrv domain imports values from a file (Data\Suffix.txt) • For the ParcelLineCodes, right click on the LandRecords.gdb, and then > Properties • Enter the domain name and description under the existing domain, and define the field type and coded values
Create a domain from a table • For StTypeAbbrv domain we bring street suffixes from an existing database • This first requires finding the ‘Table to Domain’ tool in ArcCatalog that allows us to do such a thing • Use Search (Ctrl+F) to find the Table to Domain tool (or > Windows > Search) • Double click the item in the returned list
In the dialog, browse to the Suffix.txt file in the Data folder C:\ESRIPress\GIST3\Data\Suffix.txt • Select SuffuxAbbrv under Code Field, and SuffixTypeunder Description field • Select the gdb under the Input WorkspaceC:\ESRIPress\GIST3\Data\MyAnswers\LandRecords.gdb • Type StTypeAbbrv under Domain Name • Type Street Type Abbreviations • > OK • > LandRecords.gdb > Properties • You can see the SuffixAbbrv domain. Click on it to see the Street suffix codes
Assign the domains • Page 44