Download
1 / 7
70 likes | 76 Views
Events Part III. The event object. Learning Objectives. By the end of this lecture, you should be able to: Learn to use the hover() function Work with the ‘ event ’ object Improve your familiarity with the API. The hover() function.

E N D
Events Part III The event object
Learning Objectives By the end of this lecture, you should be able to: • Learn to use the hover() function • Work with the ‘event’ object • Improve your familiarity with the API
The hover() function The hover function is simply a function that serves as a replacement for having to write code separately for the mouseover and mouseout events. You could simply use those two events, but hover() is a shortcut. However, this function requires TWO functions as the arguments. The first function is the one that will kick in when the user moves the mouse over the selector. In other words, this is the same thing as writing the ‘mouseover’ event. The second function is the one that will kick in when the user moves the mouse off of the selector. In other words, this is the same thing as writing the ‘mouseout’ event. So instead of: $('h3').mouseover(function(){ $(this).css('color','red'); }); $('h3').mouseout(function(){ $(this).css('color', 'black'); //set back to normal color }); You could have: $('h2').hover( function() { //FIRST anonymous function – for mouseover $(this).css('color','red'); }, function() { //SECOND anonymous function – for mouseout $(this).css('color','black'); } //anonymous function for mouseout ); //closing ‘)’ for hover() function FILE: hover_with_menu.htm Do not forget this comma!!!
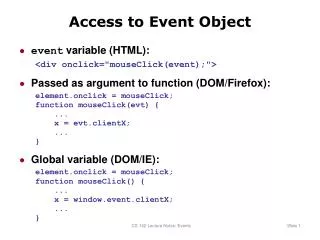
The ‘event’ object Whenever an event is generated or ‘fires’ (e.g. a click event or a keypress event), the browser records various information about that event. This information is stored inside something called an event object. For example, for a click event, the event object will store information such as the x and y (horizontal and vertical) coordinates of exactly where inside the browser window the mouse pointer was located when the mouse was clicked. It will also, of course, record what element the mouse was on when it was clicked (e.g. a button) . Lots of other information will be recorded too such as as whether or not the user was simultaneously pressing the ‘shift’ key when the button was clicked. For keypress events, the event object will store relevant information such as which key was pressed, where on the screen the user was when the key was pressed (e.g. inside a text field) and so on. As you can hopefully see, the particular pieces of information that are encapsulated inside an event object, depend on the type of event that was generated. Here is a partial list of some properties available to the ‘event’ objects: • pageX: The distance (in pixels) of the mouse pointer from the left edge of the browser window. • pageY: The distance (in pixels) of the mouse pointer from the top of the browser window. • target: The object on the web page that was the ‘target’ of the event. For a click event, this would be the element that was clicked. • which: For key events, this will tell you which key was pressed. For mouse events, will tell you which button was pressed (1 for left, 2 for middle, 3 for right). Here is the jQuery API documentation for the event object: http://api.jquery.com/category/events/event-object/ It is important to note that (as always) these properties can vary between browsers. In other words, we must be aware that even jQuery sometimes falls victim to issues of consistency among browsers. Still, as the API documentation tells us, the properties discussed in the list above should work across all major browsers.
Example: Using the event object Here is some code that will simply alert the X and Y coordinates whenever the user clicks the mouse. $(document).click( function(evt) { var xPos = evt.pageX; var yPos = evt.pageY; alert("X is at: " + xPos + ", and Y is at: " + yPos); }); Recall that with our previous anonymous functions, we did not provide any arguments to our anonymous function. In those examples, the identifier function() contained nothing inside the parentheses. However, if we want to use the event object, we must provide an argument to our anonymous function. The identifier I will give to this argument is ‘evt’. (I will avoid calling it ‘event’ since this is a reserved keyword in some languages). So in this case, our anonymous function will look like this: function(evt) Now we can use this ‘evt’ identifer to find out information about our mouse click event. And to reiterate, the identifier does not have to be evt – just be sure that you choose an identifier that is clear. I believe that ‘evt’ serves our purpose just fine, and many programmers use it. Also note in the example above, we use the selector ‘document’. This means that the entire web page serves as our selector instead of, say, a specific tag or ID.
Example 2: Using the event object Here is some code that will alert the name of any target on the page that has been clicked on: $(document).click( function(evt) { alert(evt.target); }); Try placing this code inside a page with lots of different elements and look at the resulting output when you click. You will see that it will identify (in somewhat awkward text) whether the item was a heading tag, an input tag (e.g. text field, button, etc), or some other HTML element. You will not, of course, typically, ‘alert’ the item that was clicked. However, you can write JS/JQ code to respond to specific things if you need to. Though we won’t do it now, you could, for example, write code to determine if, say, the item clicked was a radio button, and could have code that responds differently than it would for some other kind of element.
Example of Using the API to learn about a topic:Keypress Event This example (with very slight modifications) is taken from the jQuery API. We first have a simple text field in which we ask the user to type something: Type Something: <input type="text" id="txtSomeKey"> <div id="log"></div> Note that just below the input tag is an empty div called ‘log’. We will output which key the user pressed in this section using jQuery’s html() function. The property ‘which’ is the one that tells us about which key triggered the event. Here is the code from the API documentation: <script> $( "#txtSomeKey" ).on( "keypress", function( event ) { $( "#log" ).html( event.type + ": " + event.which ); }); </script> Now as has been discussed, you should try not to get thrown off or discouraged if you look at the API and encounter unfamiliar material. In this case, for example, the on() function is probably new to you. However, if you sort of gloss over the unfamiliarity for the moment, you should, with some close perusal, be able to work out what is going on. And of course, you can then simply look up the on() function to try and get an idea of how that function works! Similarly, the ‘type’ property tells us the name of the event that occurred, in this case, a ‘keypress’ event. Returning to the keypress event, note that the function returns a number. This is fairly standard in programming. In fact, the number returned follows a standard, called Unicode in which A is assigned 65, B is assigned 66 and so on. Lower case ‘a’ is assigned 97, ‘b’ is 98 and so on. If you type other characters including space, backspace, dollar sign, etc, etc, you will see that all of them have specific character codes. FILE: keypress_example.htm