Download

1 / 29
290 likes | 418 Views
More Nav Controllers. UINavigationController. Review. Nav Controller basics Like a tabview controller, a navViewController manages views A navigationViewController uses a stack navigationViewControllers are good for hierarchies

E N D
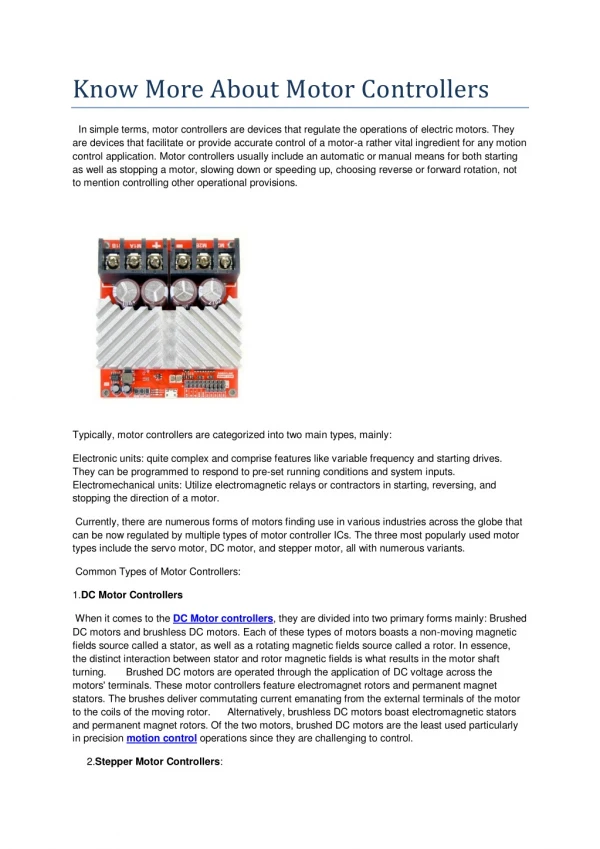
More Nav Controllers UINavigationController
Review • Nav Controller basics • Like a tabview controller, a navViewController manages views • A navigationViewController uses a stack • navigationViewControllers are good for hierarchies • The navigation controller is mostly used on iPhone apps for iPad apps the splitViewControlleris used instead. • Reference • Apple Developer Reference
Review • Nav Controller basics • When you create a navigationController project, the first view that is displayed is created • Called the masterViewController.h and .m in Xcode • This is the root controller or main controller. • In the Xcodenav controller project one of the subsidaryviews is provided. • It’s called the detailedViewController.h and .m • When a row in the root controller is selected • A corresponding view controller is pushed onto the controller stack • The view associated with the pushed view controller appears
Navigation Stack Initially the masterViewController view is displayed and pushed on the stack MasterViewController
Navigation Stack When a row is pressed, a detail view controller is pushed onto the stack DetailViewControler MasterViewController
Navigation Stack And the detailed view is shown DetailViewControler MasterViewController
Navigation Stack When the return button is pressed, the detailedViewController is popped off the stack. DetailViewControler MasterViewController
Navigation Stack And the top of stack controller view (masterViewController in this case) is displayed. MasterViewController
Nav View • A navigation controller contains a navigation bar and a view by default. The Xcode navigation project has a navigation bar. These buttons are in the default project. The navigation controller has a title The Xcode navigation project uses a table view Navigation Controller Table view cell
Nav View • When a row is selected a detailed view is displayed. The navigation bar title changes A button back to the previous controller is automatically provided. Detailed view
More • The detailViewConroller can, itself, hold a tableView. • When rows of this table view are touched, we can launch a third level view.
The app • We’ll create a navigation app that uses tables for the detail view
Creating • Open the project moreNav • This is a simplification of the default navigation controller. • Does not have edit or add buttons • Uses the dwarves array to populate the table in the masterViewController
What did you get? • Look at the file navigator. Same files. • appDelegate, master and detail view controllers with their nibs.
What did you get? • appDelegate, master and detail view controllers with their nibs. CMPMasterViewController controls the root view that is initially displayed CMPDetailViewController controls the detail view that is displayed when a row is selected. You might need many different ViewControllers if you have many different views for the different rows.
What did you get? • appDelegate, master and detail view controllers with their nibs. CMPMasterViewController nib. Contains a UITableView DetailViewController nib. Contains a label.
Goal • Create a new vew that will load when a row in the MasterView is clicked • This view will be a table itself • When a row in this second level view is clicked, load the detail view
Create a new view • Create a new file. • Choose the type to be a Objective C class • Make sure to include the nib
Creating the view • Go to nib • Add a table view • Select the table view • Go to connections inspector • Make the file’s owner the datasource and delegate
Creating the second level view • Go to CMPSecondLevelViewController.h and add #import <UIKit/UIKit.h> @class CMPDetailViewController; @interface CMPSecondLevelViewController : UIViewController <UITableViewDataSource, UITableViewDelegate> @property (copy, nonatomic) NSArray *computers; @property (strong, nonatomic) CMPDetailViewController *detailViewController; @end Need to be the datasource and delegate of the table The NSArray computers will hold the data for the table Need a property to point to the new view controller.
Change CMPSecondLevelViewController.m #import "CMPSecondLevelViewController.h" #import "CMPDetailViewController.h" @implementation CMPSecondLevelViewController Import the CMPDetailViewController
Creating the second level view Go to CMPSecondLevelViewController.m and add - (void)viewDidLoad { [super viewDidLoad]; // initialize the data array self.computers = @[ @"MacBook", @"MacBook Pro", @"iMac", @"Mac Mini", @"Mac Pro"]; } The NSArray computers holds the data for the table. Initialize the array when the view loads
Creating the second level view Add the method to supply row cells // Customize the appearance of table view cells. −(UITableViewCell *)tableView:(UITableView *)tableViewcellForRowAtIndexPath: (NSIndexPath *)indexPath { static NSString *CellIdentifier = @"CompCell”; UITableViewCell *cell = [tableViewdequeueReusableCellWithIdentifier:CellIdentifier]; if (cell == nil) { cell = [[UITableViewCellalloc] initWithStyle:UITableViewCellStyleDefaultreuseIdentifier:CellIdentifier]; cell.accessoryType = UITableViewCellAccessoryDisclosureIndicator; } NSString *object = self.computers[indexPath.row]; cell.textLabel.text= object; return cell; } This puts a disclosure icon at the end of the cell row. We won’t use this, but you could recognize when it is clicked.
Creating the second level view Add the method to provide number of rows −(NSInteger)tableView:(UITableView *)tableViewnumberOfRowsInSection: (NSInteger)section { return self.computers.count; }
Creating the second level view Change the method to create a new view when a cell is selected −(void)tableView:(UITableView *)tableViewdidSelectRowAtIndexPath:(NSIndexPath *) indexPath { if (!self.detailViewController) { self.detailViewController = [[CMPDetailViewControlleralloc] initWithNibName:@"CMPDetailViewController" bundle:nil]; } NSString *object = self.computers[indexPath.row]; self.detailViewController.detailItem = object; [self.navigationControllerpushViewController:self.detailViewControlleranimated:YES]; }
Modify the master view (.h) #import <UIKit/UIKit.h> @class CMPDetailViewController; @class CMPSecondLevelViewController; @interface CMPMasterViewController : UITableViewController @property (strong, nonatomic) CMPSecondLevelViewController *secondLevelViewController; @property (copy, nonatomic) NSArray *dwarves; @end Change the controller that we will push to the secondLevelViewController
Modify the master view (.m) Change the import to CMPSecondLevelViewController.h #import "CMPMasterViewController.h" #import "CMPSecondLevelViewController.h” @implementation CMPMasterViewController
Modify the master view (.m) Load the CMPSecondLevelViewControllerwhen a row is selected −(void)tableView:(UITableView *)tableViewdidSelectRowAtIndexPath: (NSIndexPath *)indexPath { if (!self.secondLevelViewController) { self.secondLevelViewController = [[CMPSecondLevelViewControlleralloc] initWithNibName:@"CMPSecondLevelViewController" bundle:nil]; } [self.navigationControllerpushViewController:self.secondLevelViewControlleranimated:YES]; }
Run! • Should get the detailViewController view when click a row at the second level.