Download
1 / 11
110 likes | 218 Views
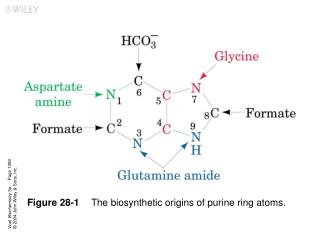
How to do ‘page-flipping’. The steps needed when revising our ‘wfmodel1.cpp’ prototype to achieve ‘smooth’ animation. How page-flipping works. The user sees this part of video memory. The ‘visible’ page. CRTC START-ADDRESS. Your program draws to this part of video memory.

E N D
How to do ‘page-flipping’ The steps needed when revising our ‘wfmodel1.cpp’ prototype to achieve ‘smooth’ animation
How page-flipping works The user sees this part of video memory The ‘visible’ page CRTC START-ADDRESS Your program draws to this part of video memory The ‘drawing’ page When the ‘drawing’ page is ready to be viewed, your program changes the CRTC START-ADDRESS and thus the roles of these two pages are ‘flipped’ VRAM
Use a Radeon-specific register • The CRT Controller’s Start-Address can be accessed via a 32-bit register (called CRTC_START) which is part of the ATI Radeon’s 2D drawing engine -- allowing the Start-Address to be reprogrammed as a single atomic operation #define CRTC_START 0x0224
Installation check • The software must detect the presence of a Radeon X300 graphics adapter, and it must discover which i/o port-address got assigned to the Radeon 2D engine during the Operating System’s startup process #define VENDOR_ID 0x1002 // ATI #define DEVICE_ID 0x5B60 // X300
PCI Find Device service init8086(); // initialization for vm8086 vm.regs.eax = 0x1B02; // PCI Find Device vm.regs.ecx = DEVICE_ID; // X300 vm.regs.edx = VENDOR_ID; // ATI vm.regs.esi = 0; // device index int86( 0x1A, vm ); // invoke PCI BIOS if ( vm.regs.eax & 0xFF00 ) exit(1); // failed
PCI Read Configuration Dword vm.regs.eax = 0x1B0A; // PCI Read Dwd vm.regs.edi = 0x0014; // Resource #1 Adr int86( 0x1A, vm ); // invoke PCI BIOS iobase = vm.regs.ecx & 0xFFFFFFFC;
Global Variables int iobase; // value is filled in at runtime int page_size = (2 << 20); // 2-megabytes int drawing_page = 0; // page 0 or page 1 int visible_page = 0; // page 0 or page 1
Hardware helper-function void set_visible_page( void ) { int start_addr = visible_page * page_size; outl( CRTC_START, iobase + 0 ); outl( start_addr, iobase + 4 ); }
Pixel-drawing helper-function void draw_pixel( int x, int y, int color ) { int offset = drawing_page * page+size; unsigned char *dstn = vram + offset; dstn[ y * vres + x ] = color; }
The ‘page-flipping’ algorithm • Main loop: • Compute the new image • Set drawing_page to (visible_page + 1)%2 • Draw next screen image onto drawing page • Set visible_page to equal the drawing_page
In-class exercise • Create a revision of the ‘wfmodel2’ demo (named ‘wfmodel3.cpp’) to automatically spin the wireframe model contiunuously, until the user hits the <ESCAPE>-key • You will need to use a signal-handler and asynchronous keyboard-input notification (as in our earlier ‘persists.cpp’ demo)