Download
1 / 53
530 likes | 652 Views
Creating a Database. Keith Valley Health and Physical Education Department. Angelo Lafratta- Alafratt@hatboro-horsham.org Website: www.hatboro-horsham.org Search: Keith Valley Physical Education. Using Microsoft Excel to Track Performance. Create an Excel Sheet. Important Items

E N D
Creating a Database Keith Valley Health and Physical Education Department Angelo Lafratta- Alafratt@hatboro-horsham.org Website: www.hatboro-horsham.org Search: Keith Valley Physical Education
Create an Excel Sheet • Important Items • Student ID – used for tracking students progress from year to year- also can be used to compare fitness scores to academic progress and standardized tests. • Sorting Factor – how you want class sort students • Day/ grade- on which days students have PE on (ex. A,C,E) • Student Birthday- • PE Teacher – • Homeroom Teacher – • Graduating year • Parent EmailGender • Grade • Other Information (that you would enter) • Fall fitness scores (ex. Push-ups, sit-ups, mile run, flexibility) • Spring fitness scores
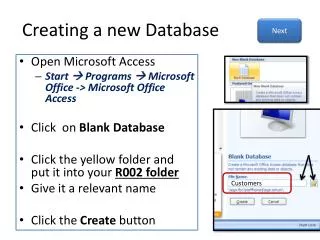
Open a New Database 1 2 3 4 Open Microsoft Access Click blank database Name database Click folder to choose a location to save file Click create
Enter Data • Access automatically opens a new table. • You can choose to ……. • Enter student info manually • Copy and paste student info from another location (ex. Power Teacher ) • Import an Excel Spreadsheet.
Importing External Data 1 2 Choose the External Data Tab Click Excel This will open a wizard follow directions to import spreadsheet.
Using Import Wizard 1 2 3 Click Browse button to find file Click the import button Click ok
1 2 Make sure the check box is filled in Click next
2 1 3 Click on the column heading to change the field name- type in the field name box You can choose not to import a field by clicking the check box When complete click the next button
1 2 3 Click choose my own primary key and select ID Field You may get an error later in the process if a student is missing an ID or if there is a duplicate for some reason. Click next
Name File – use something specific ex. 2010-2011 fit scores Click Finish You may get an error after clicking finish if the formats are not correct
3 1 2 Click your file to open it Enter info by typing in each box – similar to a spreadsheet By clicking the arrow next to each column heading you can sort your info
Importing Another File • If you have more than one file to import repeat the directions. • Example – if you have fitness scores for the same class from a different year.
Making Adjustments to Imported Tables Open Table Click View button > select design view
Making Adjustments to Imported Tables • Select each field name • Select the data type • Make changes to property settings
Making Adjustments to Imported Tables • ****Save Changes to File when you finish**** • While you are in design view you can assign the primary key to the ID column. Just select the ID column and then click the primary key. You will see a small key next to the field name. Click close and save changes. • If an error shows up, take the primary key off and return to the table view. If there are extra rows with no info please delete any rows without student info. then return to previous steps.
Linking Data from year to year • The key to using a database is being able to link student fitness scores from year to year. • You need at least two years of info to link students scores. • Follow directions on the following slides to link data.
Linking Data/ Creating Relationships • We need to tell the program two important things • What tables do we want to link together? • What is the link that ties these two tables together (Student ID)?
Linking Data/ Creating Relationships Open one of the tables Click the datasheet tab Select relationships
Linking Data/ Creating Relationships The “Show Table” box will pop up Select each table and click add Click close
Linking Data/ Creating Relationships Pull and drag the ID field name from one box across towards the other ID field- start with most recent and move to previous years. Edit Relationships box will pop up Make sure ID is shown under table/ query and under related table/ query See next slide
Linking Data/ Creating Relationships • Click join type- select 2nd option so it will add any new students from this year and will not include students from last year that are not in school this year. • It should read something like………. “Include all records from “(most recent year)” and only those records from “(previous year)” where joined fields are equal. This will make sure that students who were enrolled last year but not this year are not included. • Click ok • Click ok again • A solid line should then be drawn connecting both ID Fields • Now your files are linked/ related- click the close button – you want to save changes
Create a Form • A form is a screen where you can find all information related to an individual student. • You may also use a form to enter students data individually. • Forms are the most accurate way to enter info. A card size form could be printed and used to handwrite info before transferring it to the database.
Creating a Form Select this year’s fit scores table Click the create tab Select more forms and click form wizard
Using Form Wizard Make sure you start with your most recent table – in this case 2010-2011 Use the single arrow (pointing to the right) to select single fields you would like to include. Use the double arrow to select all fields. **** I like to add names and ID from both tables to make sure they are linked properly. You can delete one set later. Repeat steps 1 and 2 to add other tables Use the drop down labeled Tables/ Queries to find other tables. Click next
Using Form Wizard Select Columnar to make Individual reports Or ->Select datasheet to see all info merged into one spreadsheet Click next
Using Form Wizard Choose none – it makes it easier when copying in black and white. Click next
Using Form Wizard Final step Name file – I like to add “Form” to the title for reference Click finish
Manipulating Form Access will automatically drop fields inside the form box. You can always move things around later. Moving Around in Form Under the home tab is a button that says view. There are 3 types of views. Form View – You can make changes to the info inside the fields here, add or delete student info. Layout View – Is where you can move fields. Design View – Is where you can manipulate the fields themselves – move things around or delete a field all together.
Manipulating Form We are now going to re-arrange fields Make sure you are in layout view You can pull and re-size boxes to fit your style
Manipulating Form After arranging files how I want them set up. 1. You can add clip art or logos from here by clicking the logo button.
Final View – click arrow buttons to sort through student records. • Notice how it only shows info for John Smith.
Queries • Queries can also be used to tie multiple tables together and show all info you choose in one spreadsheet.
Queries • You can use the query wizard to help you create your own. • Click the create tab and select query wizard • Select simple query • Insert tables as before using most recent first, then additional files. • Select next when finished
Queries • Select the detail button and click next
Queries • Name and click finish
Queries Final View Minor adjustments can be made right in that sheet (font size, column size etc.)
Report View • A report can be used two ways • As an individual report • As a class/ group report
Creating an Individual Report Select the files you would like to use Click report wizard on the create tab Select the tables / queries you would like to add Select the fields you would like to add Click next Step 1
Creating an Individual Report Click next – no need for grouping now Click next again on sorting screen Step 2
Creating an Individual Report Select Columnar Select paper orientation Click next Step 3
Creating an Individual Report Select style as none and click next Step 4
Creating an Individual Report Name file and click finish This will give you an individual report for each student Step 5
Creating an Individual Report Individual report Records can be moved and adjusted as needed. Click the home tab> select View tab and choose design view. Click arrange tab > click CTRL + A buttons then choose the remove button (in the control layout box) . Step 6
Creating an Individual Report KV Individual Student Report
Creating an Class/Group Report Follow steps 1-2 for creating an individual report Choose tabular this time instead of columnar Return to directions for individual report and follow steps 4 -5
Creating an Class/Group Report After you click finish and save a copy of your report will pop up. It may need to be adjusted. To adjust report go back to design view and resize as needed. You may also want to delete unnecessary items in your report or switch to landscape view.