Download

1 / 12
120 likes | 234 Views
Creating Reports for a Database. Introduction. Reports in Access are usually created when a repetitive task is performed regularly. For example when a business needs to print a list of all next weeks clients. This report data can then be used by multiple people for multiple roles.

E N D
Introduction Reports in Access are usually created when a repetitive task is performed regularly. For example when a business needs to print a list of all next weeks clients. This report data can then be used by multiple people for multiple roles. Reports are lists of things that are done regularly then, to save having to extract data from the database every time we can set up a report that can be run each day/week to show what is going to happen. Reports can be set up to create address labels so paper communications can be sent to clients, suppliers or other businesses. Most reports are created by knowing what you want in the report, you can specify these criteria by using the Query Wizard option in Access.
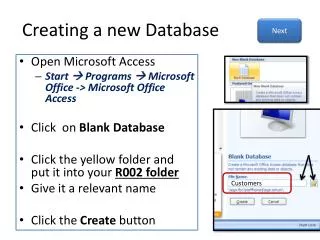
Step 1: Query • First you must create a query with all the criteria you need for your report. Create one using the wizard or in the design view • Save this with a simple, easy to remember name
Step 2: Creating the Report • Using the report wizard select the query you have just created from the drop down menu under “Tables/Queries” • Then in the “selected fields” box add all fields you need from the query (click and then click on the > icon)
Step 3: Follow the Wizard. • Carry on using the wizard and change what set up the fields will have on the final report • And then change the grouping and layout of the report
Step 4: Finish • Click the finish button and your report will be created and ready to print
Step 1: Query • As you did before, you must firstly create a query containing all the criteria you need for your address labels
Step 2: Wizards • Here is where everyone goes wrong, you must click “New”, NOT “Create a new report in ___ view” • Here you need to click on label wizard and select your query from the drop down menu
Step 2A: More Wizards From here you can do the following; • Dimensions (changes the label size) • Font Size and Colour
Step 2B: More Wizards • What’s on the label (select the fields and where they go) • And Sorting
Step 4: Finish • Click finish, and then save • Here is your final view of the address labels which is now ready to print