Download
1 / 4
40 likes | 148 Views
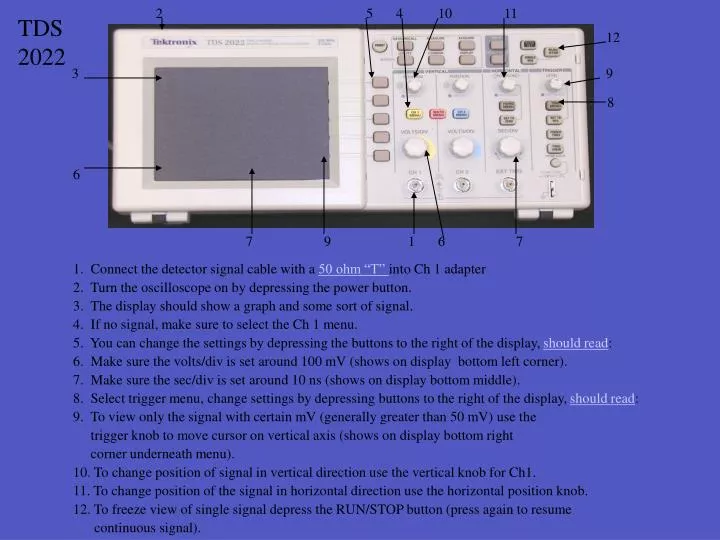
1. Connect the detector signal cable with a 50 ohm “T” into Ch 1 adapter 2. Turn the oscilloscope on by depressing the power button. 3. The display should show a graph and some sort of signal. 4. If no signal, make sure to select the Ch 1 menu.

E N D
1. Connect the detector signal cable with a 50 ohm “T” into Ch 1 adapter 2. Turn the oscilloscope on by depressing the power button. 3. The display should show a graph and some sort of signal. 4. If no signal, make sure to select the Ch 1 menu. 5. You can change the settings by depressing the buttons to the right of the display, should read: 6. Make sure the volts/div is set around 100 mV (shows on display bottom left corner). 7. Make sure the sec/div is set around 10 ns (shows on display bottom middle). 8. Select trigger menu, change settings by depressing buttons to the right of the display, should read: 9. To view only the signal with certain mV (generally greater than 50 mV) use the trigger knob to move cursor on vertical axis (shows on display bottom right corner underneath menu). 10. To change position of signal in vertical direction use the vertical knob for Ch1. 11. To change position of the signal in horizontal direction use the horizontal position knob. 12. To freeze view of single signal depress the RUN/STOP button (press again to resume continuous signal). 2 5 4 10 11 TDS 2022 12 3 9 8 6 7 9 1 6 7
Coupling DC Tek R Auto MPos 50 ns Trigger Type Edge Source Ch 1 Slope Falling Mode Normal Coupling DC CH 1 100mV CH 1 <10HZ M2.5ns Click here to return
Coupling DC Tek R Auto MPos 50 ns Trigger Type Edge Source Ch 1 Slope Falling Mode Normal Coupling DC CH 1 100mV CH 1 <10HZ M2.5ns Click here to return