Download
1 / 63
630 likes | 682 Views
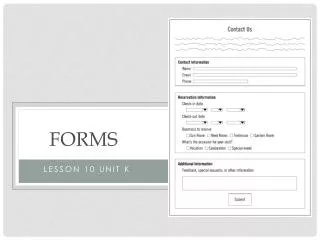
SIMPLE FORMS. This presentation shows how to create a simple form from a single table, CUSTOMER. Also show is a way to change the formatting displayed by the Layout Wizard. Schema of the example database. CUSTOMER {CustomerNumber, CustomerName, StreetAddress, Town, Province

E N D
SIMPLE FORMS This presentation shows how to create a simple form from a single table, CUSTOMER. Also show is a way to change the formatting displayed by the Layout Wizard.
Schema of the example database CUSTOMER {CustomerNumber, CustomerName, StreetAddress, Town, Province Primary Key: CustomerNumber INVENTORY {InventoryNumber, Description, Colour, QuantityOnHand, Cost} Primary Key: InventoryNumber SUPPLIER {SupplierNumber, SupplierName, StreetAddress, Town, Province, FreightInArea} Primary Key: SupplierNuymber SUPP_INV {SupplierNumber, InventoryNumber} Primary Key: SupplierNumber, InventoryNumber Foreign Key: SupplierNumber references SUPPLIER Foreign Key: InventoryNumber references INVENTORY INVOICE {InvoiceNumber, SaleDate, CustomerNumber} Primary Key: InvoiceNumber Foreign Key: CustomerNumber references CUSTOMER INVOICE_LINE_ITEM {InvoiceNumber, LineItemNumber, InventoryNumber, Quantity} Primary Key: InvoiceNumber, LineItemNumber Foreign Key: InventoryNumber references INVENTORY
Tables used in this presentation P P F P F P P = primary key F = foreign key
Values in the tables Primary Key Foreign Key
Values in the tables continued Primary Key Foreign Key Primary Key & Foreign Key
Open the Oracle Forms Builder and Logon to the database Enter File, Connect. The popup will appear as shown on the next slide.
Select Data Block Wizard in order to create the Data Block A new module is shown. This will be later saved under a desired name.
Create a Data Block for CUSTOMER A Data Block contains the fields to be displayed from a selected table.
Select a New Canvas. This can be given a name at a later time Select Content. See the next page for details.
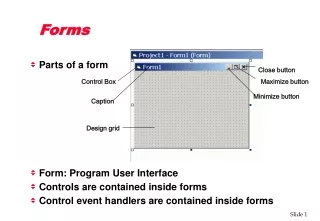
A canvas is the object on which the graphical user interface (GUI) is drawn, or the background of the form. At run-time, the user only sees those items that have been assigned to a specific canvas. Each canvas is displayed in a specific window. A a frame provides a way to interact with the window including the ability to scroll, move, update etc. • There are five main types of canvases. The three main ones are: • Content: Also called the “Base” canvas, is the main and default type of canvas. It occupies the entire window in which it is displayed. Each form should have at least one content canvas. • Tab: This allows for a number of tabbed pages to be shown on each canvas. One tab could show Customer, another could show Supplier. The tab is clicked-on to bring up the form. Adds, changes and deletes are allowed. • Stacked: One canvas can be stacked upon another so that the user can see several canvasses at the same time. A stacked canvas is stacked on, or displayed on top of, the content canvas. More than one stacked canvas can be displayed at the same time.
This shows that the Data Block CUSTOMER is being used. Move all items over
The Prompt, Width, and Height can be modified. Modify the Prompt names to a more readable format.
The Prompt has been modified. The Prompt is the word that appears on the Form.
Choose the Form layout. The Form layout shows the contents as a form, not a table. Tabular layout shows the contents of the table in table format
Name the frame CUSTOMER Allow 5 records to be displayed Choose to display the Scrollbar
This is what the CUSTOMER Form layout looks like. It can be modified later. The Frame Title
The CUSTOMER Form is run in Windows Explorer as a Web application. The format could be more user-friendly. It can now be saved and modified.
The CUSTOMER module is the active module. CANVAS4 is the canvas, using the (CUSTOMER) frame The tool palette will aid in modifying the form
In the Object Navigator, under Tools, right click on CUSTOMER. This will bring up the Property Palette
This is the Property Palette for CUSTOMER. In the palette the form can be modified
The Layout Editor of the CUSTOMER frame Notice the black dots around the CUSTOMER frame. Right click to bring up the Property Palette
The Physical properties of the CUSTOMER frame. Set the width at 530
Close the screen after setting the width at 530. The width has been highlighted and set to 530.
Highlight the Scroll Bar. Right click to bring up the Property Palette
The Scroll Bar properties. Set the X Position at 520
The Scroll Bar position has changed. Now the CUSTOMER fields need to be rearranged
The name field has been highlighted. Right click to bring up the Property Palette.
Highlight the Address field and change the X coordinate to 350 and Y to 29